> ## Documentation Index
> Fetch the complete documentation index at: https://docs.argyle.com/llms.txt
> Use this file to discover all available pages before exploring further.
# Accounts
> Every payroll connection creates a new account.
## Definition
"Accounts" represent sources of income for a user.
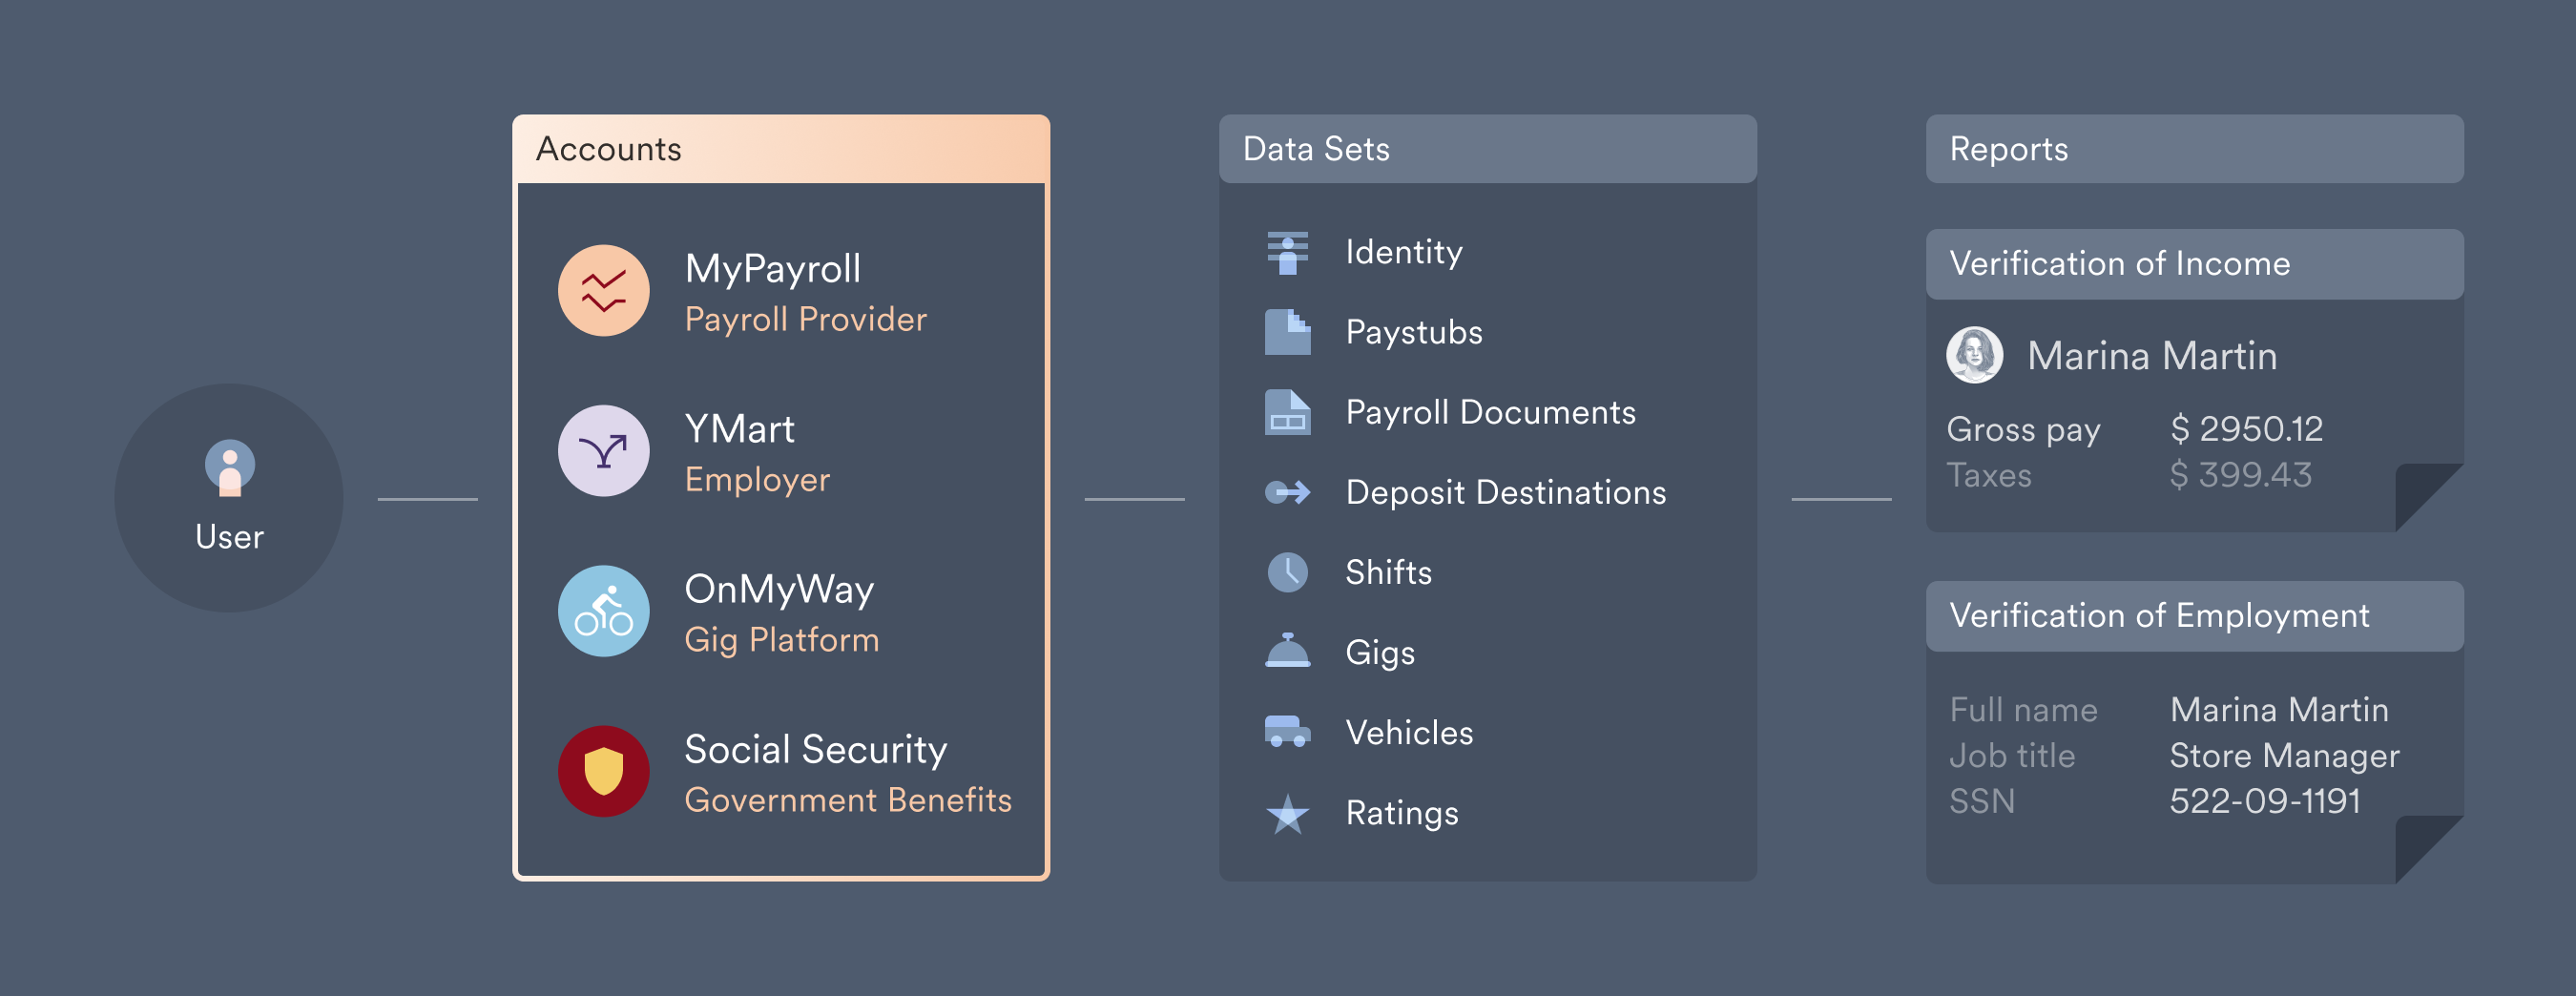 Users log in to their accounts through Link by searching through various [Items](/overview/data-structure/items) and finding the one that matches the entity that sends them payments. Once a match is found, the user enters their login credentials and connects their account.
## Standard connection process
Without any customizations, the standard payroll connection process in Link is as follows:
The user searches from a general list of potential incomes sources. This includes employers, government entities, and payroll services.
Users log in to their accounts through Link by searching through various [Items](/overview/data-structure/items) and finding the one that matches the entity that sends them payments. Once a match is found, the user enters their login credentials and connects their account.
## Standard connection process
Without any customizations, the standard payroll connection process in Link is as follows:
The user searches from a general list of potential incomes sources. This includes employers, government entities, and payroll services.
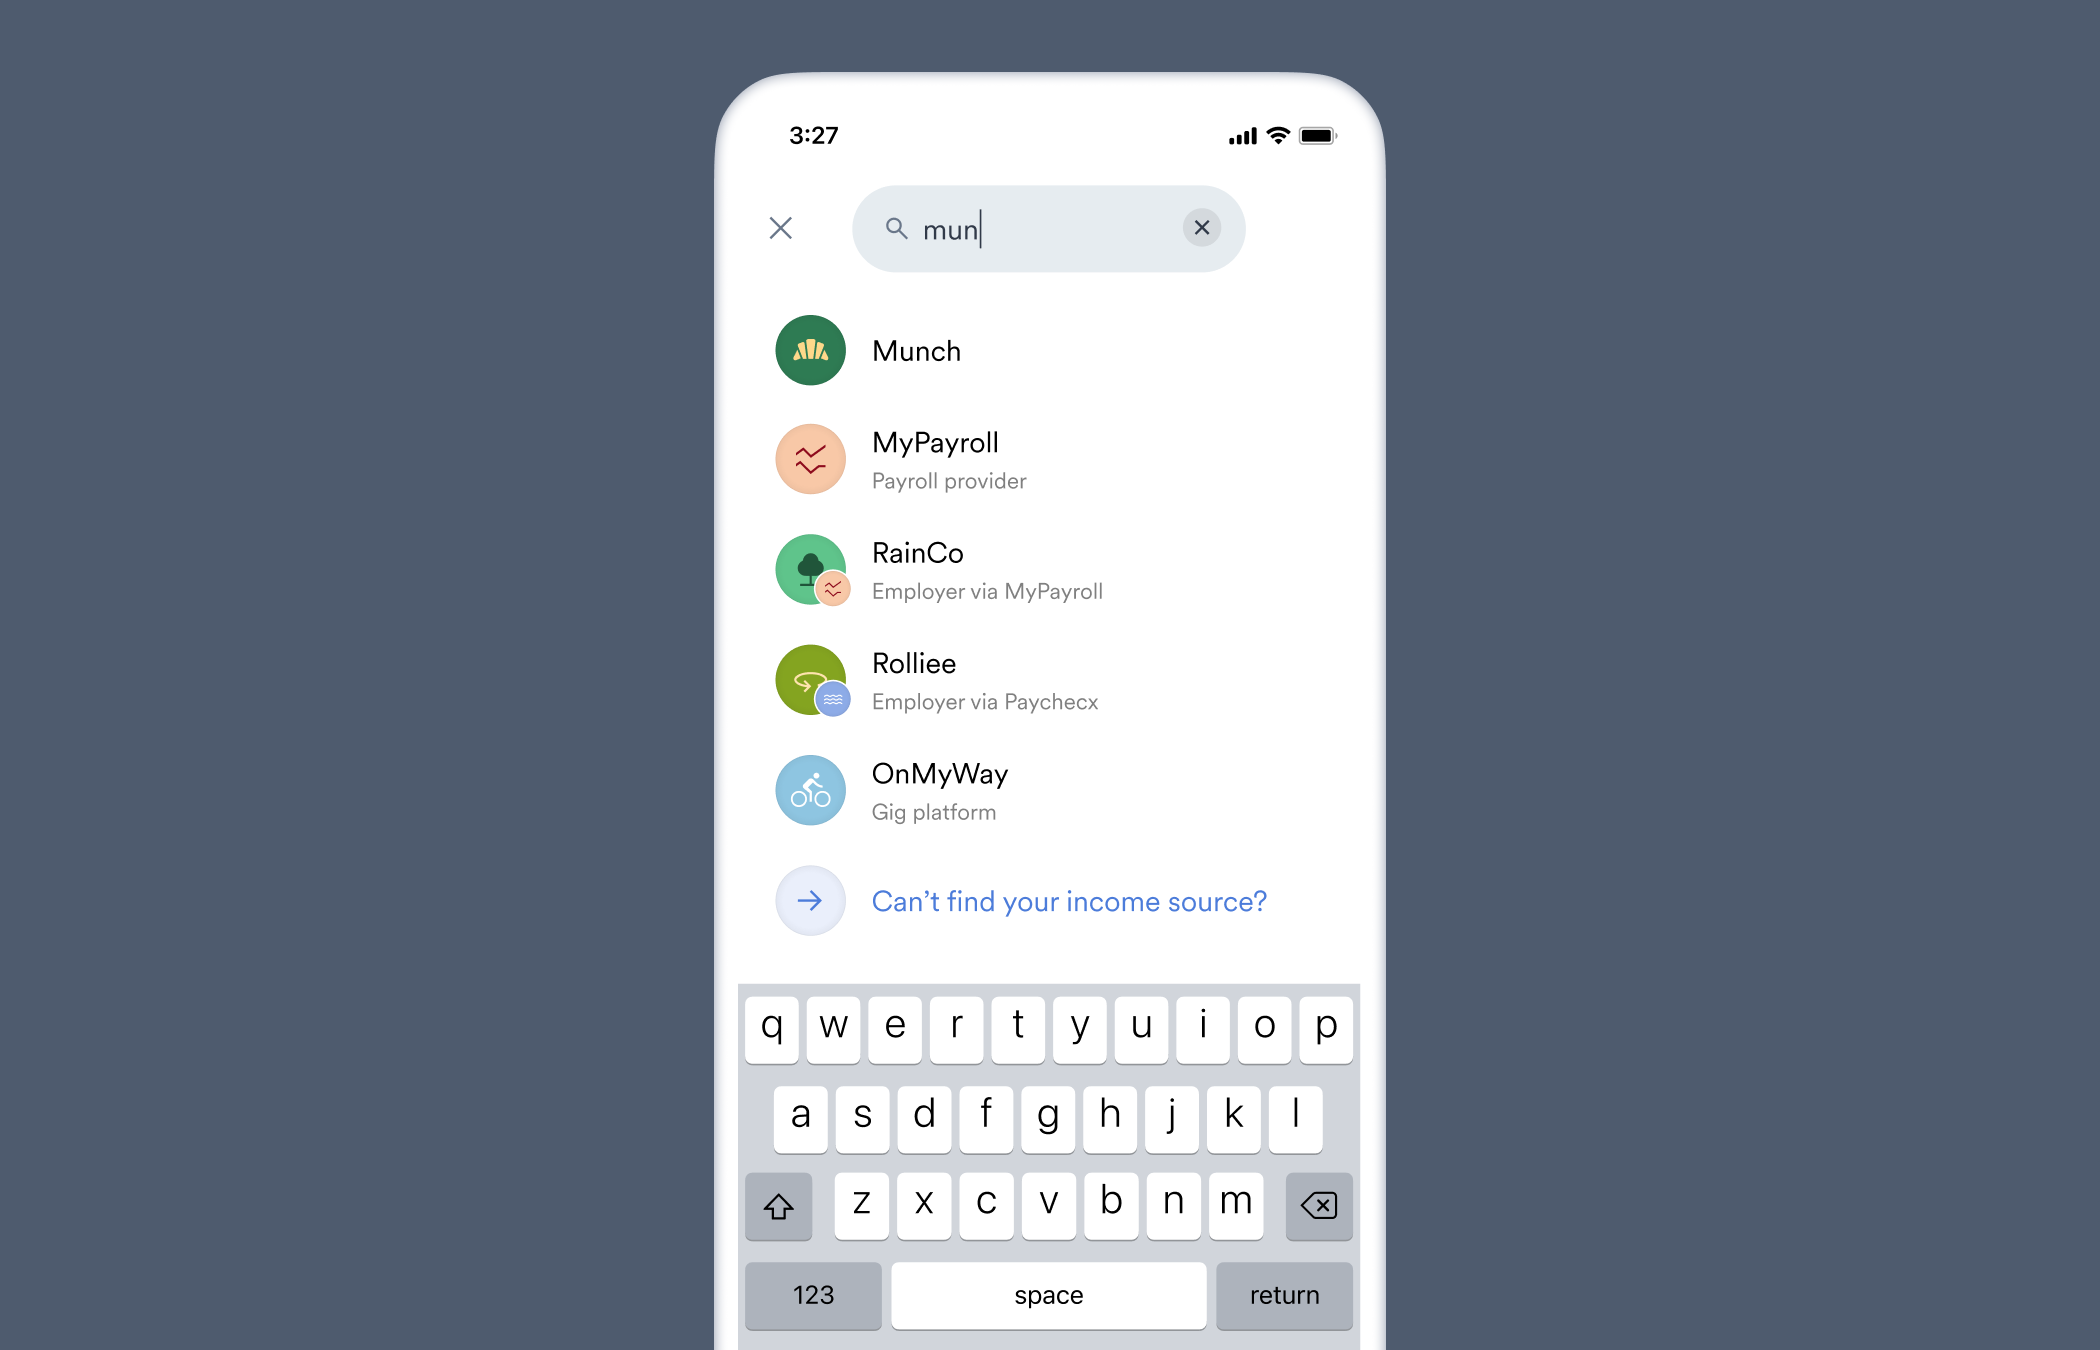 If the user cannot find their source of income from this general list, they will be prompted to search from a list of only payroll providers that service multiple employers.
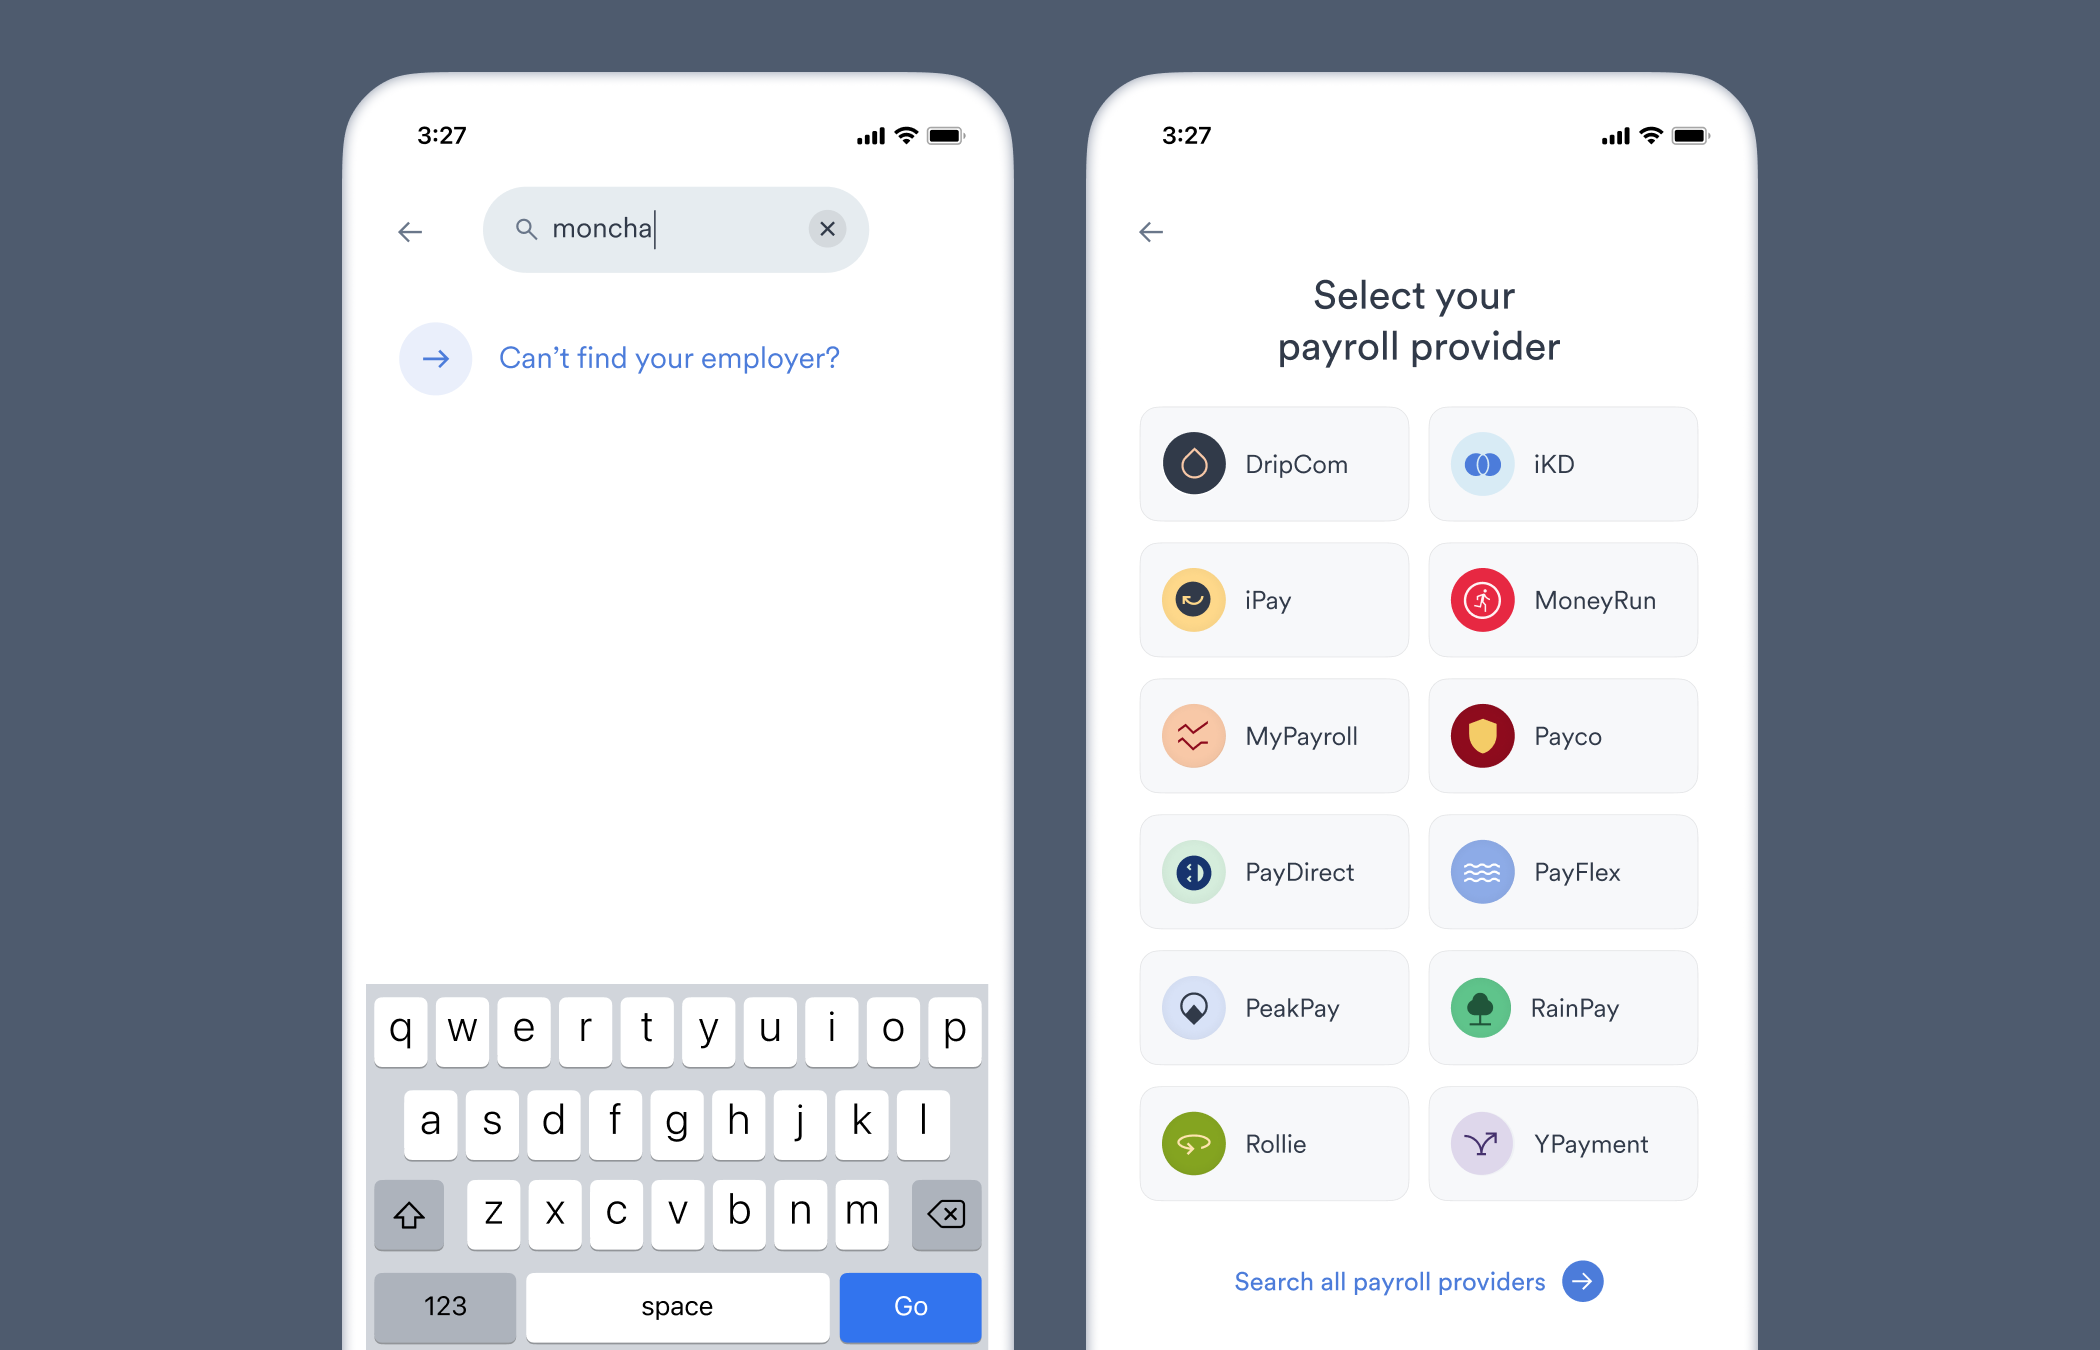 These payroll providers are searchable in step 1, but we have found narrowing the search focus to payroll providers improves the connection success rate for users.
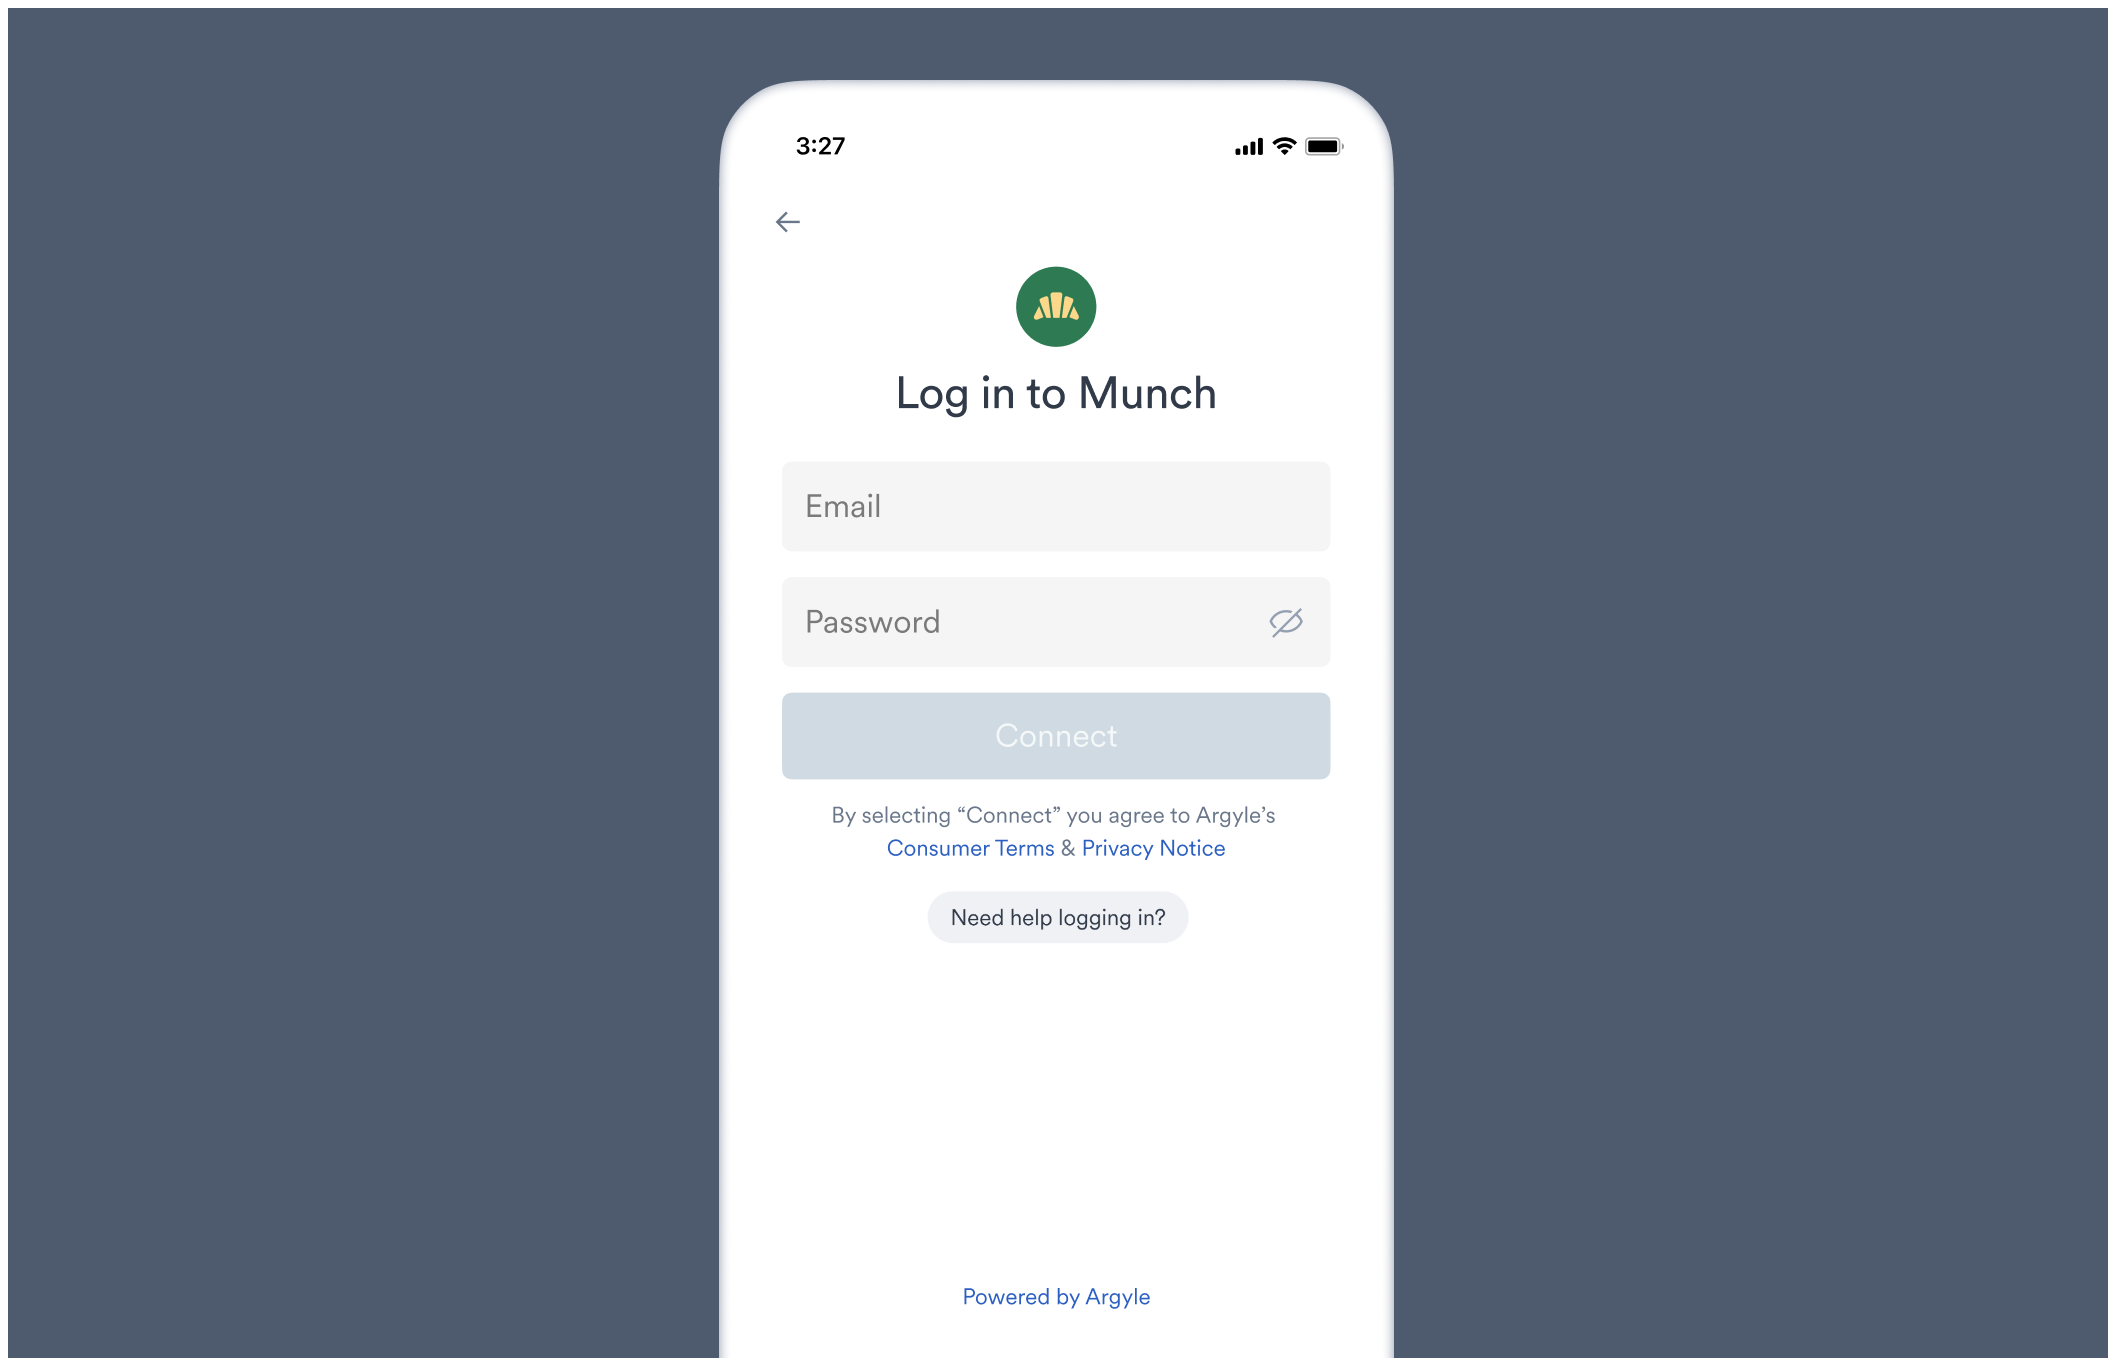
If the user successfully finds their source of income, they are taken to its respective login screen. From the login screen, the user can enter their login credentials to connect their account.
These payroll providers are searchable in step 1, but we have found narrowing the search focus to payroll providers improves the connection success rate for users.
If the user successfully finds their source of income, they are taken to its respective login screen. From the login screen, the user can enter their login credentials to connect their account.
 * If the user cannot remember their login credentials, the login screen provides a link to the platform's username/password reset process.
* Each login screen is tailored to match the input fields used by the underlying payroll system. For example, some systems require a username and password, others an email and password, while others may use SSO methods to login. You can preview the login screen for any employer or payroll system in the Flows section of Console.
If the user cannot ultimately find their source of income, they are asked to submit a response form and list their employers or payroll providers.
* If the user cannot remember their login credentials, the login screen provides a link to the platform's username/password reset process.
* Each login screen is tailored to match the input fields used by the underlying payroll system. For example, some systems require a username and password, others an email and password, while others may use SSO methods to login. You can preview the login screen for any employer or payroll system in the Flows section of Console.
If the user cannot ultimately find their source of income, they are asked to submit a response form and list their employers or payroll providers.
 ## Connection types
A new account is created for a user in four scenarios:
* A connection is successful.
* A connection was attempted but was not successful.
* A document was manually uploaded.
* A response form was submitted if the user could not locate their source of income.
### Successful connections
An account connection is considered successful when a user submits their login credentials through Link and Argyle successfully authenticates the payroll account using the provided login credentials. Once an account is successfully connected, Argyle immediately begins [data retrieval and delivery](/overview/data-delivery).
Visit our [Workflows Guides](/workflows/reconnecting-accounts) if you need more information related to re-verifying a disconnected account, completing MFA, or allowing users to revoke access to a connected account.
### Attempted connections
A new account is created for a user if they enter their login credentials in Link and click **Connect**, but the account connection is unsuccessful. Details on why an account connection attempt was unsuccessful are shown when viewing the account via Console or the API.
### Document uploads
A new account is created for a user if they manually upload any documents in Link, even if they do not connect a payroll account. Visit our [Document Processing Guide](/workflows/document-processing) to learn how to enable document uploading in Link.
### Form submissions
A new account is created for a user if they are unable to locate their source of income in Link search, but when prompted proceed and submit a response form ([Step 4](/overview/data-structure/accounts#standard-connection-process)) asking them about their sources of income.
## Viewing user accounts
### Console
Navigate to the Connections section of Console, where attempted and successfully connected accounts are shown next to each user. Hover over an account to display more information including when data from connected accounts was most recently synced.
View individual account information by selecting an individual user.
* A **Connections** section at the top of the individual user's page will show information on each account the user has ever successfully connected. Revoked connections will disappear from the user's page in 30 days.
An indicator will appear if the account has become disconnected and needs to be [reconnected](/workflows/reconnecting-accounts).
* A **Form Responses** tab will be shown in the main part of the user's page if a response form ([Step 4](/overview/data-structure/accounts#standard-connection-process)) was submitted.
### API
Use the API's [`/accounts`](/api-reference/accounts) endpoint to retrieve information for a single account connection, list all accounts, or delete an account.
## Connection types
A new account is created for a user in four scenarios:
* A connection is successful.
* A connection was attempted but was not successful.
* A document was manually uploaded.
* A response form was submitted if the user could not locate their source of income.
### Successful connections
An account connection is considered successful when a user submits their login credentials through Link and Argyle successfully authenticates the payroll account using the provided login credentials. Once an account is successfully connected, Argyle immediately begins [data retrieval and delivery](/overview/data-delivery).
Visit our [Workflows Guides](/workflows/reconnecting-accounts) if you need more information related to re-verifying a disconnected account, completing MFA, or allowing users to revoke access to a connected account.
### Attempted connections
A new account is created for a user if they enter their login credentials in Link and click **Connect**, but the account connection is unsuccessful. Details on why an account connection attempt was unsuccessful are shown when viewing the account via Console or the API.
### Document uploads
A new account is created for a user if they manually upload any documents in Link, even if they do not connect a payroll account. Visit our [Document Processing Guide](/workflows/document-processing) to learn how to enable document uploading in Link.
### Form submissions
A new account is created for a user if they are unable to locate their source of income in Link search, but when prompted proceed and submit a response form ([Step 4](/overview/data-structure/accounts#standard-connection-process)) asking them about their sources of income.
## Viewing user accounts
### Console
Navigate to the Connections section of Console, where attempted and successfully connected accounts are shown next to each user. Hover over an account to display more information including when data from connected accounts was most recently synced.
View individual account information by selecting an individual user.
* A **Connections** section at the top of the individual user's page will show information on each account the user has ever successfully connected. Revoked connections will disappear from the user's page in 30 days.
An indicator will appear if the account has become disconnected and needs to be [reconnected](/workflows/reconnecting-accounts).
* A **Form Responses** tab will be shown in the main part of the user's page if a response form ([Step 4](/overview/data-structure/accounts#standard-connection-process)) was submitted.
### API
Use the API's [`/accounts`](/api-reference/accounts) endpoint to retrieve information for a single account connection, list all accounts, or delete an account.