> ## Documentation Index
> Fetch the complete documentation index at: https://docs.argyle.com/llms.txt
> Use this file to discover all available pages before exploring further.
# Implementation
> Integrating your paycheck-linked lending solution.
This guide provides a step-by-step process for paycheck-linked lending implementations, which combine Argyle's [verification of income and employment](/legacy/solutions/voie/implementation) and [deposit switching](/legacy/solutions/dds/implementation) capabilities.
Here we will cover the typical paycheck-linked lending flow:
* The loan applicant connects their payroll accounts through Argyle Link.
* Argyle retrieves their income and employment information, which is used to make a loan decision.
* The loan applicant returns to Argyle Link and accepts a new loan-matching paycheck allocation.

## Add your company logo
After initial [sign-up](https://console.argyle.com/sign-up), access Argyle Console and navigate to **Settings** in the top nav bar. Upload your company name and logo from the [Company details](https://console.argyle.com/settings/company) tab.
## Initialize Argyle Link
Argyle Link is the portal through which your applicants connect their payroll accounts.
* Follow the steps below to embed Argyle Link in your website or application.
* Alternatively, you can use Argyle Console to [invite applicants](/legacy/guides/argyle-console/faq#how-to-invite-new-users) via text or email. The invitation will include a URL that will connect the applicant to Argyle Link directly.
### Embedded Link configurations
Visit our embedding Link guides for [Web](/legacy/guides/argyle-link/embed/web), [iOS](/legacy/guides/argyle-link/embed/ios), [Android](/legacy/guides/argyle-link/embed/android), and [React Native](/legacy/guides/argyle-link/embed/react-native) to see how to include optional configuration parameters such as [callbacks](/legacy/api-reference/callbacks) and search limits.
Basic configurations for connecting payroll accounts:
```html theme={}
```
```swift theme={}
class ViewController: UIViewController {
override func viewDidLoad() {
_ = Argyle.shared
.loginWith (
linkKey: "YOUR_LINK_KEY", // Found in Argyle Console
apiHost: "https://api-sandbox.argyle.com/v1", // Sandbox testing environment
userToken: "USER_TOKEN" // Used to authenticate users
)
.resultListener(self)
}
@IBAction func startArgyleFlow(_ sender: Any) {
let argyle = Argyle.shared.controller
argyle.modalPresentationStyle = .fullScreen
self.present(argyle, animated: true, completion: nil)
}
}
```
```kotlin theme={}
val config = ArgyleConfig.Builder()
.loginWith (
"YOUR_LINK_KEY", // Found in Argyle Console
"https://api-sandbox.argyle.com/v1", // Sandbox testing environment
"USER_TOKEN" // Used to authenticate users
)
.build()
Argyle.instance.init(config)
Argyle.instance.startSDK(this)
```
```js theme={}
import ArgyleSdk from '@argyleio/argyle-plugin-react-native';
ArgyleSdk.loginWith(
'YOUR_LINK_KEY', // Found in Argyle Console
'https://api-sandbox.argyle.com/v1', // Sandbox testing environment
'USER_TOKEN' // Used to authenticate users
);
// After configuring the SDK, call ArgyleSdk.start() when the UI is needed
ArgyleSdk.start();
```
**Link Keys** — Link keys connect your embedded instance of Argyle Link to your Argyle account. Your Sandbox and Production link keys can be found in the [Link key section](https://console.argyle.com/link-key) of Argyle Console. Make sure the type of link key in your configuration matches the environment.
**Environment** — Argyle Link can run in two types of environments: Sandbox mode (for testing) or Production mode (for connecting real payroll accounts).
* Sandbox configurations use `https://api-sandbox.argyle.com/v1`
* Production configurations use `https://api.argyle.com/v1`
**User tokens** — Argyle utilizes user tokens to authenticate users (your applicants).
1. Create a new user using the [users API endpoint](/legacy/api-reference/users#create)
2. The response payload will include a `token` and `id`
3. Save the `id` for quickly creating user tokens for this user in the future
4. Initialize Argyle Link using the `token` as the user token in your configuration
1. Create a new user token using the [user-tokens API endpoint](/legacy/api-reference/users#create-token)
2. The response payload will include an `access` and `refresh` token
3. Initialize Argyle Link using *only* the `access` token as the user token in your configuration
## Connect test accounts
If you are testing an embedded instance of Argyle Link that uses the Sandbox environment, you can connect sample applicants using the test login credentials below. These credentials will also work if you are using [Flows](https://console.argyle.com/flows) in Argyle Console for testing.
| | Bob | Sarah | Joe |
| ------------------ | ----------------------------- | ----------------------------- | ----------------------------- |
| Email | test1@argyle.com | test2@argyle.com | test3@argyle.com |
| Username | test\_1 | test\_2 | test\_3 |
| Password | passgood | passgood | passgood |
| Verification code | 8081 | 8082 | 8083 |
| Phone number | (800) 900-0010 | (800) 900-0020 | (800) 900-0030 |
| Driver's license # | D1230010 | D1230020 | D1230030 |
If a login field does not match one of the fields above, the closest field can be used. For example, a username value can be used for a "UserID" login field.
The sample data returned depends on what type of payroll account (gig or non-gig) was connected in the Sandbox environment.
## View data retrieval status
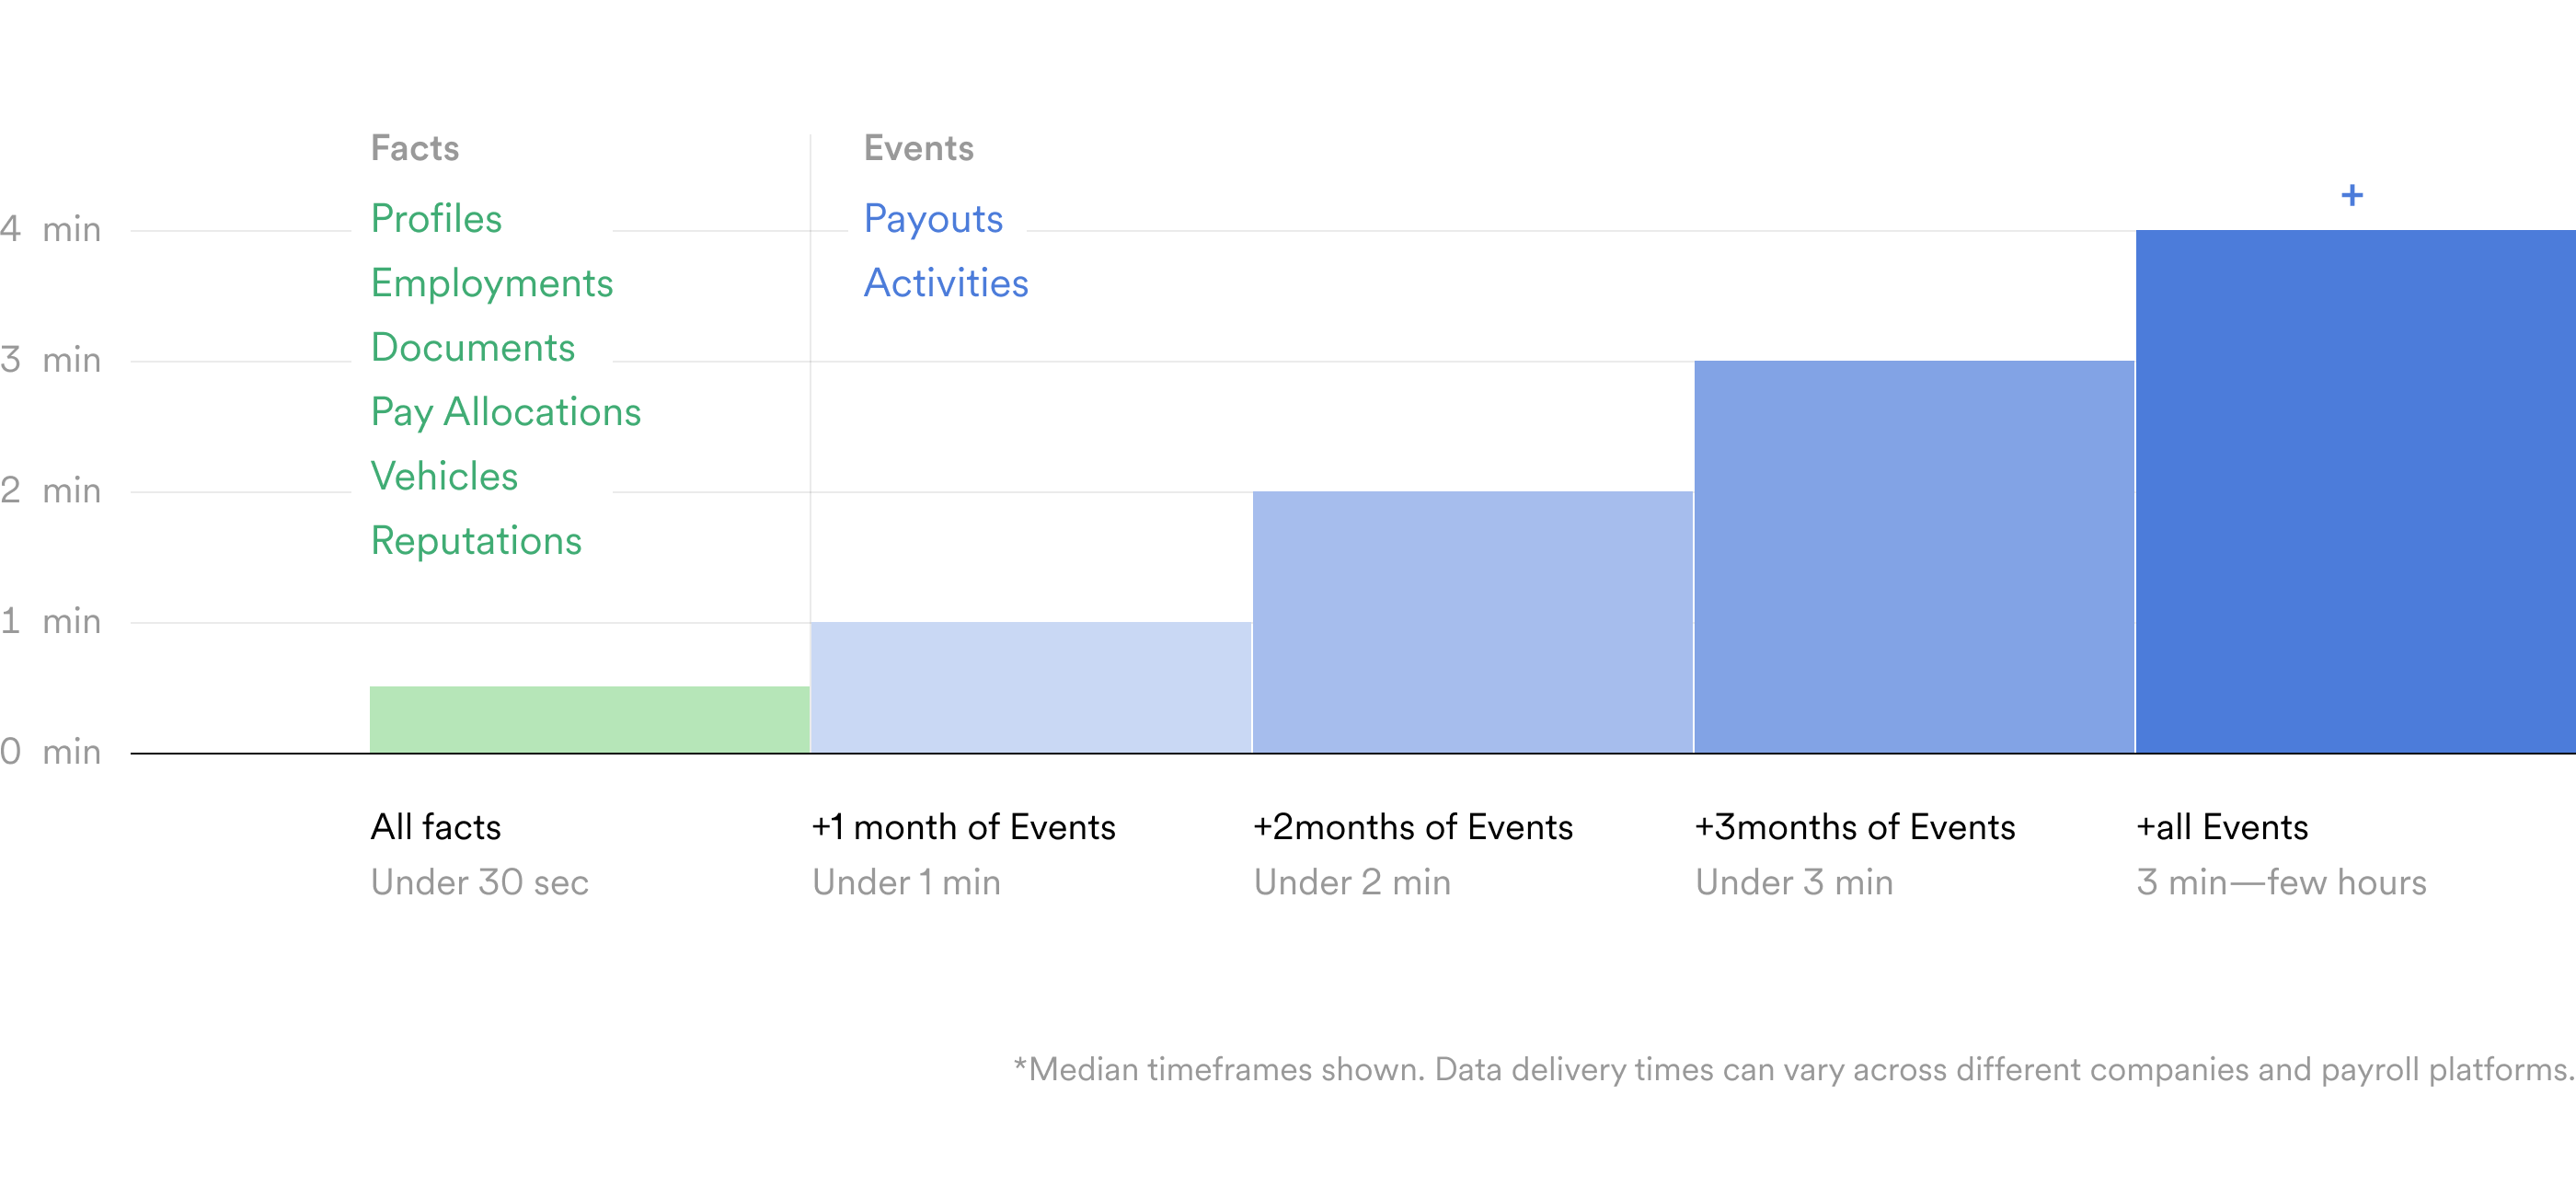
Argyle begins data retrieval immediately when a payroll account is successfully connected. The time it takes for all data to finish syncing depends on the length of employment:
When viewing data in Console (by clicking on an individual user within the [Connections](https://console.argyle.com/connections) page), spinning status circles will indicate if data is still syncing for a new payroll connection.
You can also monitor the progress of data retrieval by using the [accounts API endpoint](/legacy/api-reference/accounts) and checking the `status` field of the `availability` object. We recommend including the optional `onAccountConnected` [callback](/legacy/api-reference/callbacks) in your Link configuration to make automating this process easier.
## Retrieve payroll data
If you are using Console to retrieve payroll data, navigate to the [Connections](https://console.argyle.com/connections) page and click on an individual user to view data from their connected payroll accounts.
If you are using the API to retrieve payroll data, visit our [API Reference](/legacy/api-reference/introduction) for more information.
1. Make a GET request to the [employments API endpoint](/legacy/api-reference/employments#retrieve)
2. (Optional) Include the query parameter account with the value `accountId`
* The `accountId` is the ID of the recently connected payroll account
* If you included the `onAccountConnected` [callback](/legacy/api-reference/callbacks) in your Link configuration, the callback automatically returns this `accountId` every time a user connects a new payroll account
* You can also use the [accounts API endpoint](/legacy/api-reference/accounts) to find the `accountId` for the user
Example GET request to the employment API endpoint using the Sandbox environment:
```text theme={}
GET https://api-sandbox.argyle.com/v1/employments?account=021a1749-6973-4e47-a82a-307008ca88cc
```
Example JSON response (employment object):
```json theme={}
{
"id": "857b4aad-1a55-4200-84f7-311cd3dc3432",
"account": "021a1749-6973-4e47-a82a-307008ca88cc",
"employer": "floormart",
"created_at": "2022-01-24T17:29:08.724Z",
"updated_at": "2022-01-24T17:29:08.724Z",
"status": "active",
"type": "part-time",
"job_title": "cashier",
"hire_datetime": "2018-10-27T17:29:08.724Z",
"termination_datetime": null,
"termination_reason": null,
"base_pay": {
"amount": 36400,
"period": "annual",
"currency": "USD"
},
"pay_cycle": "monthly",
"platform_ids": {
"employee_id": "47FJ06ON8",
"position_id": "INA609028",
"platform_user_id": "H3WTY0FHMQ24ERDN"
},
"metadata": {}
}
```
1. Make a GET request to the [payouts API endpoint](/legacy/api-reference/payouts#retrieve)
* A payout is the equivalent of a single paystub. You can also use the [income totals API endpoint](/legacy/api-reference/income-totals) for yearly pay totals.
2. (Optional) Retrieve all payouts over a certain time period by include the `from_start_date` and `to_start_date` query parameters
3. (Optional) Add the `account` query parameter to retrieve the payouts for an individual payroll account
Example GET request to the payouts API endpoint using the Sandbox environment:
```text theme={}
GET https://api-sandbox.argyle.com/v1/payouts?account=f8bf3e18-09ba-428c-b197-6798f1b2b834&from_start_date=2022-01-01&to_start_date=2022-02-01
```
Example JSON response (payout object):
```json theme={}
{
"id": "a6b95412-e43a-4584-be9f-1dc101aa349a",
"account": "f8bf3e18-09ba-428c-b197-6798f1b2b834",
"document_id": "97f21592-b6b6-352a-91d7-e221bf0dd6e9",
"employer": "ceilingmart",
"status": "completed",
"type": "direct_deposit",
"payout_date": "2022-01-15T00:00:00Z",
"payout_period": {
"start_date": "2022-01-01T00:00:00Z",
"end_date": "2022-01-31T00:00:00Z"
},
"currency": "USD",
"gross_pay": "1730.77",
"reimbursements": "279.87",
"deductions": "68.68",
"deduction_list": [
{
"amount": "68.68",
"name": "Health Benefits - Pretax",
"tax_classification": "pre_tax"
}
],
"taxes": "224.68",
"tax_list": [
{
"amount": "171.28",
"name": "Fed Withholdng",
"type": "federal"
},
{
"amount": "53.40",
"name": "Fed OASDI/EE",
"type": "fica"
}
],
"fees": null,
"net_pay": "1717.28",
"bonuses": "0.00",
"commission": "0.00",
"overtime": "0.00",
"hours": "80.00",
"employer_address": {
"line1": "4 Jackson St",
"line2": "Apt C",
"city": "Norton",
"state": "MA",
"postal_code": "27660",
"country": "US"
},
"filing_status": [
{
"type": "federal",
"location": null,
"status": "single"
},
{
"type": "state",
"location": "MD",
"status": "single"
}
],
"metadata": {
"hours_breakdown": [
{
"hours": "80",
"amount": "1730.77",
"description": "Work Hours"
}
]
}
}
```
## Configure the deposit switch
At this point in the process, the applicant will have connected their payroll accounts and been approved for a loan based on their income data.
You would now re-initialize Argyle Link for the same applicant and include a deposit switch configuration in your Link initialization code if you are embedding Argyle Link, or send the applicant another invite through Argyle Console after [setting up deposit switching for invites](/legacy/guides/argyle-console/faq#how-to-set-up-deposit-switching).
To set up your deposit switch configuration if you are embedding Argyle Link, follow the steps in the section below.
### Embedded configurations
To enable the deposit switching flow if you are embedding Argyle Link, you will need to provide a deposit switching configuration in your Argyle Link initialization code.
This deposit switching configuration contains the bank account details where you want the user's paycheck to be sent, and the allocation settings that determine how much of that paycheck you want to receive.
Below is an example configuration that transfers an exact amount (\$177) of the applicant's paycheck to the provided bank account. A full list of example configurations can be found in our dedicated [Deposit Switching Guide](/legacy/guides/argyle-link/flows/direct-deposit-switching).
```json theme={}
// Receive $177 of the paycheck
{
"bank_account": {
"bank_name": "YellowHorizon",
"routing_number": "084101234",
"account_number": "9483746361234",
"account_type": "checking"
},
"amount_allocation": {
"value": "177",
"min_value": "177",
"max_value": "177"
}
}
```
In order to protect sensitive bank account details, this deposit switch configuration needs to be encrypted before including it in your Argyle Link initialization.
To encrypt the configuration, make a POST request to our [API encryption endpoint](/legacy/api-reference/dds-configurations#encrypt). Include the unencrypted configuration above in the request body.
You should received an encrypted configuration in the response that looks similar to:
```json theme={}
{
"encrypted_config": "CiQAB/5leR8apwI6icBQ6w7TsNOYoYNpAUBP4/fpP48Pij6Z+OYSvQIAfV+QlVQKWPoQPVeMf1wqovnIZprUQrmn/3TTAw3LH3MXphOd/610Hy36Tgv0oig9Q/xMxLMQWGThV9TaXBWw0ucowHjETRaQVynM78W/IQ5eVn+Xn7OqL5Imz36XbzNd+O1Xtor+ZE5hhXzH+CR0uo1bq5dsxCks9p8z5PLZIXgZCJr4v9ximsUAbT1WFiclPSai4MjL3zkMto1Ss0teSYUBKdgBWn/mgAGsV/As6tRVKT3Hyhhy7LWGyvySmTxe8ALAVv21nx+R76i+ddVoxrmgVn0slTrVBz5P4w/9pSD/6fH5HnKQc7g44qJtnORdqujbcdSaK1H5RgqTLld0DUX+ujrxHZE+FP1mo0Ziq80H5HlGgjsjA+JWEif/gItT+Ada8ckS2/IOMJPE8vbK2jQYlCj+mlj2uQF5yg=="
}
```
This encrypted configuration will be used in your Link initialization for the returning applicant.
### Initialize a deposit switch
If are sending invitations through Argyle Console, the deposit switching flow will automatically be enabled in Argyle Link when you resend an invitation to the applicant if you completed the deposit switching setup process.
If you are embedding Argyle Link:
1. Create a new user token for the returning applicant
1. Create a new user token using the [user-tokens API endpoint](/legacy/api-reference/users#create-token)
2. The response payload will include an `access` and `refresh` token
3. Initialize Argyle Link using *only* the `access` token as the user token in your configuration
2. Replace the previous user token in your [original Link initialization code](/legacy/solutions/pll/implementation#embedded-link-configurations) with the new user token
3. Add these two deposit switching parameters to your Link initialization: `payDistributionUpdateFlow` and `payDistributionConfig`. See the example Link initializations below for examples of how to add them to each platform.
* **Pay Distribution Update Flow** — Enables the deposit switching flow in Argyle Link.
* **Pay Distribution Config** — Where you pass your encrypted deposit switching configuration. For our \$177 paycheck allocation example, you would include the following:
```json theme={}
// $177 of paycheck example
payDistributionConfig: "CiQAB/5leR8apwI6icBQ6w7TsNOYoYNpAUBP4/fpP48Pij6Z+OYSvQIAfV+QlVQKWPoQPVeMf1wqovnIZprUQrmn/3TTAw3LH3MXphOd/610Hy36Tgv0oig9Q/xMxLMQWGThV9TaXBWw0ucowHjETRaQVynM78W/IQ5eVn+Xn7OqL5Imz36XbzNd+O1Xtor+ZE5hhXzH+CR0uo1bq5dsxCks9p8z5PLZIXgZCJr4v9ximsUAbT1WFiclPSai4MjL3zkMto1Ss0teSYUBKdgBWn/mgAGsV/As6tRVKT3Hyhhy7LWGyvySmTxe8ALAVv21nx+R76i+ddVoxrmgVn0slTrVBz5P4w/9pSD/6fH5HnKQc7g44qJtnORdqujbcdSaK1H5RgqTLld0DUX+ujrxHZE+FP1mo0Ziq80H5HlGgjsjA+JWEif/gItT+Ada8ckS2/IOMJPE8vbK2jQYlCj+mlj2uQF5yg=="
```
4. (Optional) You can also add a parameter to your Link initialization that directly connects the applicant to one of their connected payroll accounts. This can be useful to ensure the connected payroll account supports your specific deposit switching configuration. Visit our [Deep Linking Guide](/legacy/guides/argyle-link/flows/deep-linking) for more information on initializing Argyle Link with direct connections.
Example Argyle Link initializations for deposit switching:
```html theme={}
```
```swift theme={}
class ViewController: UIViewController {
let DEPOSIT_CONFIG = "ENCRYPTED_CONFIGURATION" // Your encrypted deposit switching configuration
override func viewDidLoad() {
_ = Argyle.shared
.loginWith (
linkKey: "YOUR_LINK_KEY", // Found in Argyle Console
apiHost: "https://api-sandbox.argyle.com/v1", // Sandbox testing environment
userToken: "USER_TOKEN" // Used to authenticate users
)
.payDistributionUpdateFlow(true) // Enables deposit switching flow
.payDistributionConfig(DEPOSIT_CONFIG)
.resultListener(self)
}
@IBAction func startArgyleFlow(_ sender: Any) {
let argyle = Argyle.shared.controller
argyle.modalPresentationStyle = .fullScreen
self.present(argyle, animated: true, completion: nil)
}
}
```
```kotlin theme={}
val DEPOSIT_CONFIG = "ENCRYPTED_CONFIGURATION" // Your encrypted deposit switching configuration
val config = ArgyleConfig.Builder()
.loginWith (
"YOUR_LINK_KEY", // Found in Argyle Console
"https://api-sandbox.argyle.com/v1", // Sandbox testing environment
"USER_TOKEN" // Used to authenticate users
)
.payDistributionUpdateFlow(true) // Enables deposit switching flow
.payDistributionConfig(DEPOSIT_CONFIG)
.build()
Argyle.instance.init(config)
Argyle.instance.startSDK(this)
```
```js theme={}
import ArgyleSdk from '@argyleio/argyle-plugin-react-native';
const DEPOSIT_CONFIG = 'ENCRYPTED_CONFIGURATION'; // Your encrypted deposit switching configuration
ArgyleSdk.loginWith(
'YOUR_LINK_KEY', // Found in Argyle Console
'https://api-sandbox.argyle.com/v1', // Sandbox testing environment
'USER_TOKEN' // Used to authenticate users
);
ArgyleSdk.payDistributionUpdateFlow(true);
ArgyleSdk.payDistributionConfig(DEPOSIT_CONFIG);
// After configuring the SDK, call ArgyleSdk.start() when the UI is needed
ArgyleSdk.start();
```
The deposit switching update process typically takes fifteen to thirty seconds on most payroll systems, and up to two minutes on the slowest payroll systems.
## Set up notifications
Argyle uses webhooks to notify you when different events occur, such as a new payroll account connection or if a deposit switch is successful.
You can subscribe to webooks from the [webhooks page](https://console.argyle.com/webhooks) in Console, or [using the API](/legacy/api-reference/webhooks-overview#subscribing-to-webhooks).
We recommend subscribing to the following webhooks that are relevant to paycheck-linked lending to get started:
* `accounts.connected` notifies you when a payroll account connection attempt is successful.
* `accounts.failed` lets you know if a connection attempt failed, and provides error details for the event.
* `payouts.partially_synced` notifies you when pay data is available for a specified number of days\_synced — one month, one year, or two years, for example.
* `users.fully_synced` notifies you when data retrieval has fully completed for all payroll accounts successfully connected by the applicant.
* `accounts.pay_distribution_updated` notifies you when a deposit switch successfully completes.
* `accounts.pay_distribution_failed` notifies you when a deposit switch attempt is unsuccessful.
Visit our [Webhooks Reference](/legacy/api-reference/webhooks-overview) for a full list of available webhooks.
## Going live
When you are ready to transition from Sandbox testing to Production mode, make the following adjustments:
* If you are using Argyle Console's invite feature, simply [flip the toggle switch](/legacy/guides/argyle-console/faq#sandbox-and-production-modes) in the upper left to enter Production mode.
* If you are embedding Argyle Link:
1. Adjust your Argyle Link configuration to use `https://api.argyle.com/v1` instead of `https://api-sandbox.argyle.com/v1`
2. Swap the Sandbox link key to the Production link key in your Argyle Link initialization code
3. Make API requests to `https://api.argyle.com/v1` instead of `https://api-sandbox.argyle.com/v1`