> ## Documentation Index
> Fetch the complete documentation index at: https://docs.argyle.com/llms.txt
> Use this file to discover all available pages before exploring further.
# Encompass Setup Guide
> Setting up manual and automated Argyle verification ordering within the Encompass® by ICE Mortgage Technology® platform.
## Manual Ordering
### Admin login
1. Log in to Encompass Web® with an **administrator account** and select **Admin** within the applications dropdown.
### Add the Argyle service
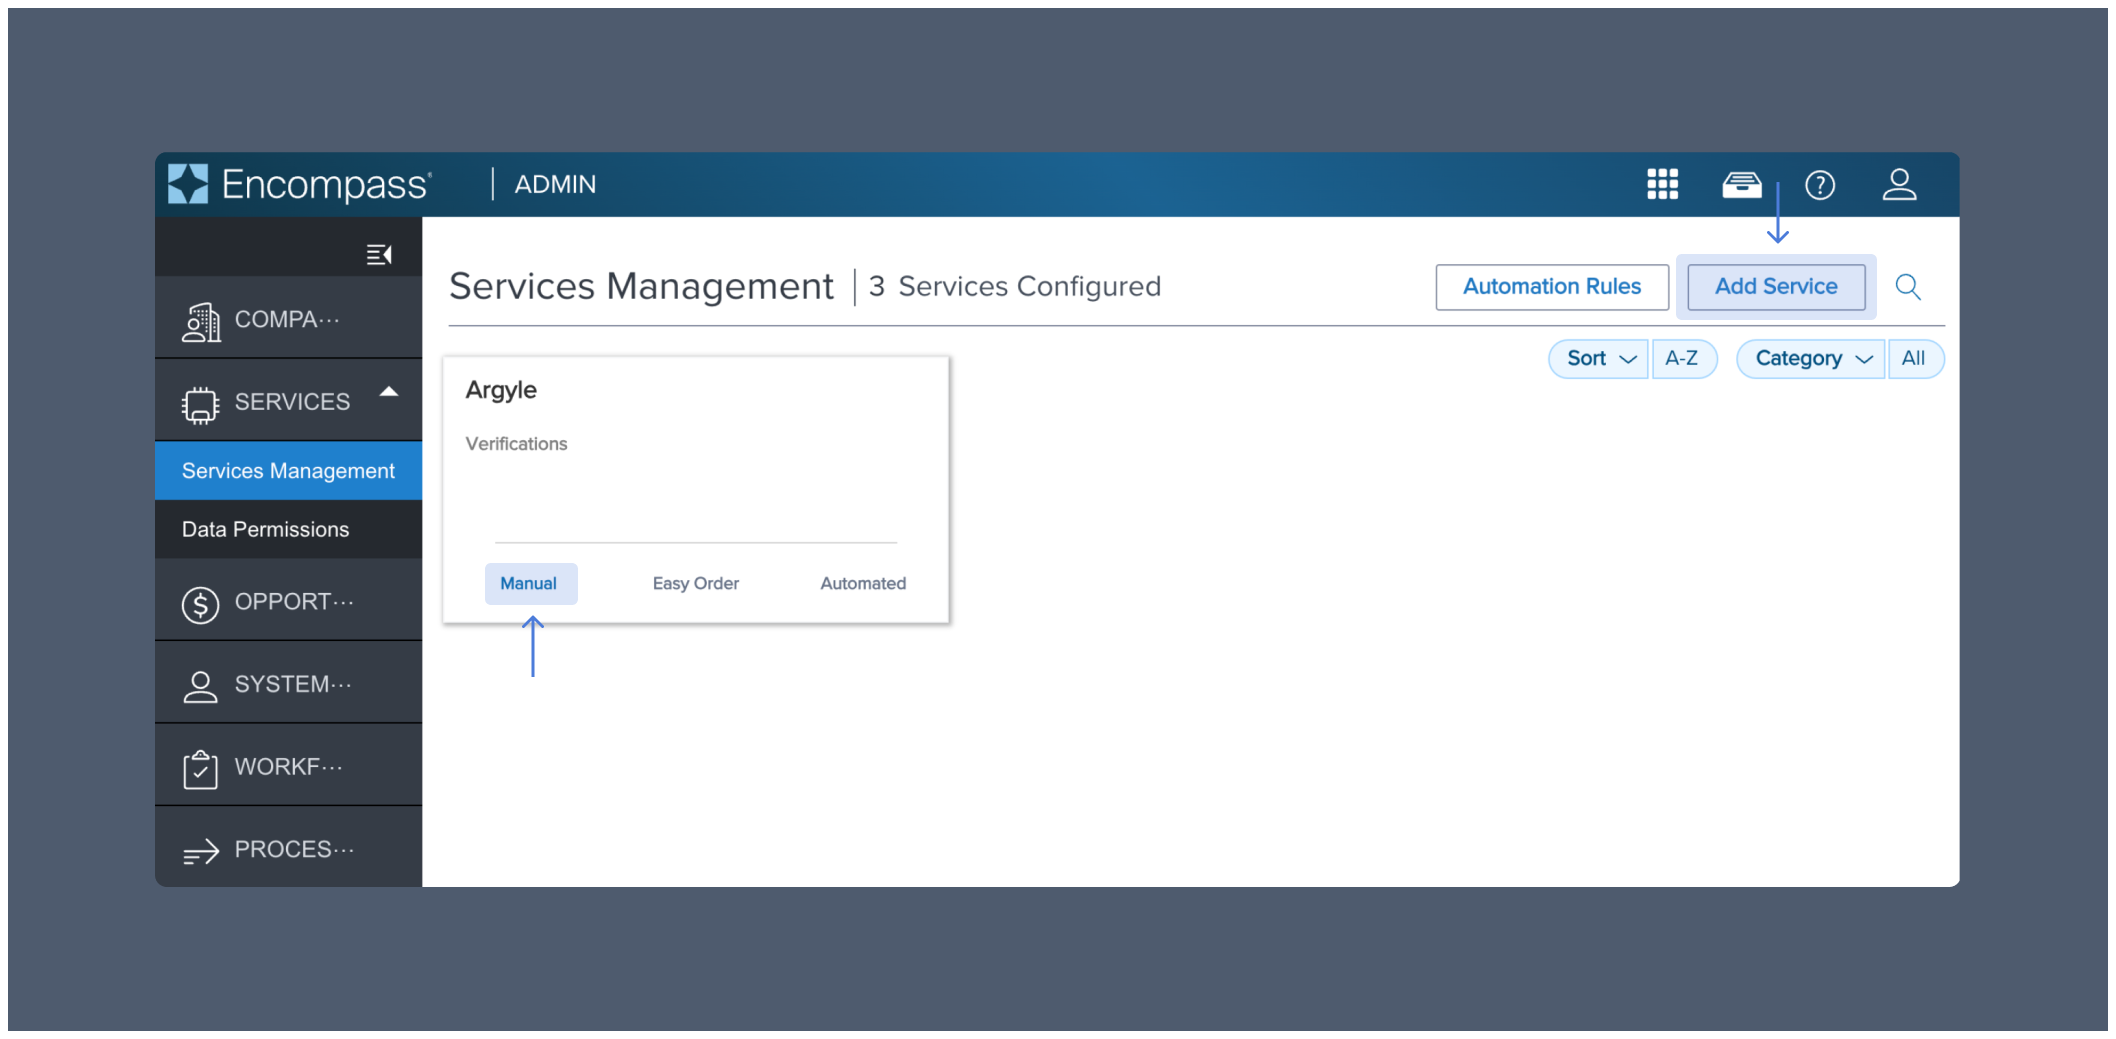
1. Select **Services Management** within the **SERVICES** dropdown.
2. Select **Add Service** and choose the **Verifications** category.
3. Search for **Argyle** and then select **Manual**.
 ### Add authorized users
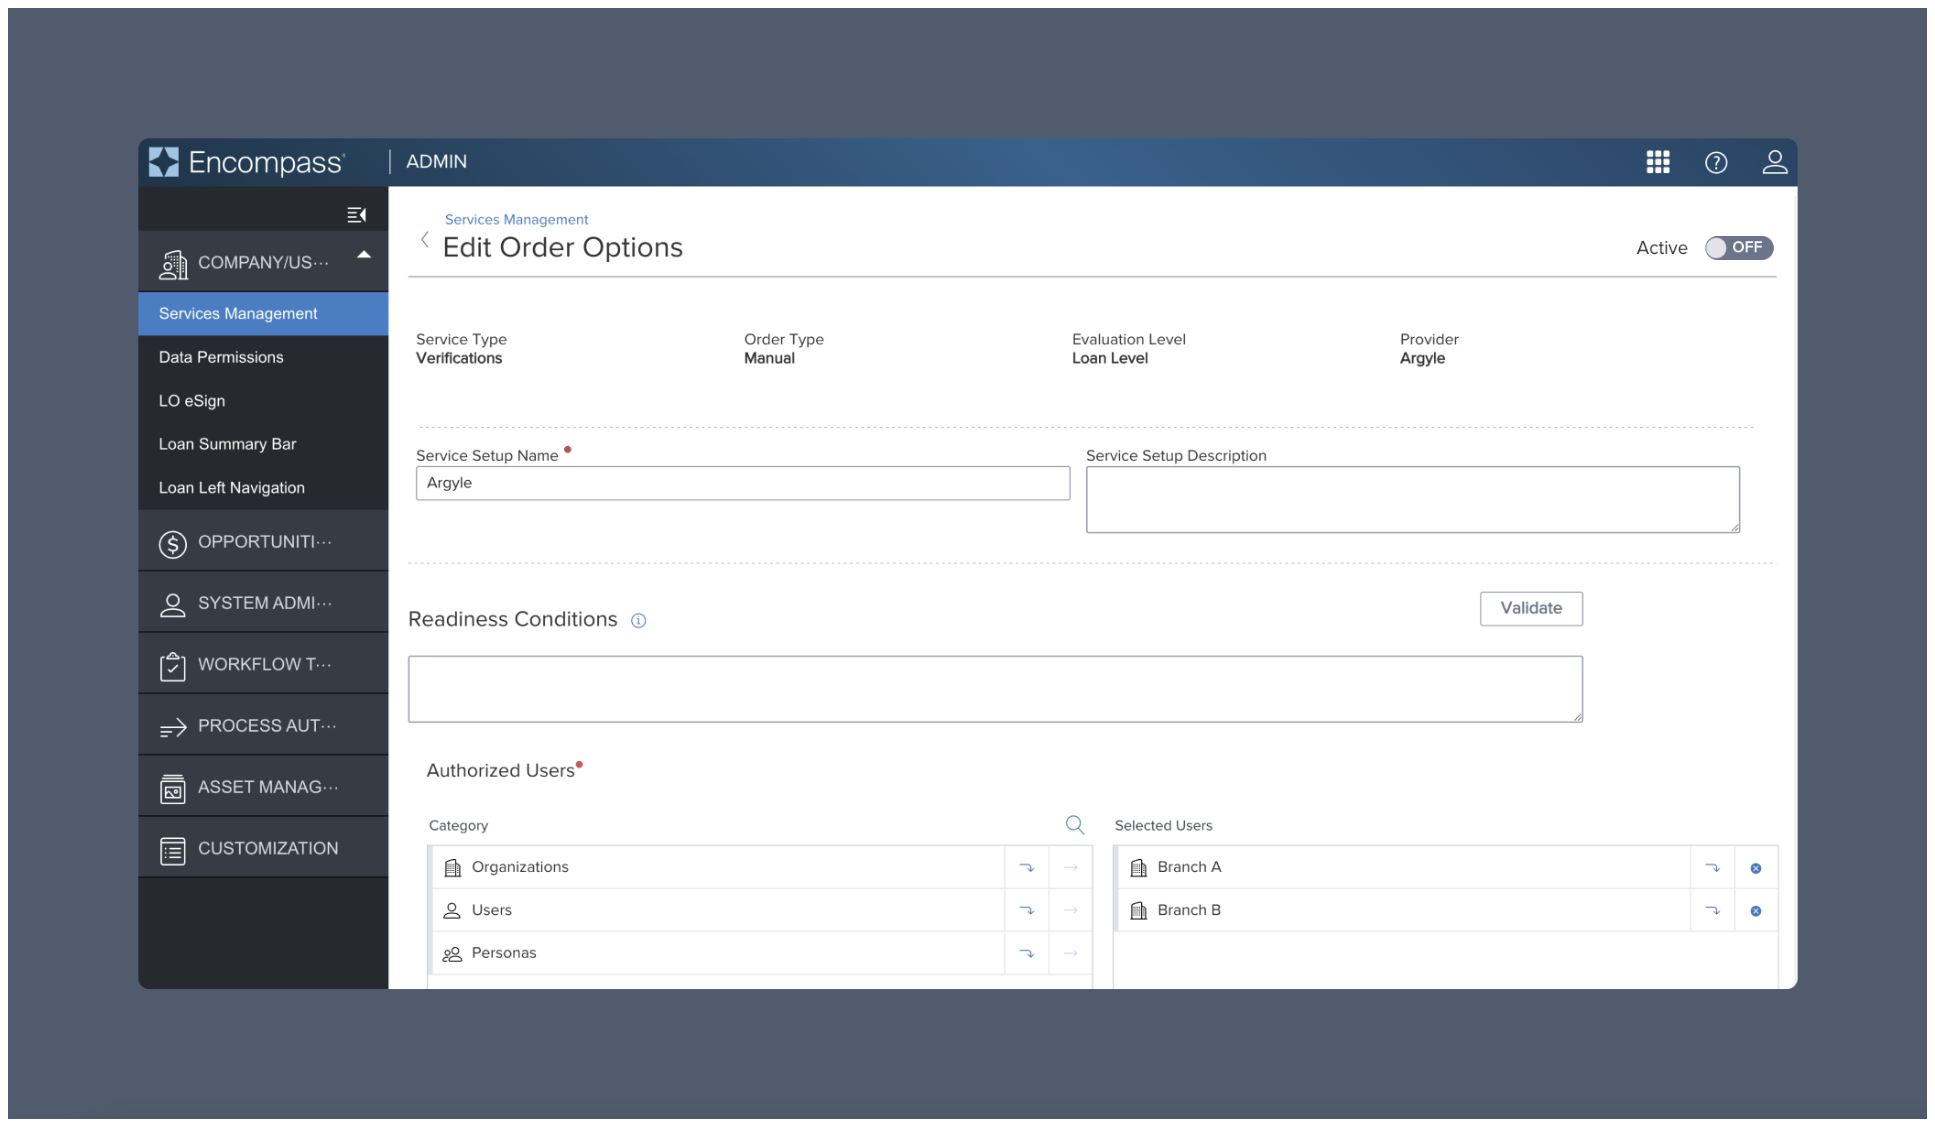
1. Choose a **Service Setup Name** and add **Authorized Users**.
2. Click **Save**.
### Add authorized users
1. Choose a **Service Setup Name** and add **Authorized Users**.
2. Click **Save**.
 ### Add Argyle API keys
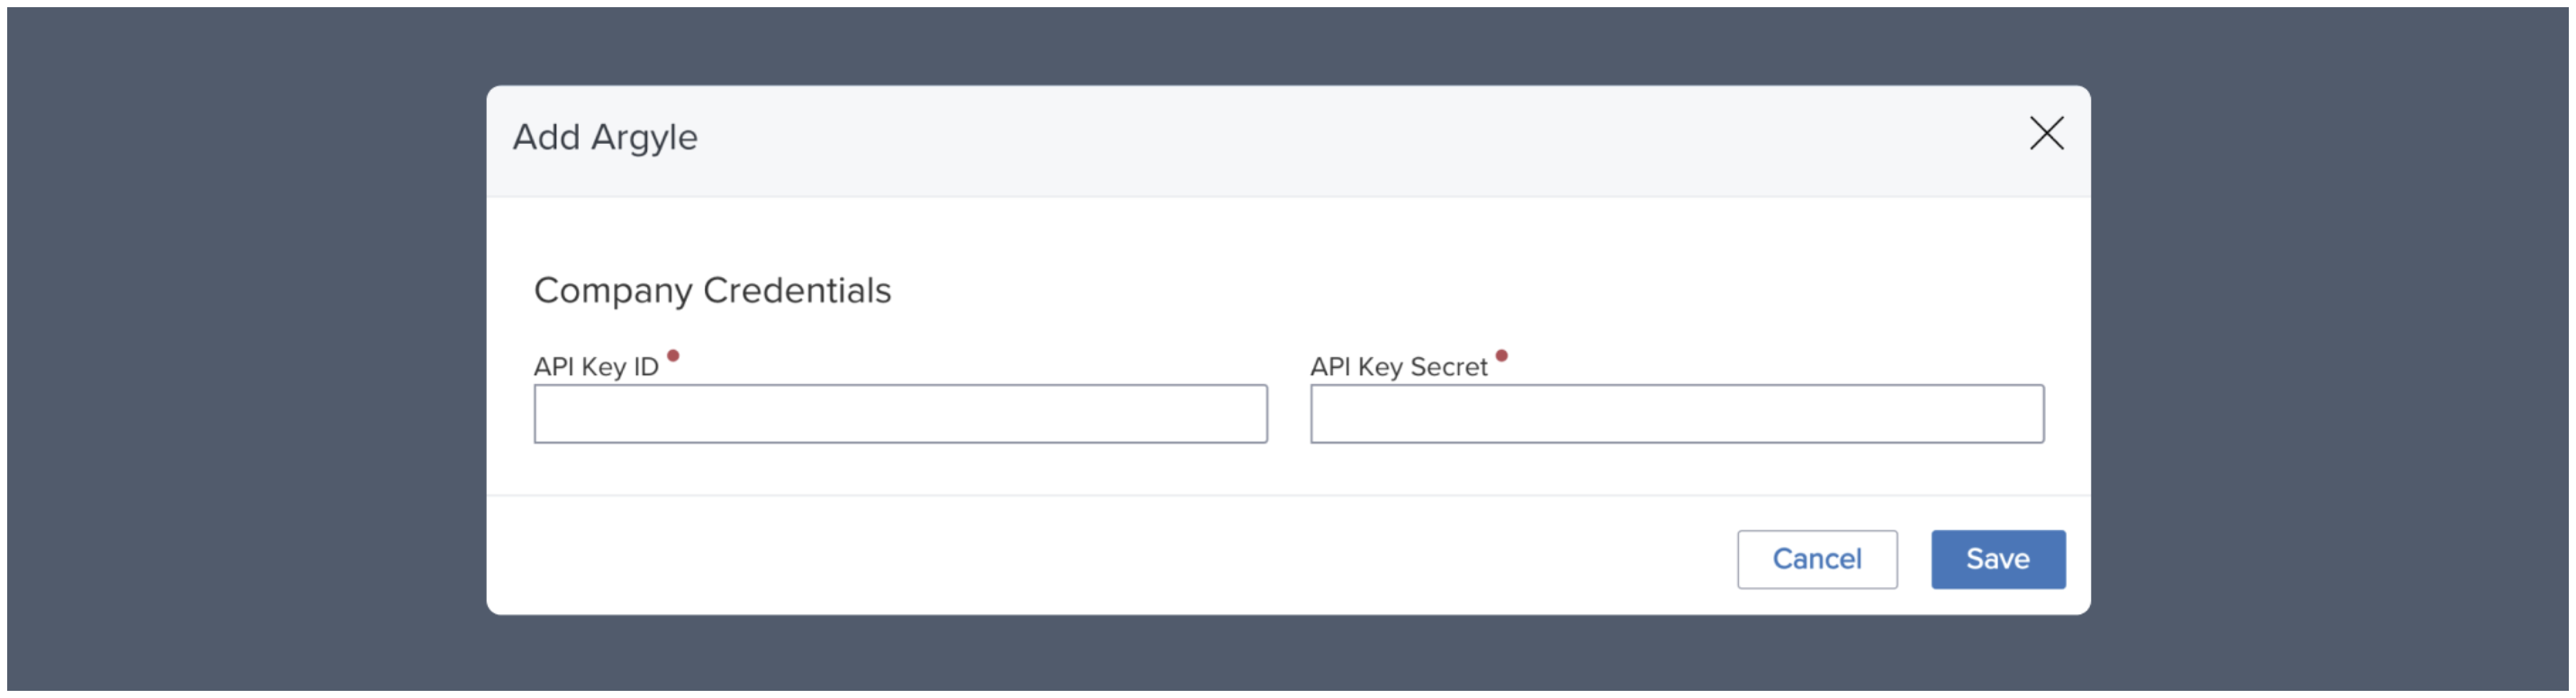
1. After Argyle is added to your configured services, select **Credentials**.
2. In the pop-up, enter your Argyle API key and secret, which can be found or created in the Developers section of Argyle Console. Then click **Save**.
3. After saving and exiting, set the **Status toggle** to **ON**.
### Add Argyle API keys
1. After Argyle is added to your configured services, select **Credentials**.
2. In the pop-up, enter your Argyle API key and secret, which can be found or created in the Developers section of Argyle Console. Then click **Save**.
3. After saving and exiting, set the **Status toggle** to **ON**.
 ### Enable Encompass in Argyle Console
Your Argyle Customer Success Manager may have already completed this step for you.
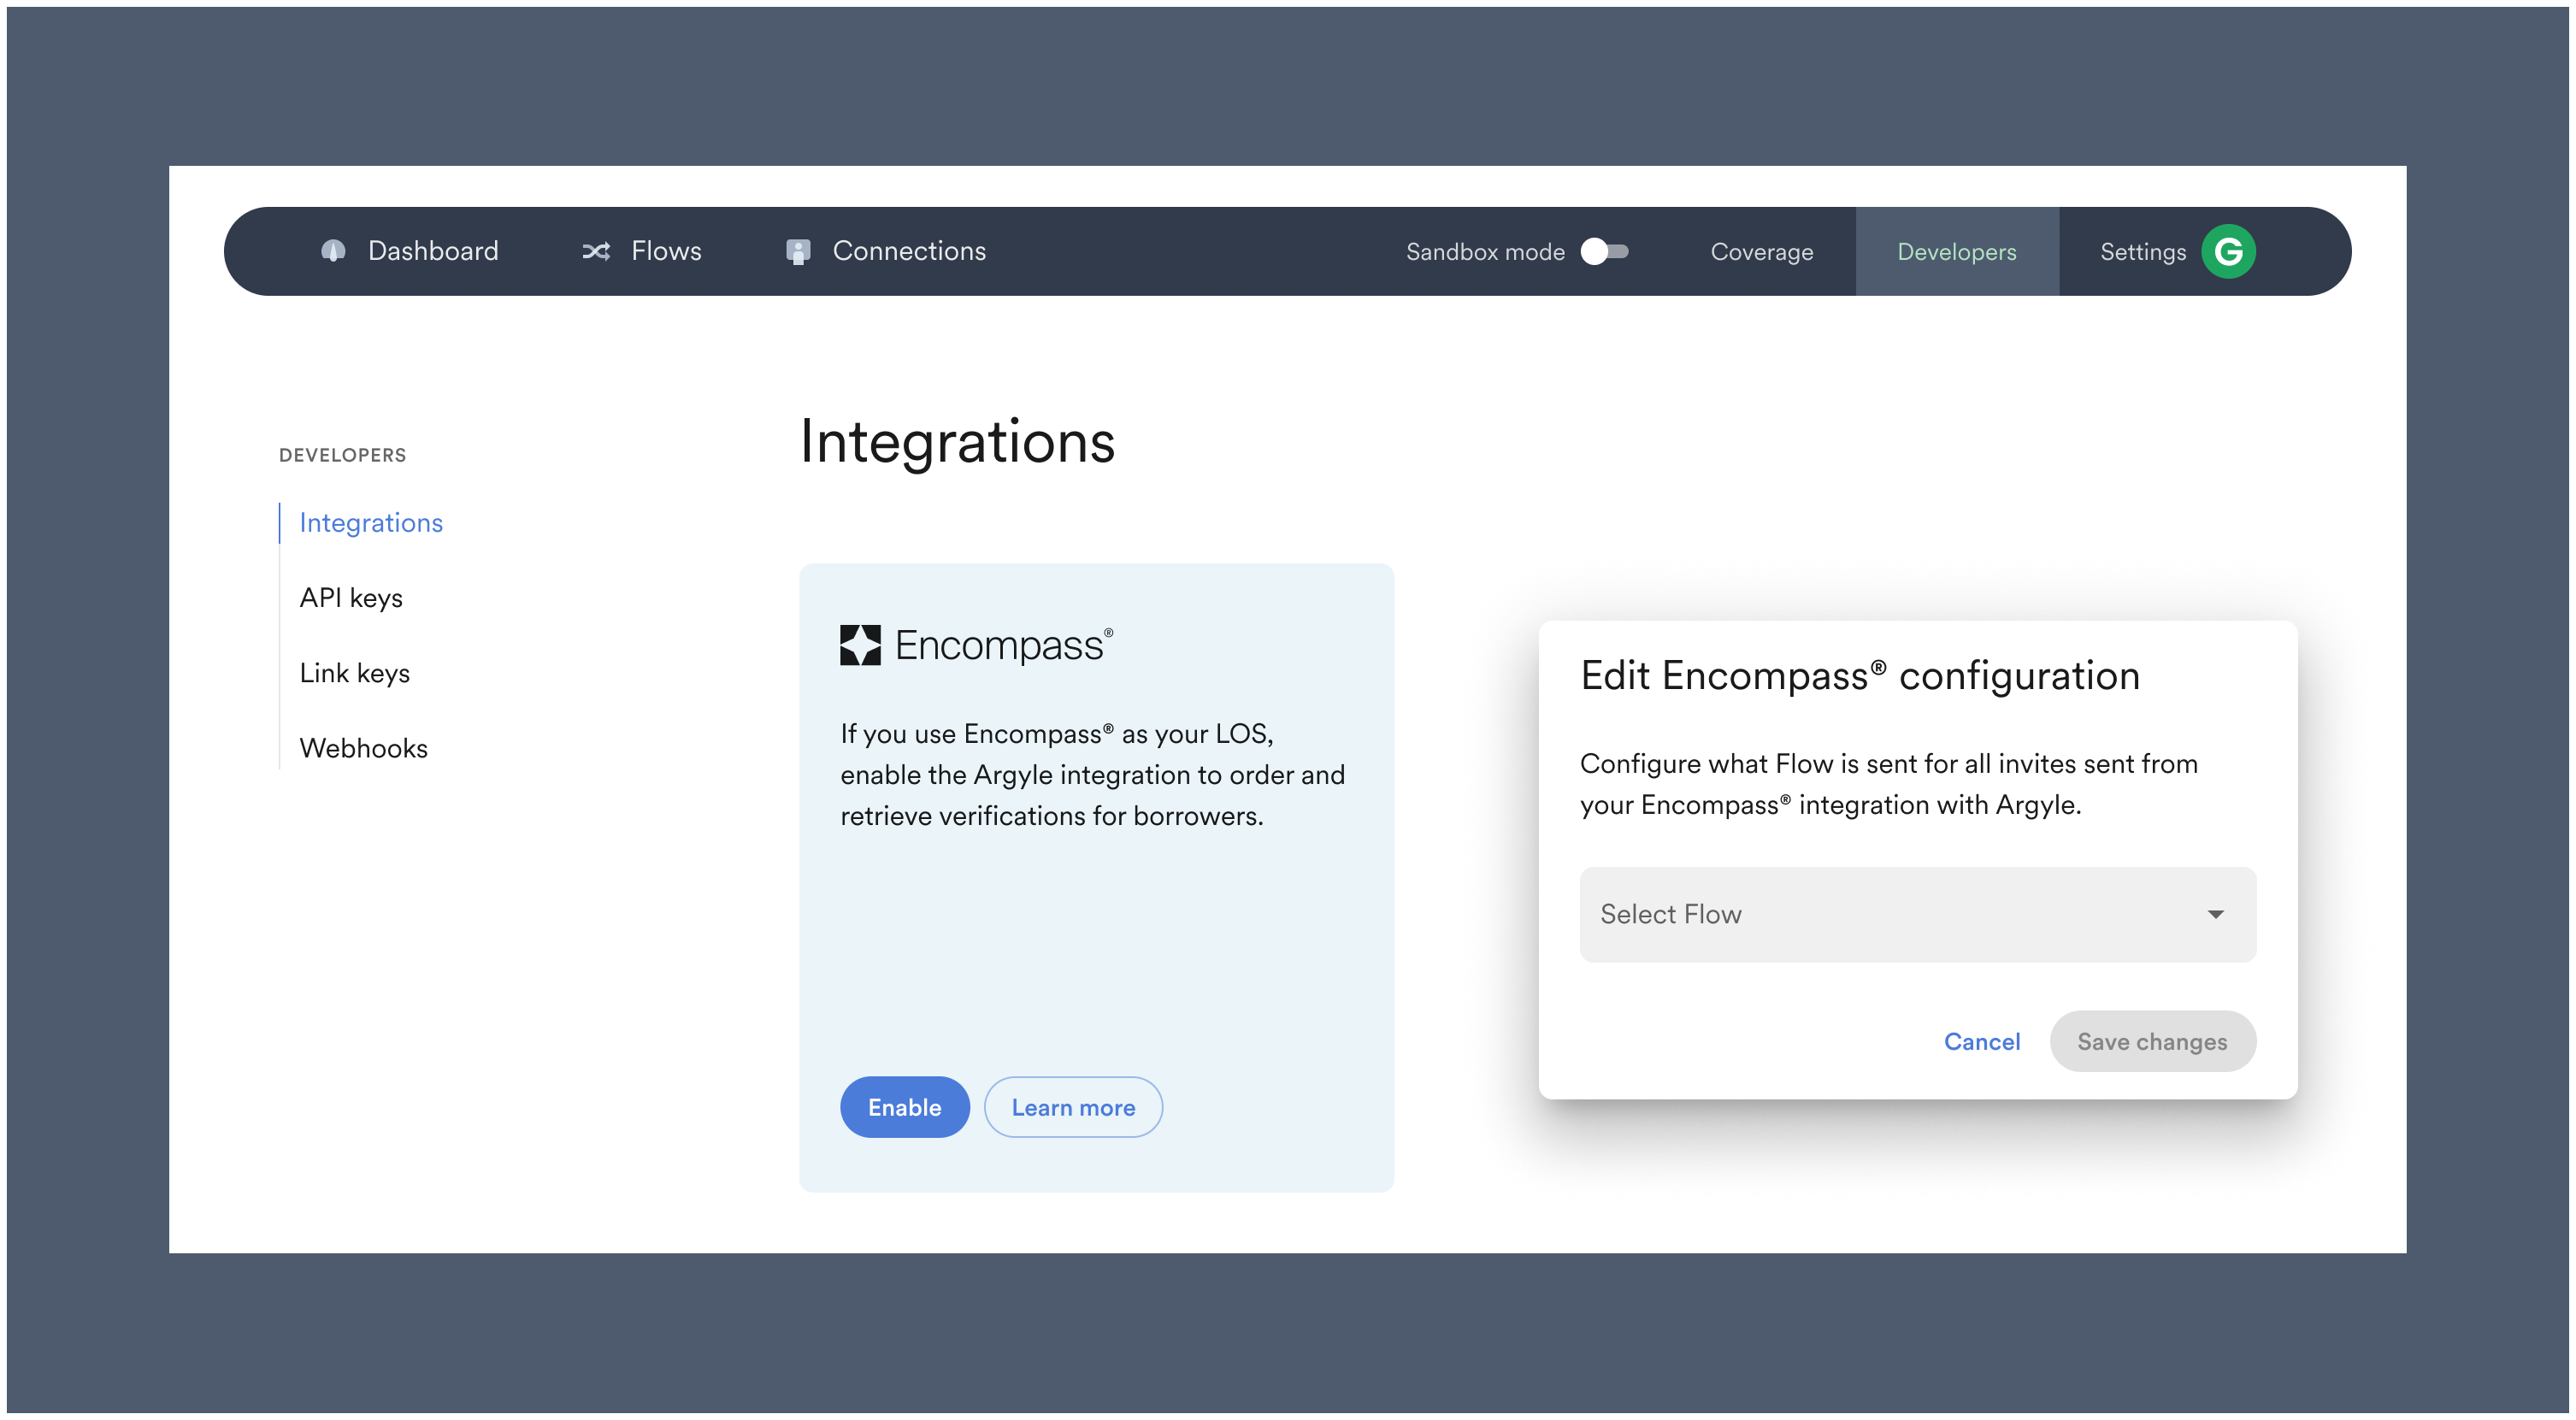
1. Enable the Encompass integration in the Integrations section of Argyle Console by clicking **Enable**.
2. (Optional) Selecting **Edit** after enabling the integration allows you to select an invitation [Flow](/console/flows/email-sms-templates#creating-emailsms-templates) (customized borrower experience) from a dropdown of your saved Flows.
### Enable Encompass in Argyle Console
Your Argyle Customer Success Manager may have already completed this step for you.
1. Enable the Encompass integration in the Integrations section of Argyle Console by clicking **Enable**.
2. (Optional) Selecting **Edit** after enabling the integration allows you to select an invitation [Flow](/console/flows/email-sms-templates#creating-emailsms-templates) (customized borrower experience) from a dropdown of your saved Flows.
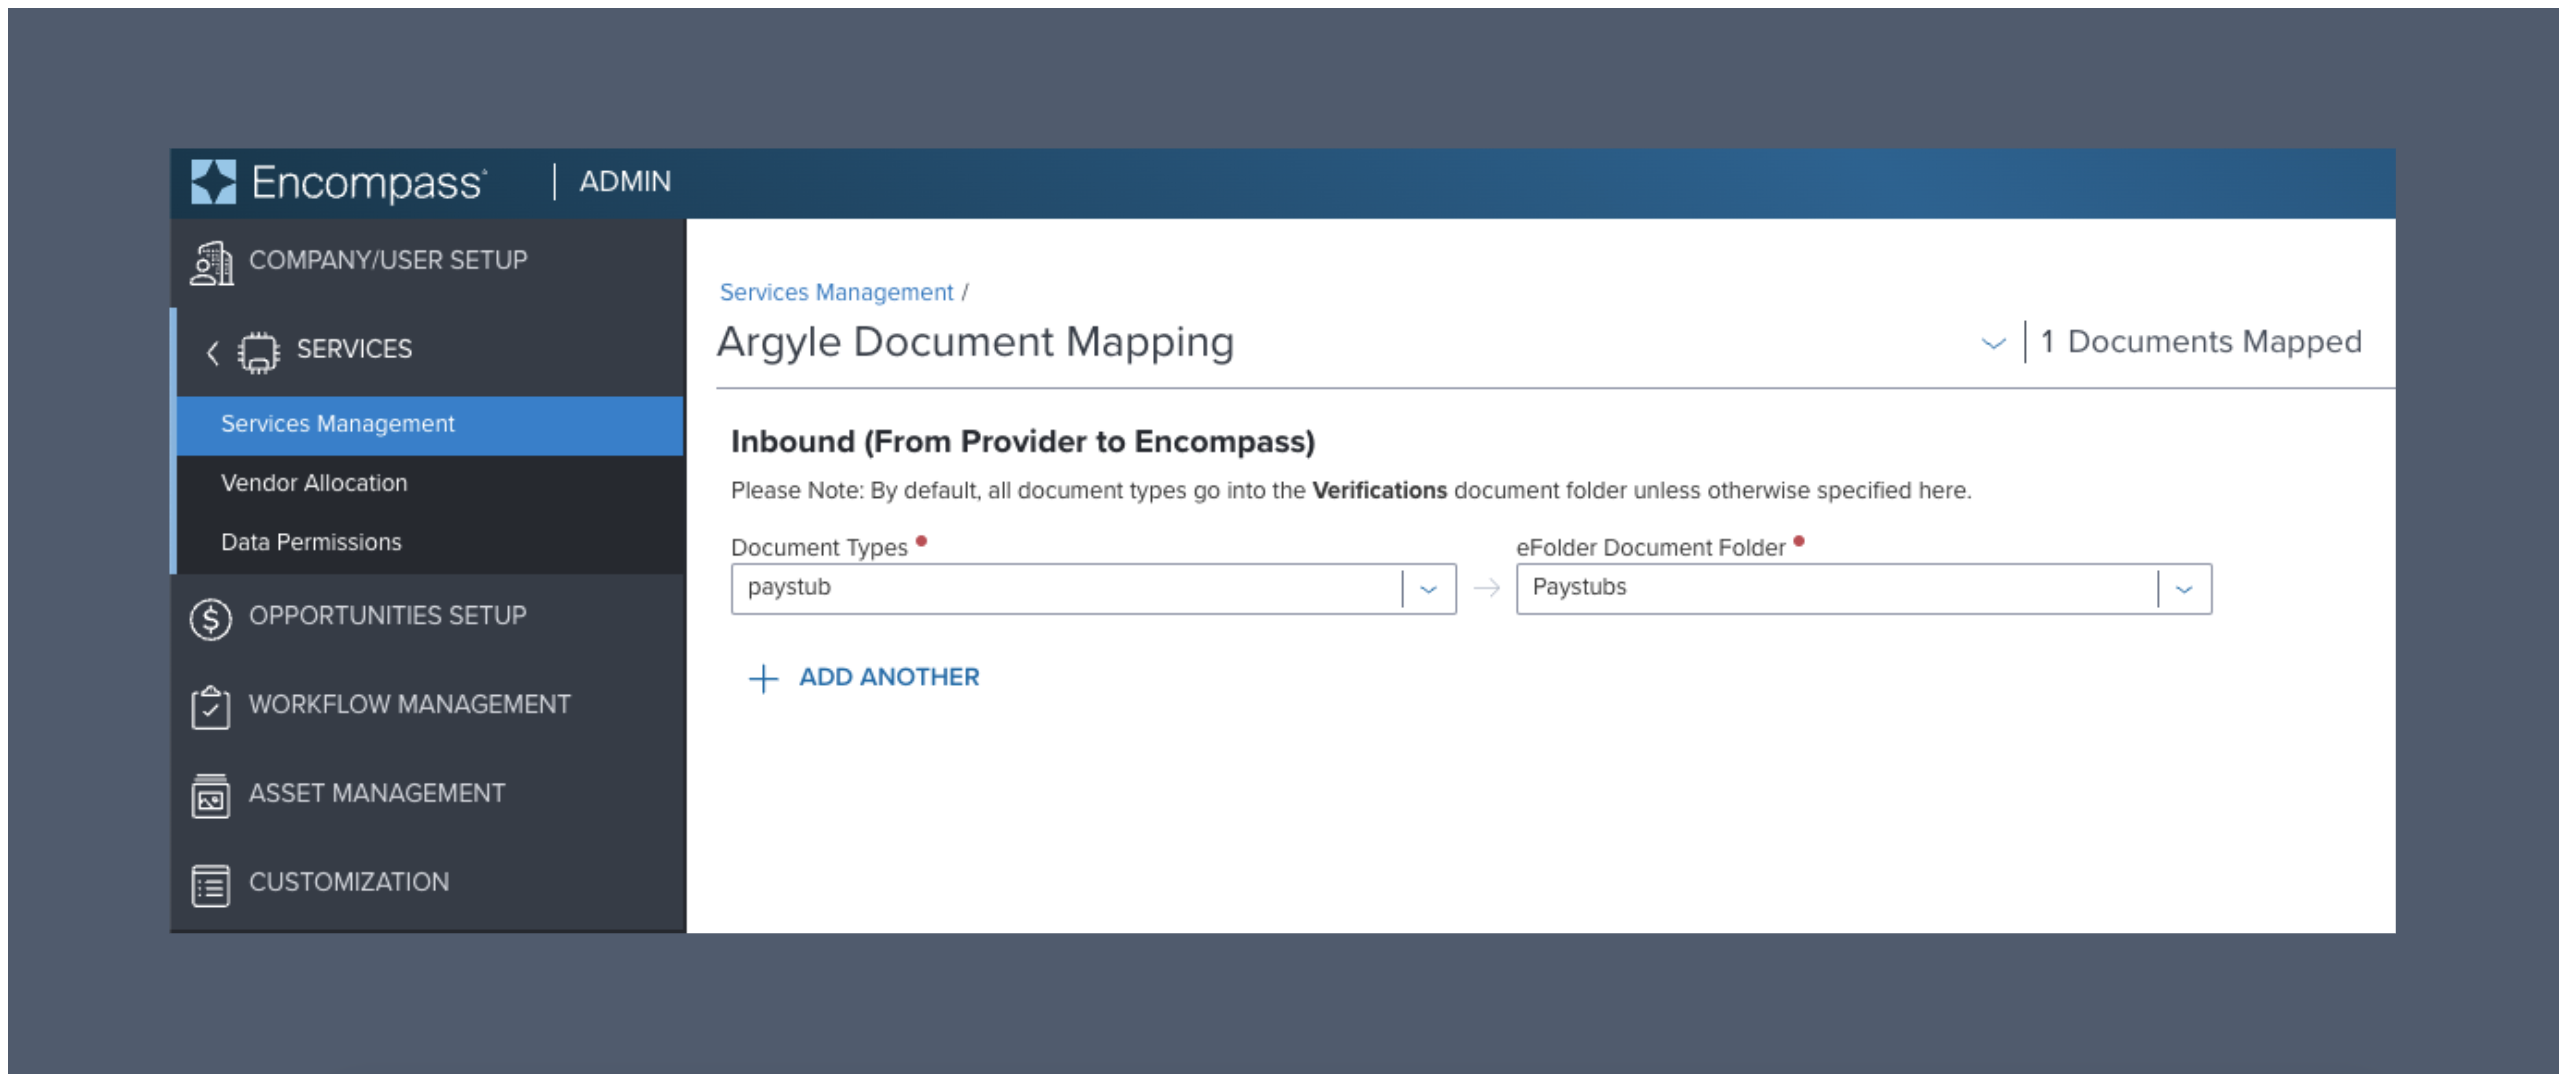
 ### Document mapping (optional)
If **Doc Mapping** is not set up, documents will be routed to a verifications eFolder by default.
1. Select **Doc Mapping** to customize which **eFolder** should automatically receive each **type** of Argyle verification report and retrieved payroll document.
### Document mapping (optional)
If **Doc Mapping** is not set up, documents will be routed to a verifications eFolder by default.
1. Select **Doc Mapping** to customize which **eFolder** should automatically receive each **type** of Argyle verification report and retrieved payroll document.
 ### Customize experience (optional)
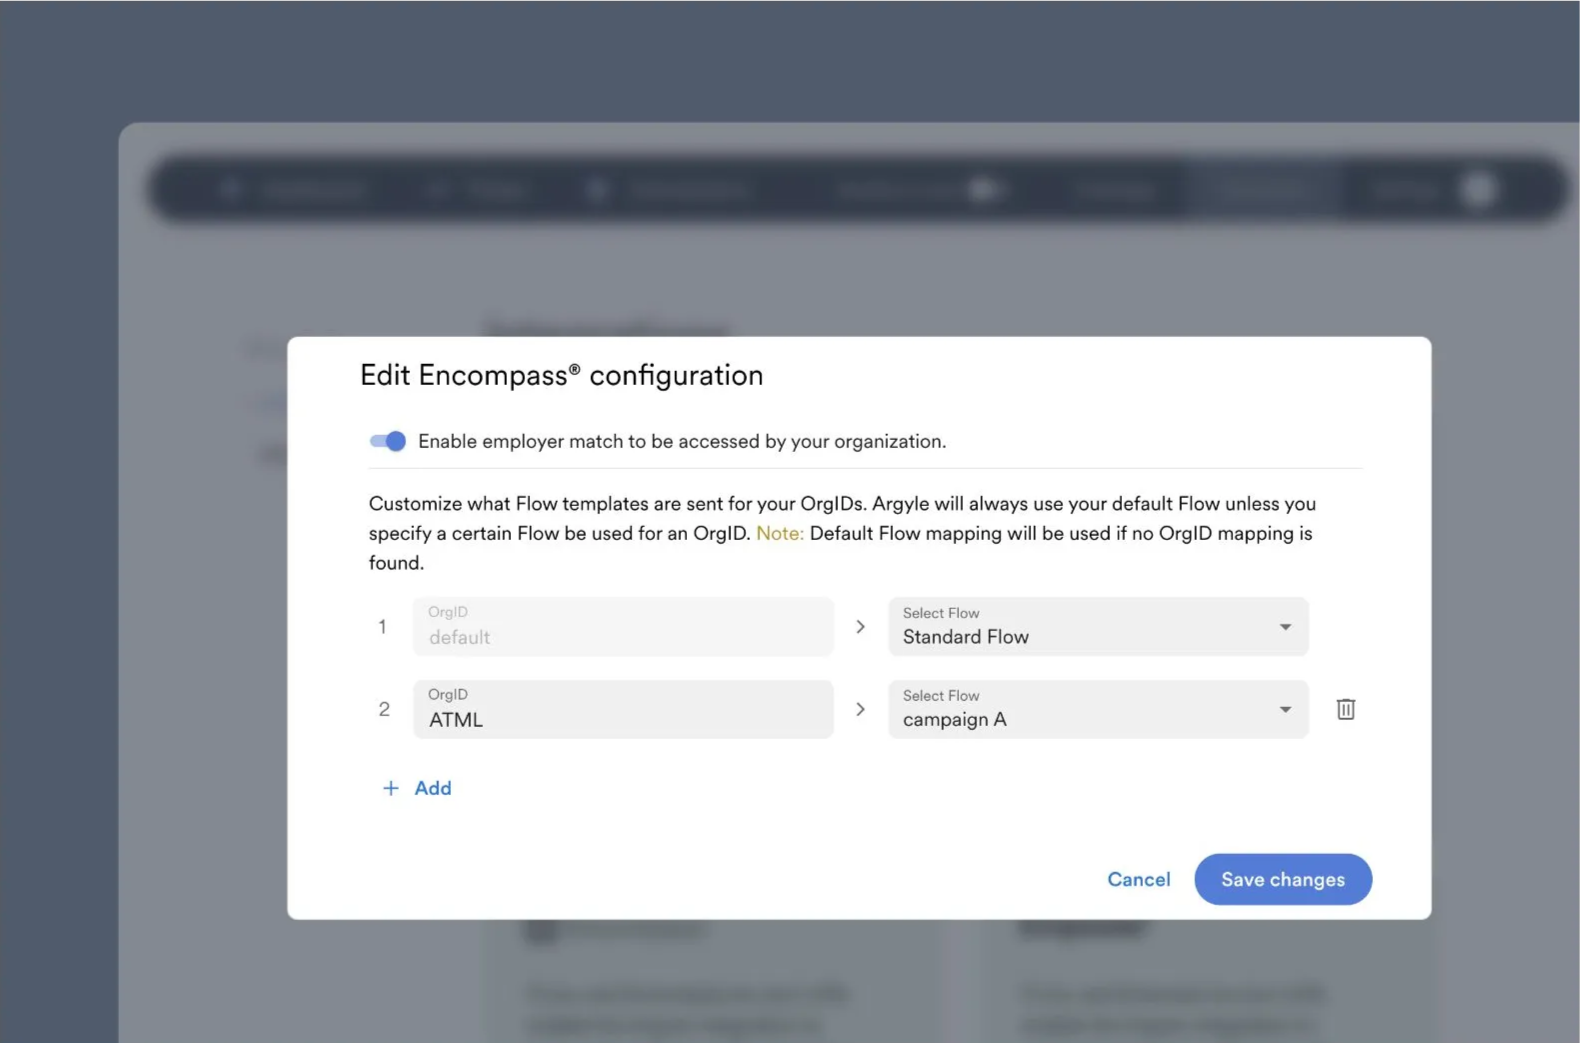
To assign different Link Flows to separate campaigns, branches, or doing-business-as (DBA) units, edit your Encompass configuration within the Integrations section of Console and assign Flows to specific OrgIDs.
* The OrgID associated with each loan file will determine which Link Flow is used.
* This allows you to have different branding for different branches, for example.
### Customize experience (optional)
To assign different Link Flows to separate campaigns, branches, or doing-business-as (DBA) units, edit your Encompass configuration within the Integrations section of Console and assign Flows to specific OrgIDs.
* The OrgID associated with each loan file will determine which Link Flow is used.
* This allows you to have different branding for different branches, for example.
 Your Argyle customer success manager can also help provide the following asset verification customizations:
* Your company name and logo shown to borrowers can be adjusted.
* Which financial institutions are shown by default on the home screen.
* After the borrower connects a financial institution, they will be shown a list of detected accounts (for example checking, savings, or 401k accounts).
- 457
- 529
- 401a
- 401k
- 403b
- Brokerage Account
- CD
- Checking
- Credit Card
- Crypto Currency
- Education Savings
- Employee Stock Purchase Plan
- Health Savings Account
- Investment
- Investment Tax Deferred
- IRA
- Keogh
- Line of Credit
- Loan
- Money Market
- Mortgage
- Non Taxable Brokerage Account
- Pension
- Profit Sharing Plan
- Rollover
- Roth
- Roth 401k
- Savings
- SEP IRA
- Simple IRA
- Student Loan
- Thrift Savings Plan
- UGMA
- Unknown
- UTMA
- Variable Annuity
## Automated Ordering
Automate Argyle verification orders in Encompass® based on workflow rules and loan readiness conditions.
### Admin login
1. Log in to Encompass Web® with an **administrator account** and select **Admin** within the applications dropdown.
2. Select **Automated Ordering Templates** within the **SERVICES** dropdown.
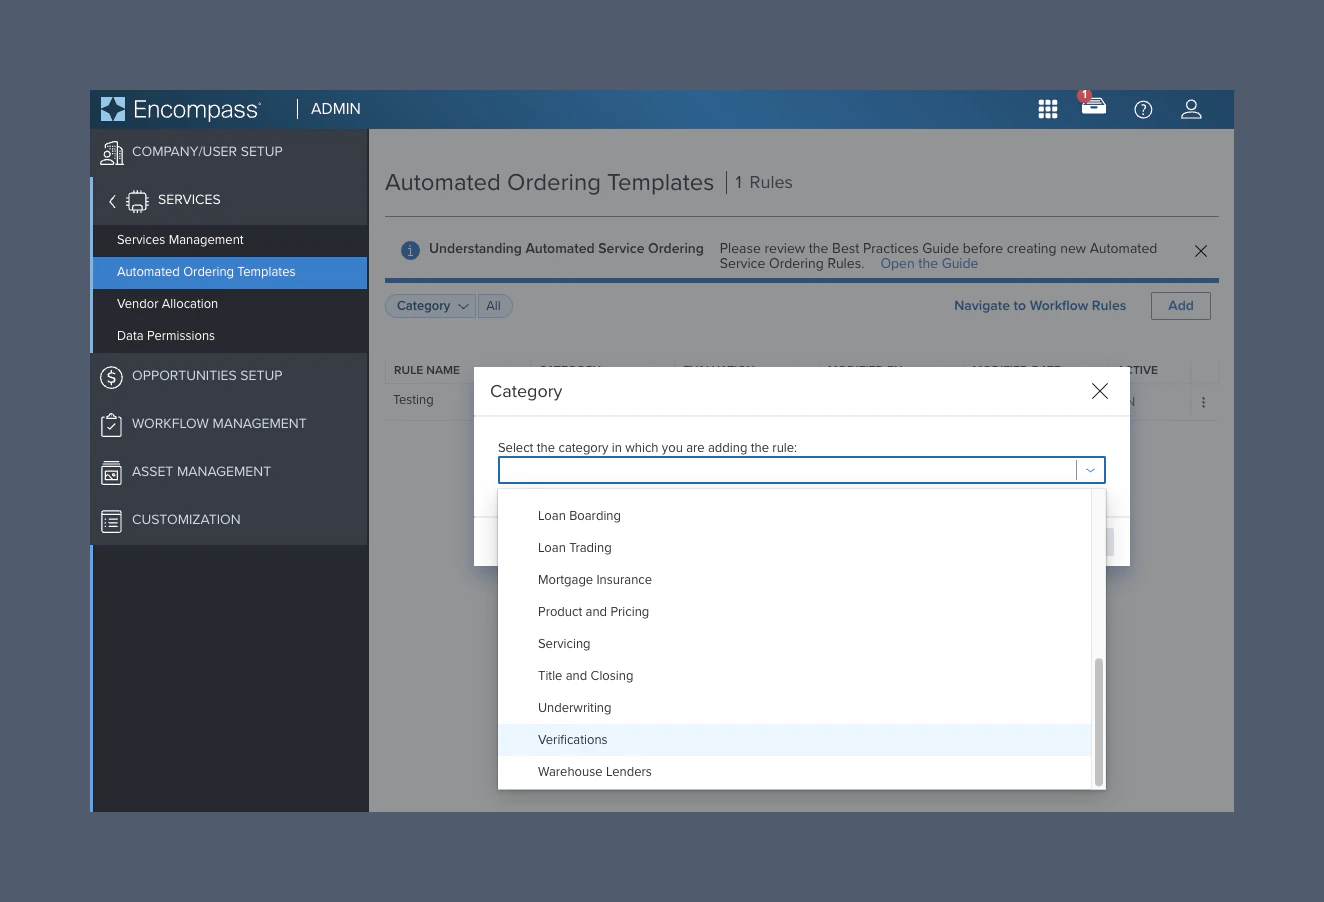
3. Select **Add**, then select **Verifications** in the dropdown.
Your Argyle customer success manager can also help provide the following asset verification customizations:
* Your company name and logo shown to borrowers can be adjusted.
* Which financial institutions are shown by default on the home screen.
* After the borrower connects a financial institution, they will be shown a list of detected accounts (for example checking, savings, or 401k accounts).
- 457
- 529
- 401a
- 401k
- 403b
- Brokerage Account
- CD
- Checking
- Credit Card
- Crypto Currency
- Education Savings
- Employee Stock Purchase Plan
- Health Savings Account
- Investment
- Investment Tax Deferred
- IRA
- Keogh
- Line of Credit
- Loan
- Money Market
- Mortgage
- Non Taxable Brokerage Account
- Pension
- Profit Sharing Plan
- Rollover
- Roth
- Roth 401k
- Savings
- SEP IRA
- Simple IRA
- Student Loan
- Thrift Savings Plan
- UGMA
- Unknown
- UTMA
- Variable Annuity
## Automated Ordering
Automate Argyle verification orders in Encompass® based on workflow rules and loan readiness conditions.
### Admin login
1. Log in to Encompass Web® with an **administrator account** and select **Admin** within the applications dropdown.
2. Select **Automated Ordering Templates** within the **SERVICES** dropdown.
3. Select **Add**, then select **Verifications** in the dropdown.
 ### Add the Argyle service order
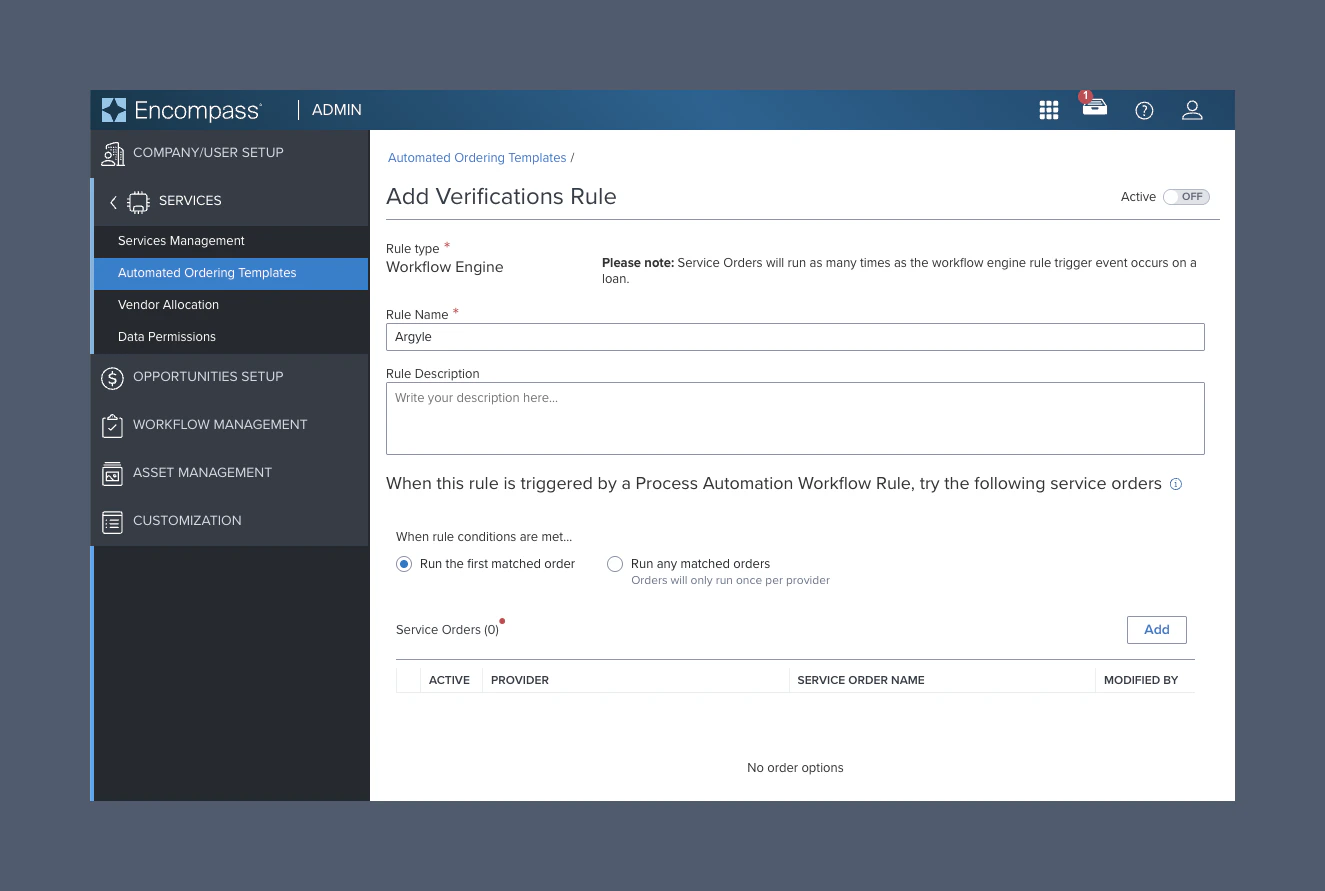
1. Select **Add** in the **Service Orders** section.
2. Select **Argyle** as the **Provider** then click **Create**.
### Add the Argyle service order
1. Select **Add** in the **Service Orders** section.
2. Select **Argyle** as the **Provider** then click **Create**.
 ### Configure automated conditions
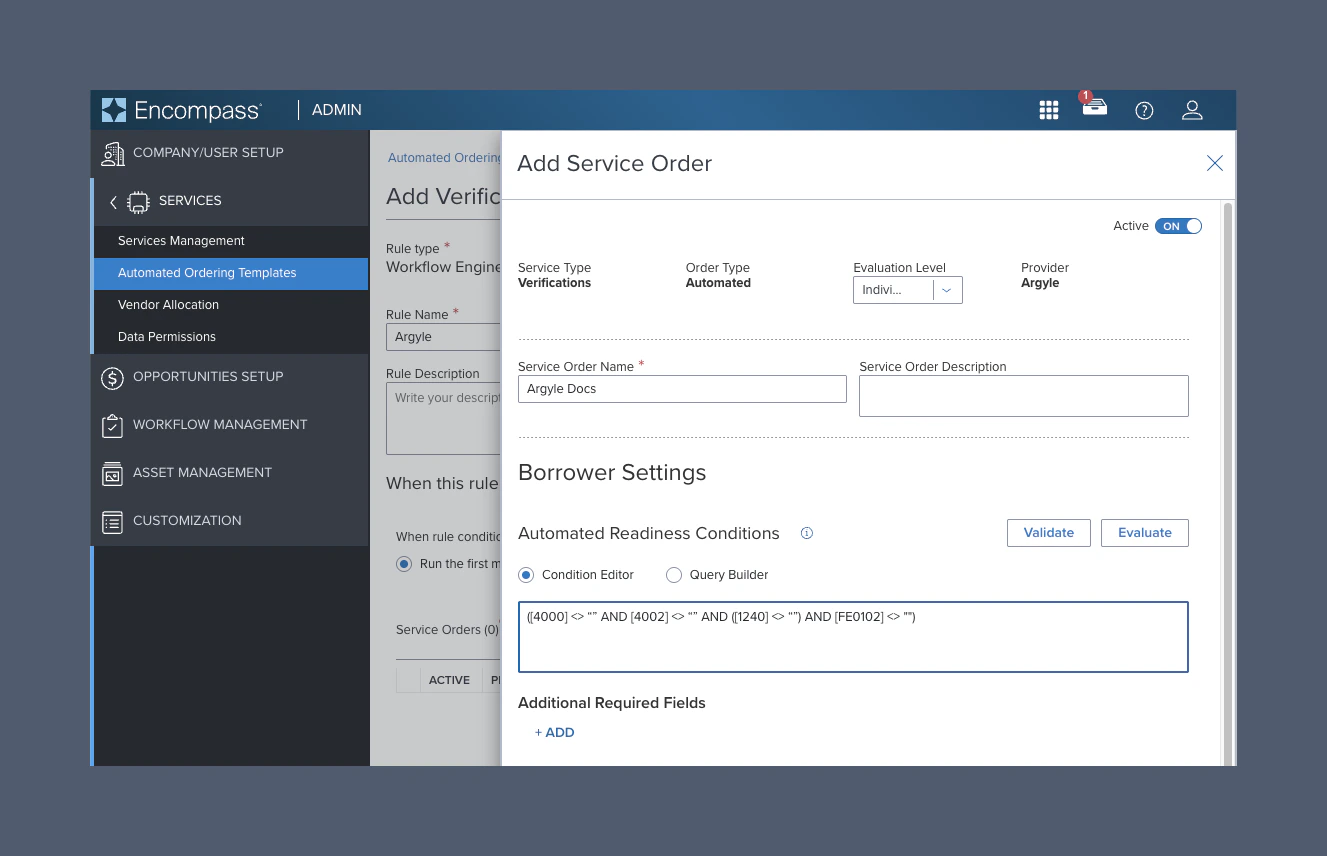
1. Make sure the **Active** toggle is set to **ON**.
2. Select **Individual Level** as the **Evaluation Level**.
3. Provide a **Service Order Name**.
4. The following Automated Readiness Conditions check for the presence of first name, last name, email, and employer in the loan application.
5. Under **Borrower Settings**, make sure **Condition Editor** is selected and add the following Automated Readiness Conditions:
```text theme={}
([4000] <> "" AND [4002] <> "" AND ([1240] <> "") AND [FE0102] <> "")
```
6. Under **Co-Borrower Settings**, make sure **Condition Editor** is selected and add the following Automated Readiness Conditions:
```text theme={}
([4004] <> "" AND [4006] <> "" AND ([1268] <> "") AND [FE0202] <> "")
```
### Configure automated conditions
1. Make sure the **Active** toggle is set to **ON**.
2. Select **Individual Level** as the **Evaluation Level**.
3. Provide a **Service Order Name**.
4. The following Automated Readiness Conditions check for the presence of first name, last name, email, and employer in the loan application.
5. Under **Borrower Settings**, make sure **Condition Editor** is selected and add the following Automated Readiness Conditions:
```text theme={}
([4000] <> "" AND [4002] <> "" AND ([1240] <> "") AND [FE0102] <> "")
```
6. Under **Co-Borrower Settings**, make sure **Condition Editor** is selected and add the following Automated Readiness Conditions:
```text theme={}
([4004] <> "" AND [4006] <> "" AND ([1268] <> "") AND [FE0202] <> "")
```
 ### Add automated options
1. In either **Borrower Settings** or **Co-Borrower Settings**, select **Add** next to **Automated Options**.
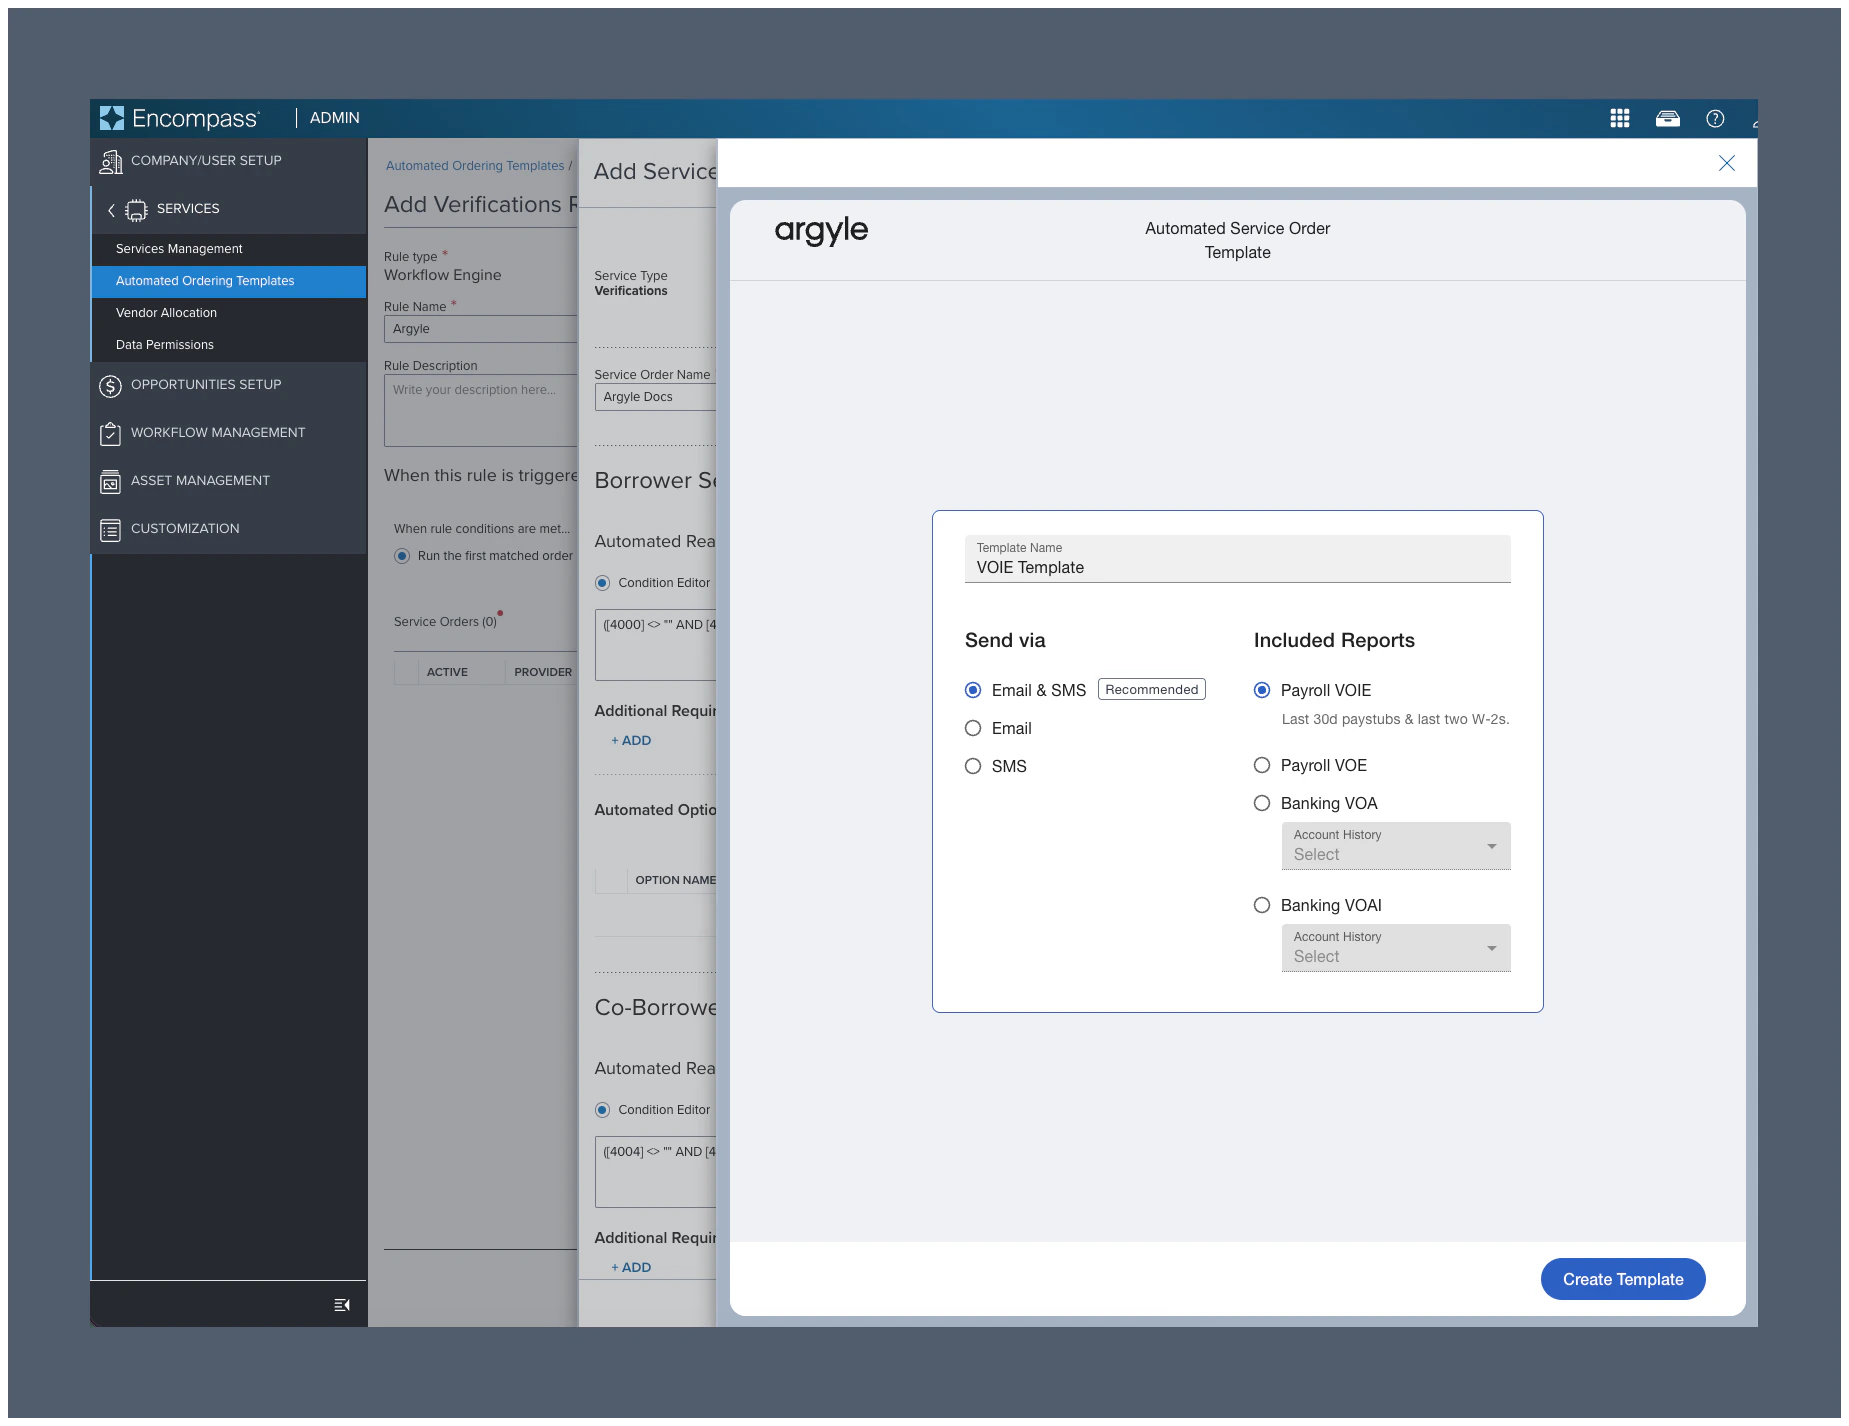
2. When the **Automated Service Order Template** window opens, provide a **Template Name**, choose how borrowers should be contacted, and your desired report type. Then click **Create Template** and exit.
* Each **Automated Service Order Template** supports one verification order. To automate both Payroll and Banking verifications for example, create a separate template for each report type.
* If both Payroll and Banking orders are triggered within a short window, Argyle sends one combined borrower invite email.
### Add automated options
1. In either **Borrower Settings** or **Co-Borrower Settings**, select **Add** next to **Automated Options**.
2. When the **Automated Service Order Template** window opens, provide a **Template Name**, choose how borrowers should be contacted, and your desired report type. Then click **Create Template** and exit.
* Each **Automated Service Order Template** supports one verification order. To automate both Payroll and Banking verifications for example, create a separate template for each report type.
* If both Payroll and Banking orders are triggered within a short window, Argyle sends one combined borrower invite email.
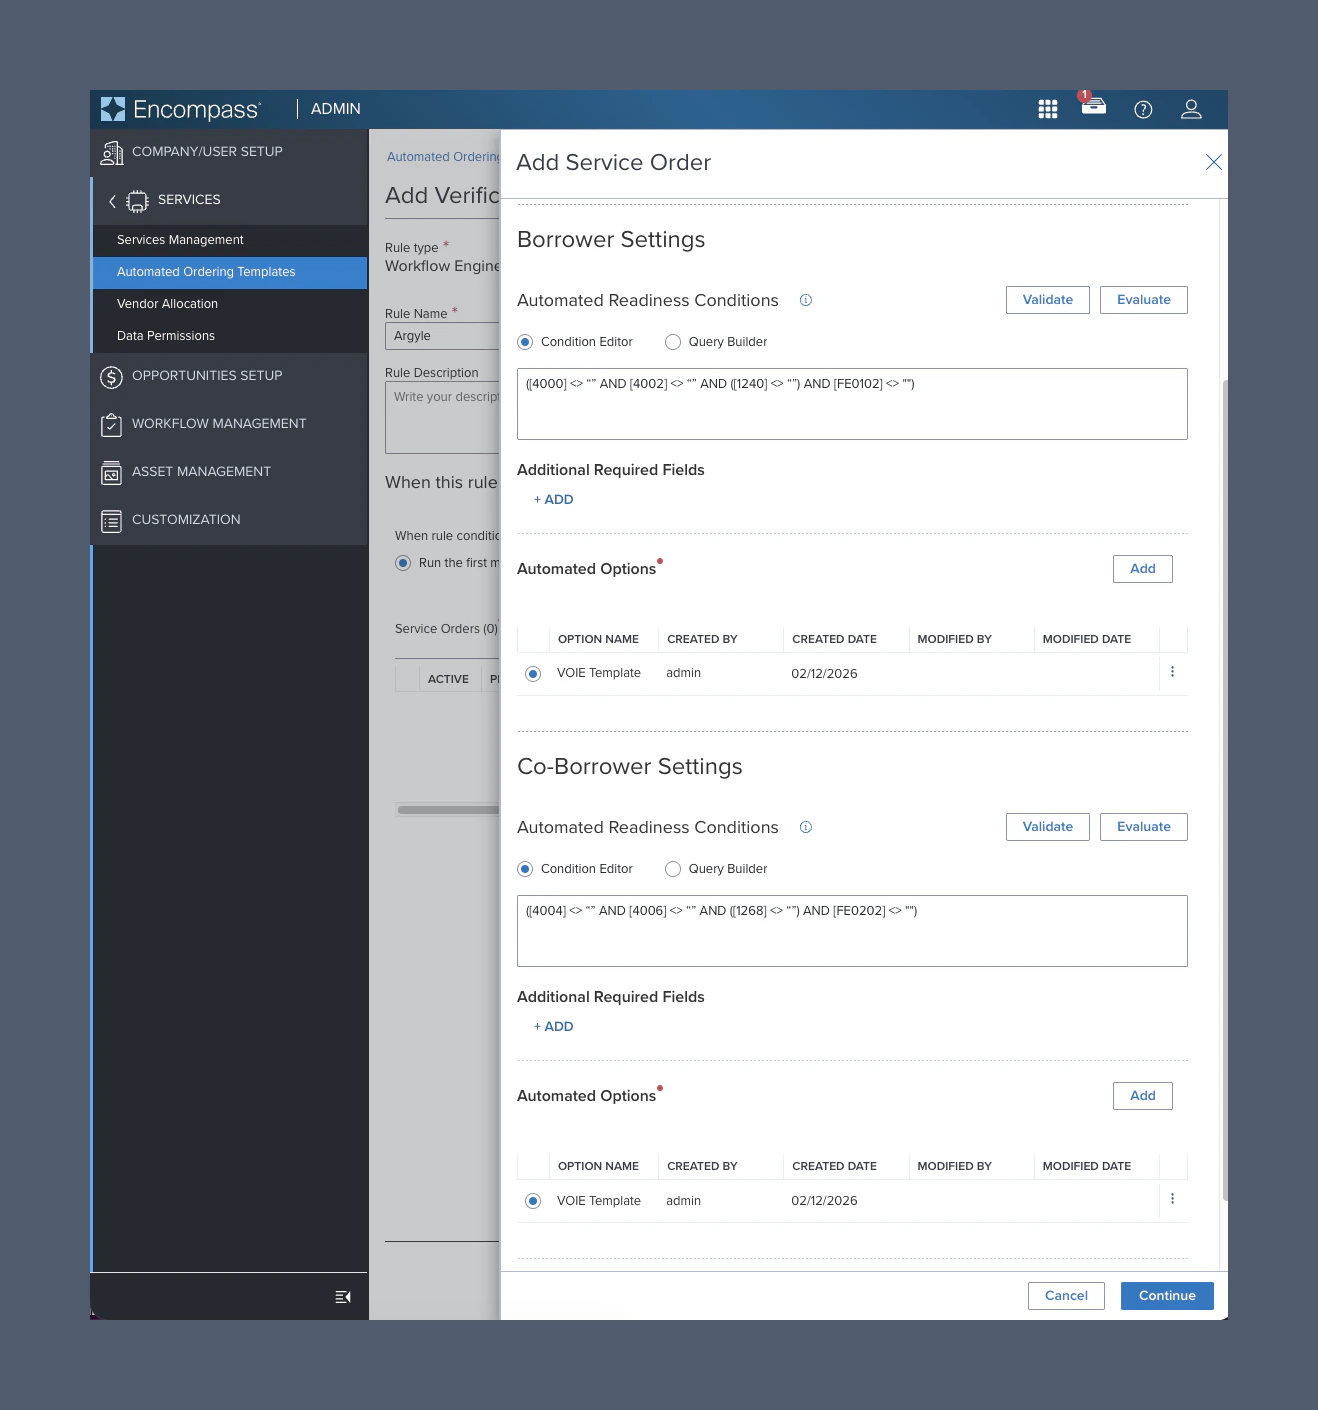
 3. The template will appear in both **Borrower Settings** and **Co-Borrower Settings**. Enable the radio button next to the template you created for both borrower and co-borrower.
4. Click **Continue**.
3. The template will appear in both **Borrower Settings** and **Co-Borrower Settings**. Enable the radio button next to the template you created for both borrower and co-borrower.
4. Click **Continue**.
 ### Save the service order
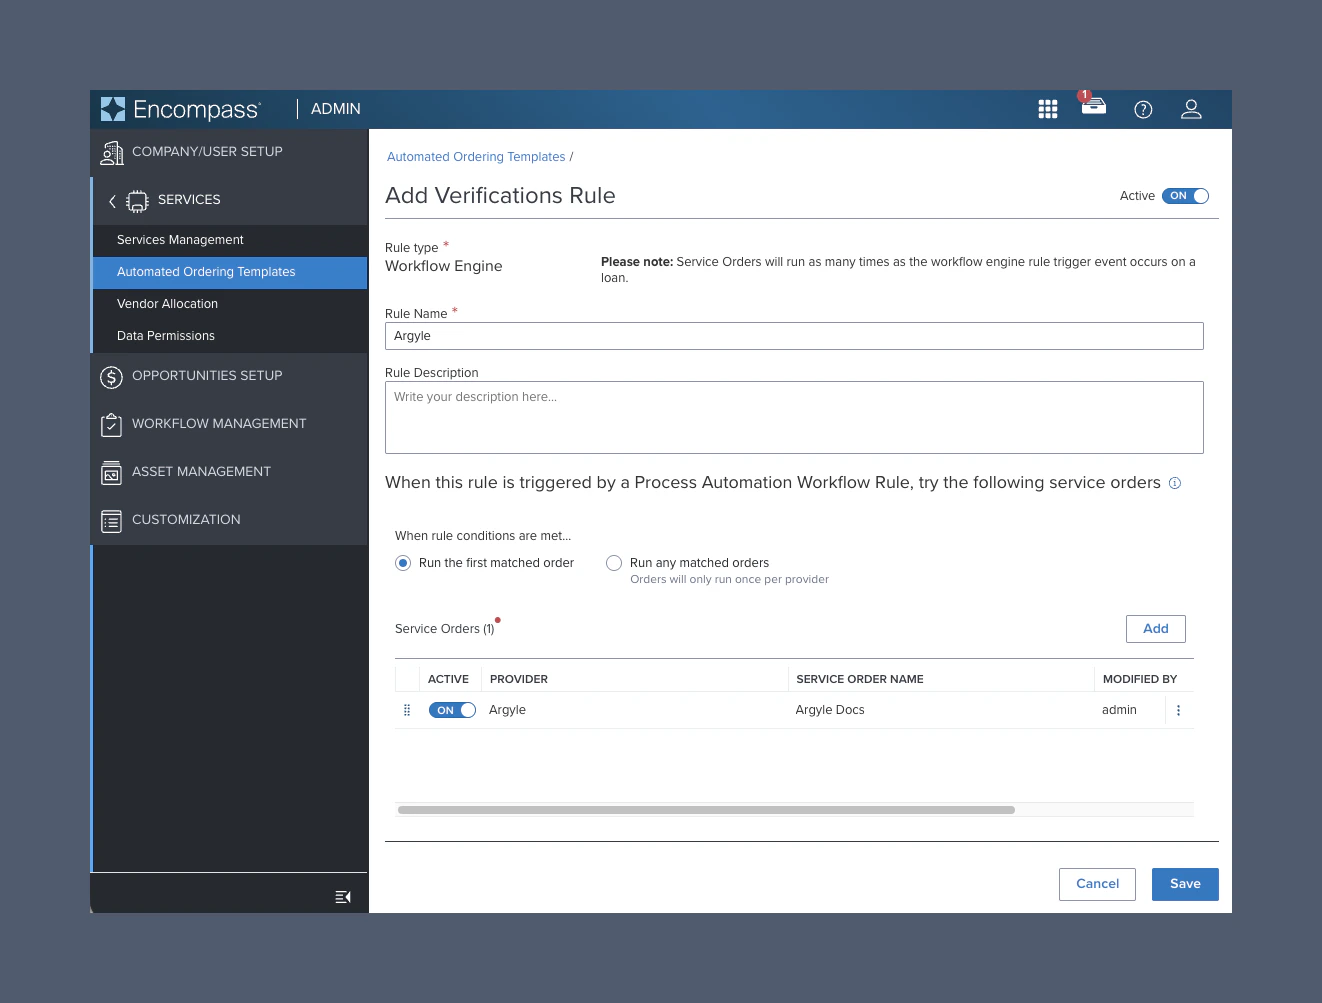
1. The order you created should now appear under **Service Orders**.
2. Make sure both **ACTIVE** toggles are set to **ON**, then click **Save**.
### Save the service order
1. The order you created should now appear under **Service Orders**.
2. Make sure both **ACTIVE** toggles are set to **ON**, then click **Save**.
 ### Create the workflow rule
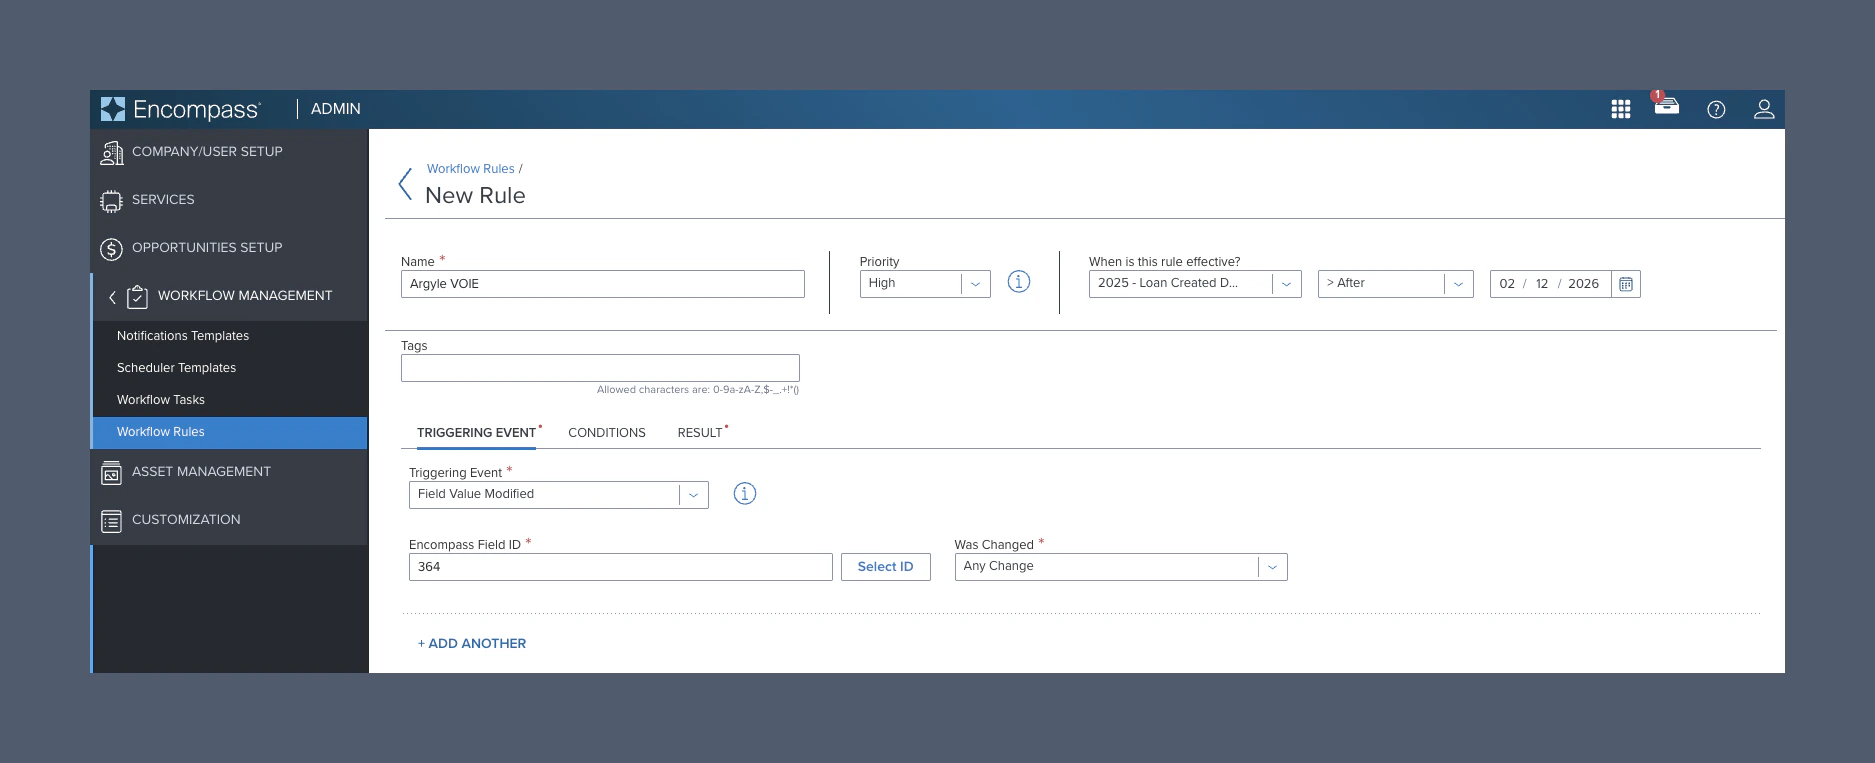
1. Select **Workflow Rules** within the **WORKFLOW MANAGEMENT** dropdown.
2. Select **New Rule**.
3. Provide a rule **Name**. Then adjust **Priority** and **Rule Effective** requirements as needed.
4. Select a **Triggering Event** in the **TRIGGERING EVENT** tab and complete the required fields.
### Create the workflow rule
1. Select **Workflow Rules** within the **WORKFLOW MANAGEMENT** dropdown.
2. Select **New Rule**.
3. Provide a rule **Name**. Then adjust **Priority** and **Rule Effective** requirements as needed.
4. Select a **Triggering Event** in the **TRIGGERING EVENT** tab and complete the required fields.
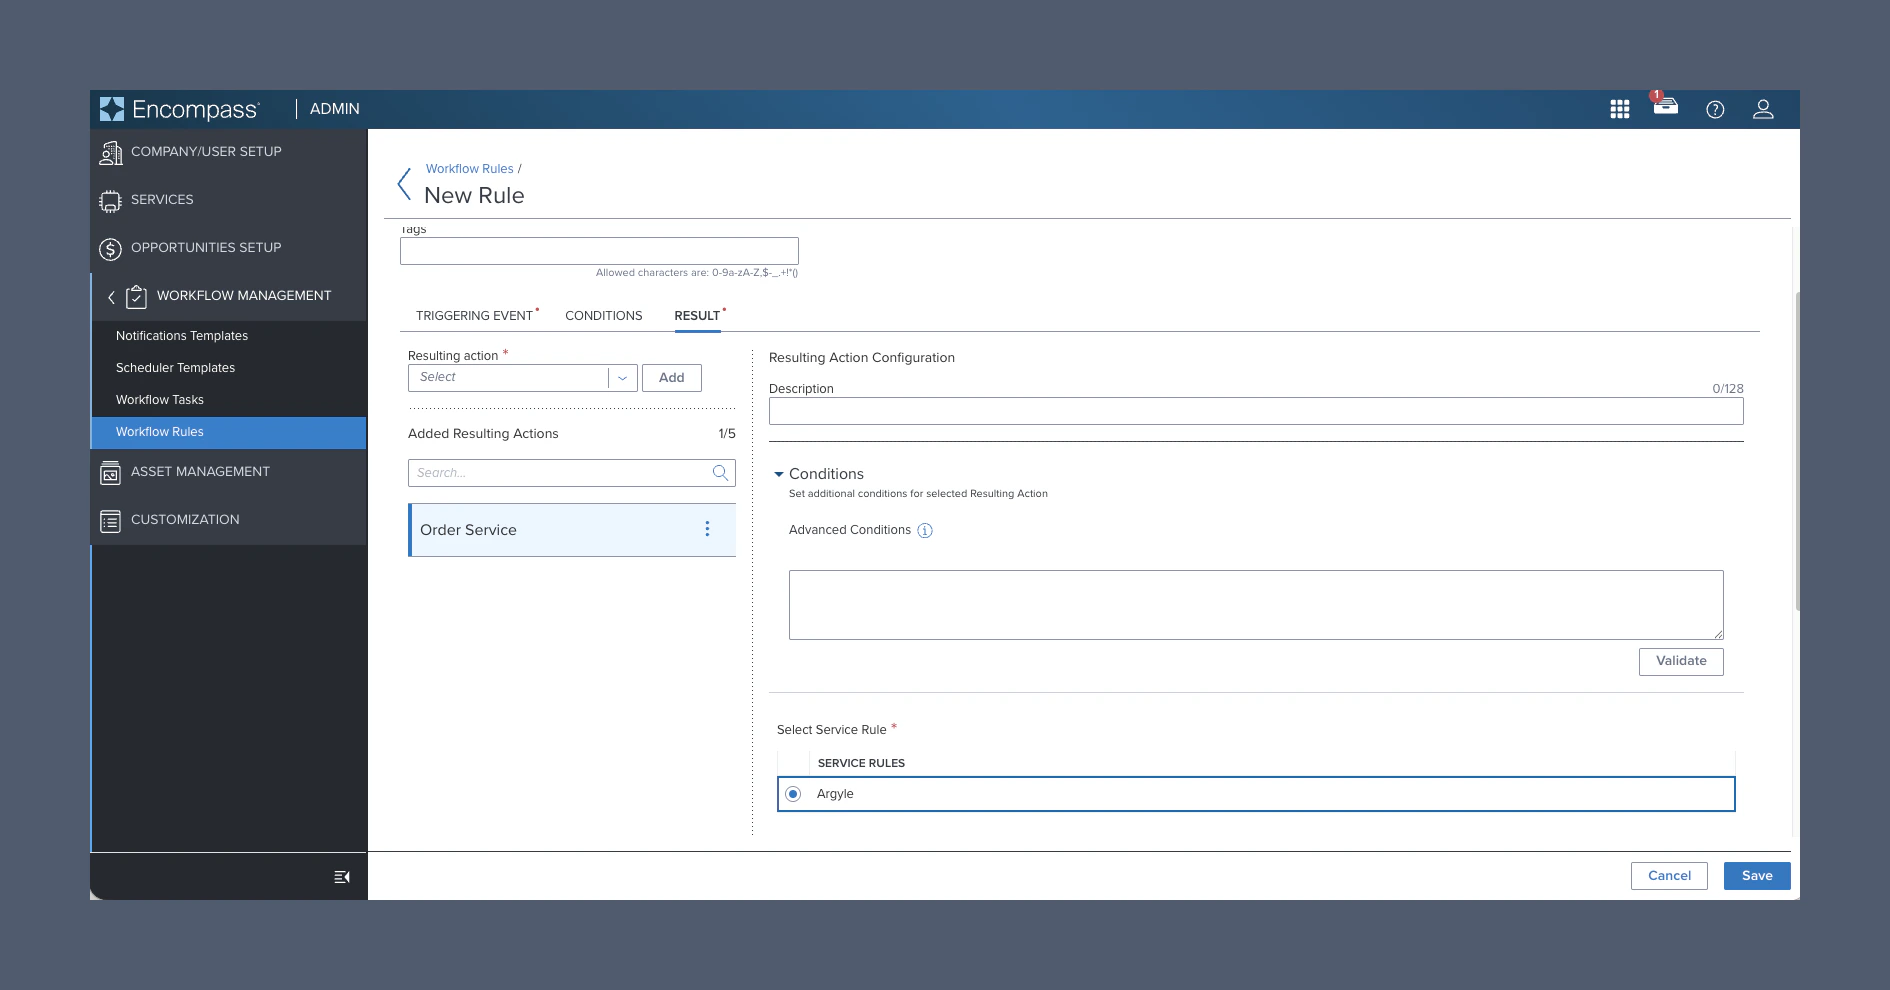
 5. Select the **RESULT** tab, then choose **Order Service** as the resulting action. Then click **Add**.
6. Under **Select Service Rule**, choose the service rule you created. Then click **Save**.
5. Select the **RESULT** tab, then choose **Order Service** as the resulting action. Then click **Add**.
6. Under **Select Service Rule**, choose the service rule you created. Then click **Save**.
 7. Make sure the **ACTIVE** toggle is **ON** for the saved workflow rule.
*For further assistance, please reach out to [support@argyle.com](mailto:support@argyle.com) or your Customer Success Manager.*