> ## Documentation Index
> Fetch the complete documentation index at: https://docs.argyle.com/llms.txt
> Use this file to discover all available pages before exploring further.
# Encompass - Manual Order Setup
> Setting up the Argyle verification service within the Encompass® by ICE Mortgage Technology® platform.
## Income & Employment
### Admin login
1. Log in to Encompass Web® with an **administrator account** and select **Admin** within the applications dropdown.
### Add the Argyle service
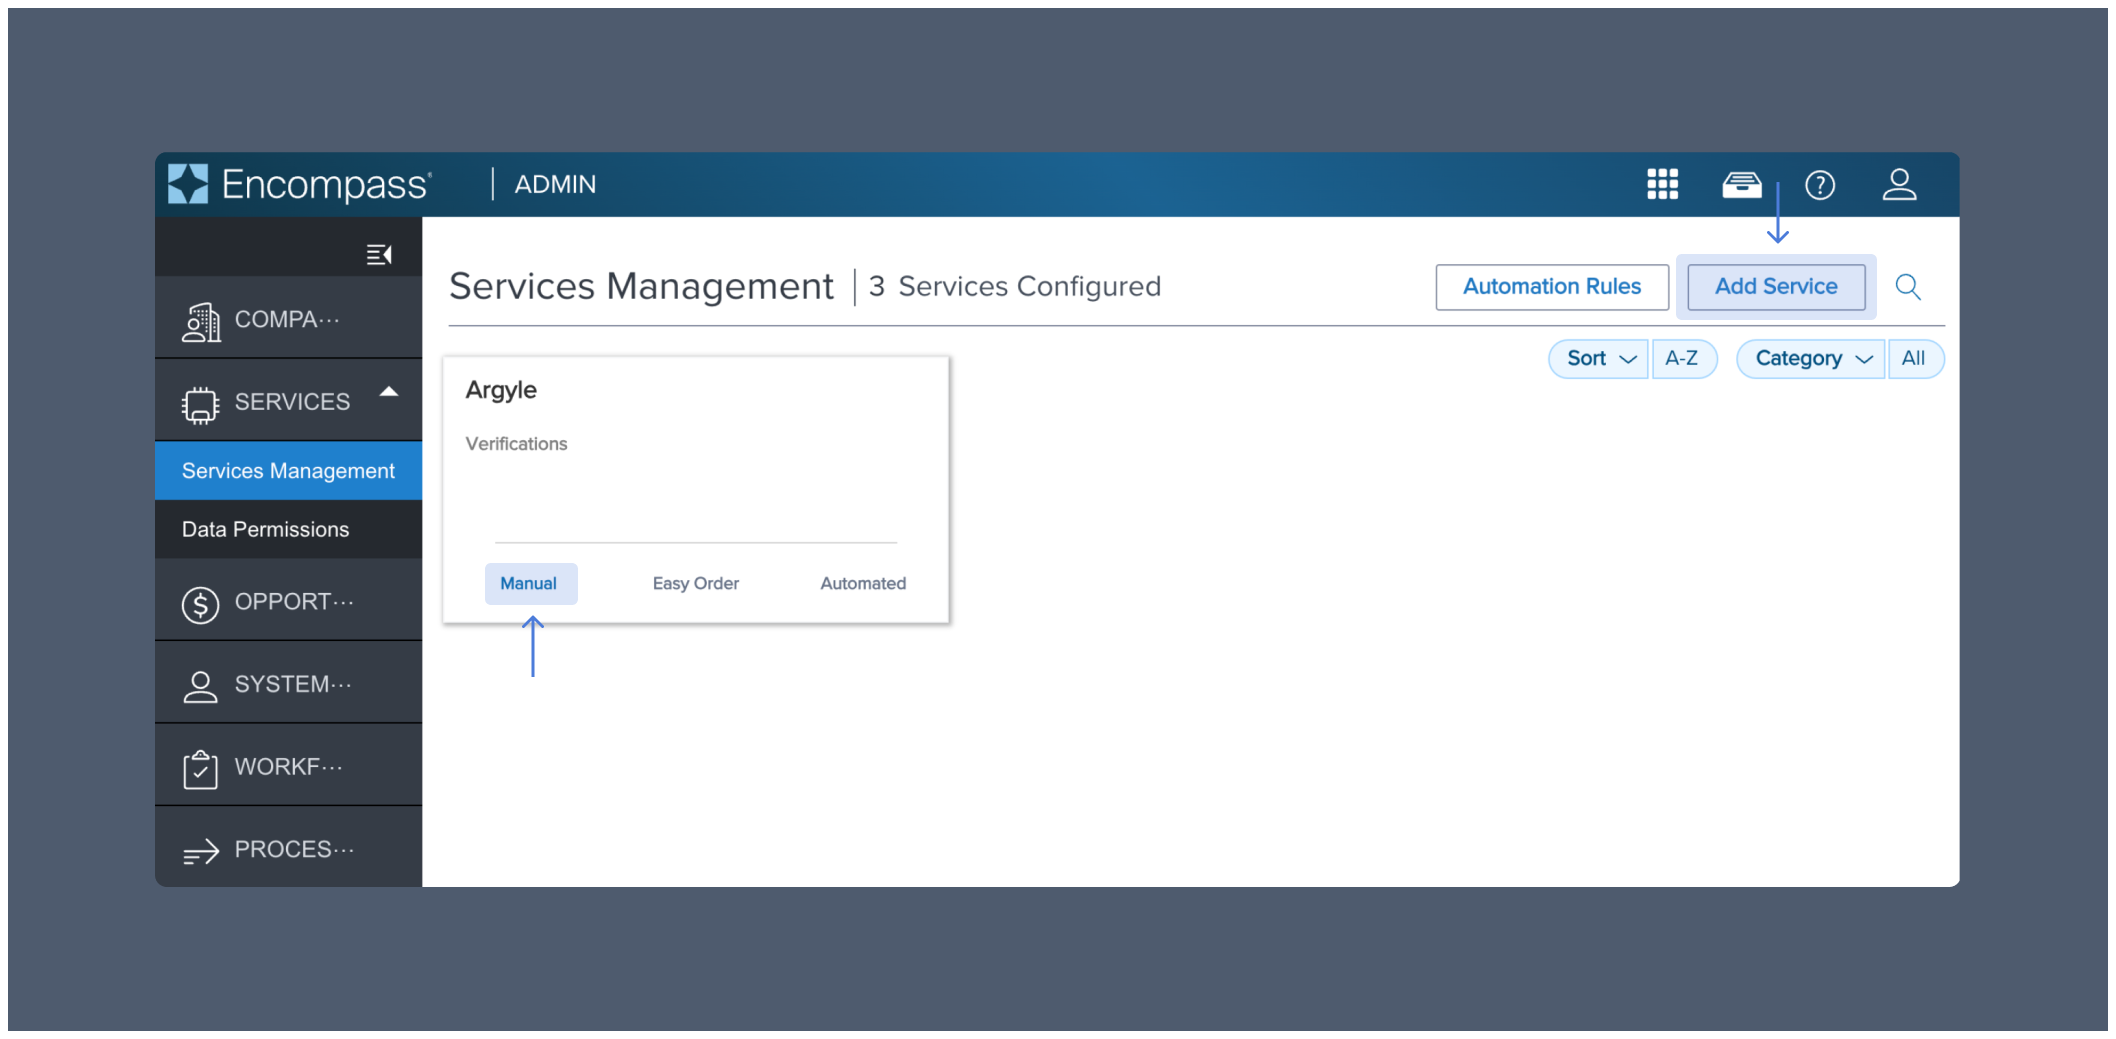
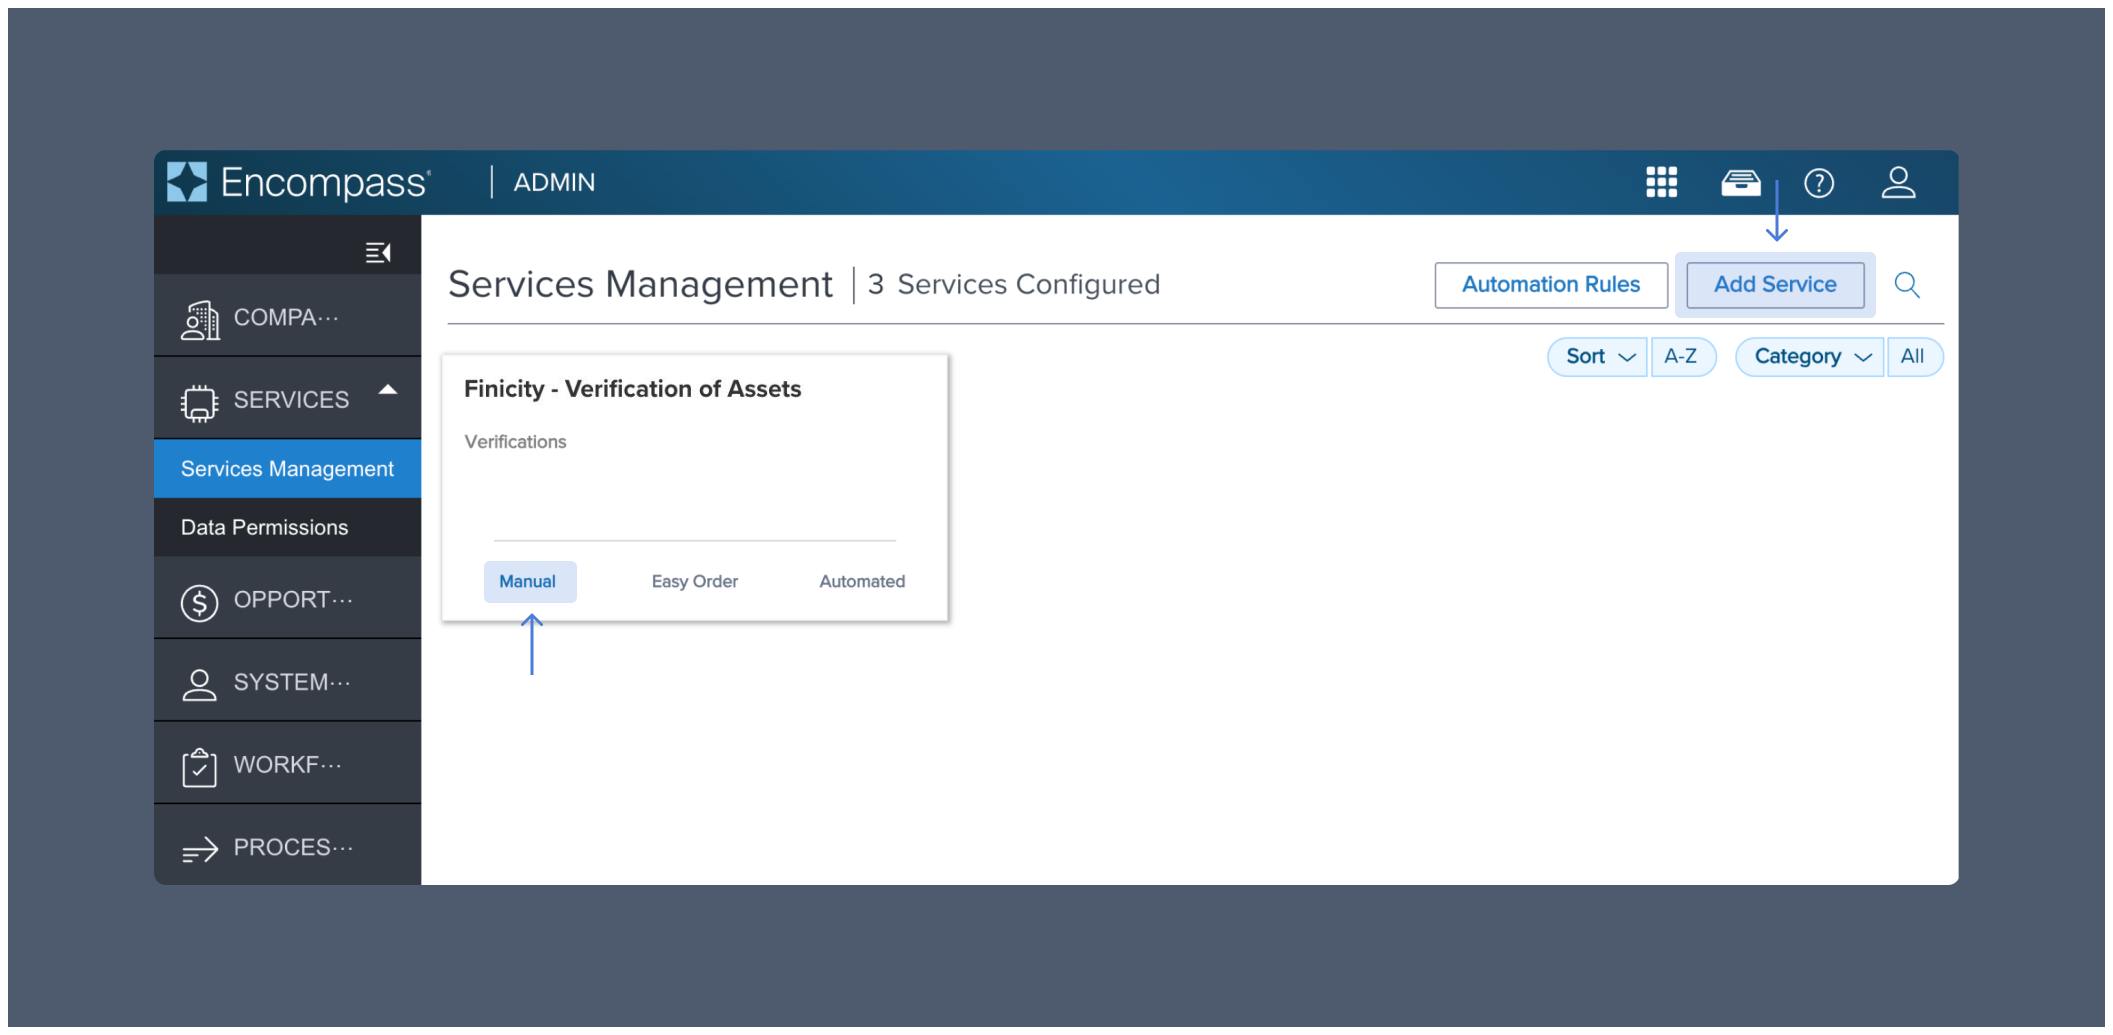
1. Select **Services Management** within the **SERVICES** dropdown.
2. Select **Add Service** and choose the **Verifications** category.
3. Search for **Argyle** and then select **Manual**.
 ### Add authorized users
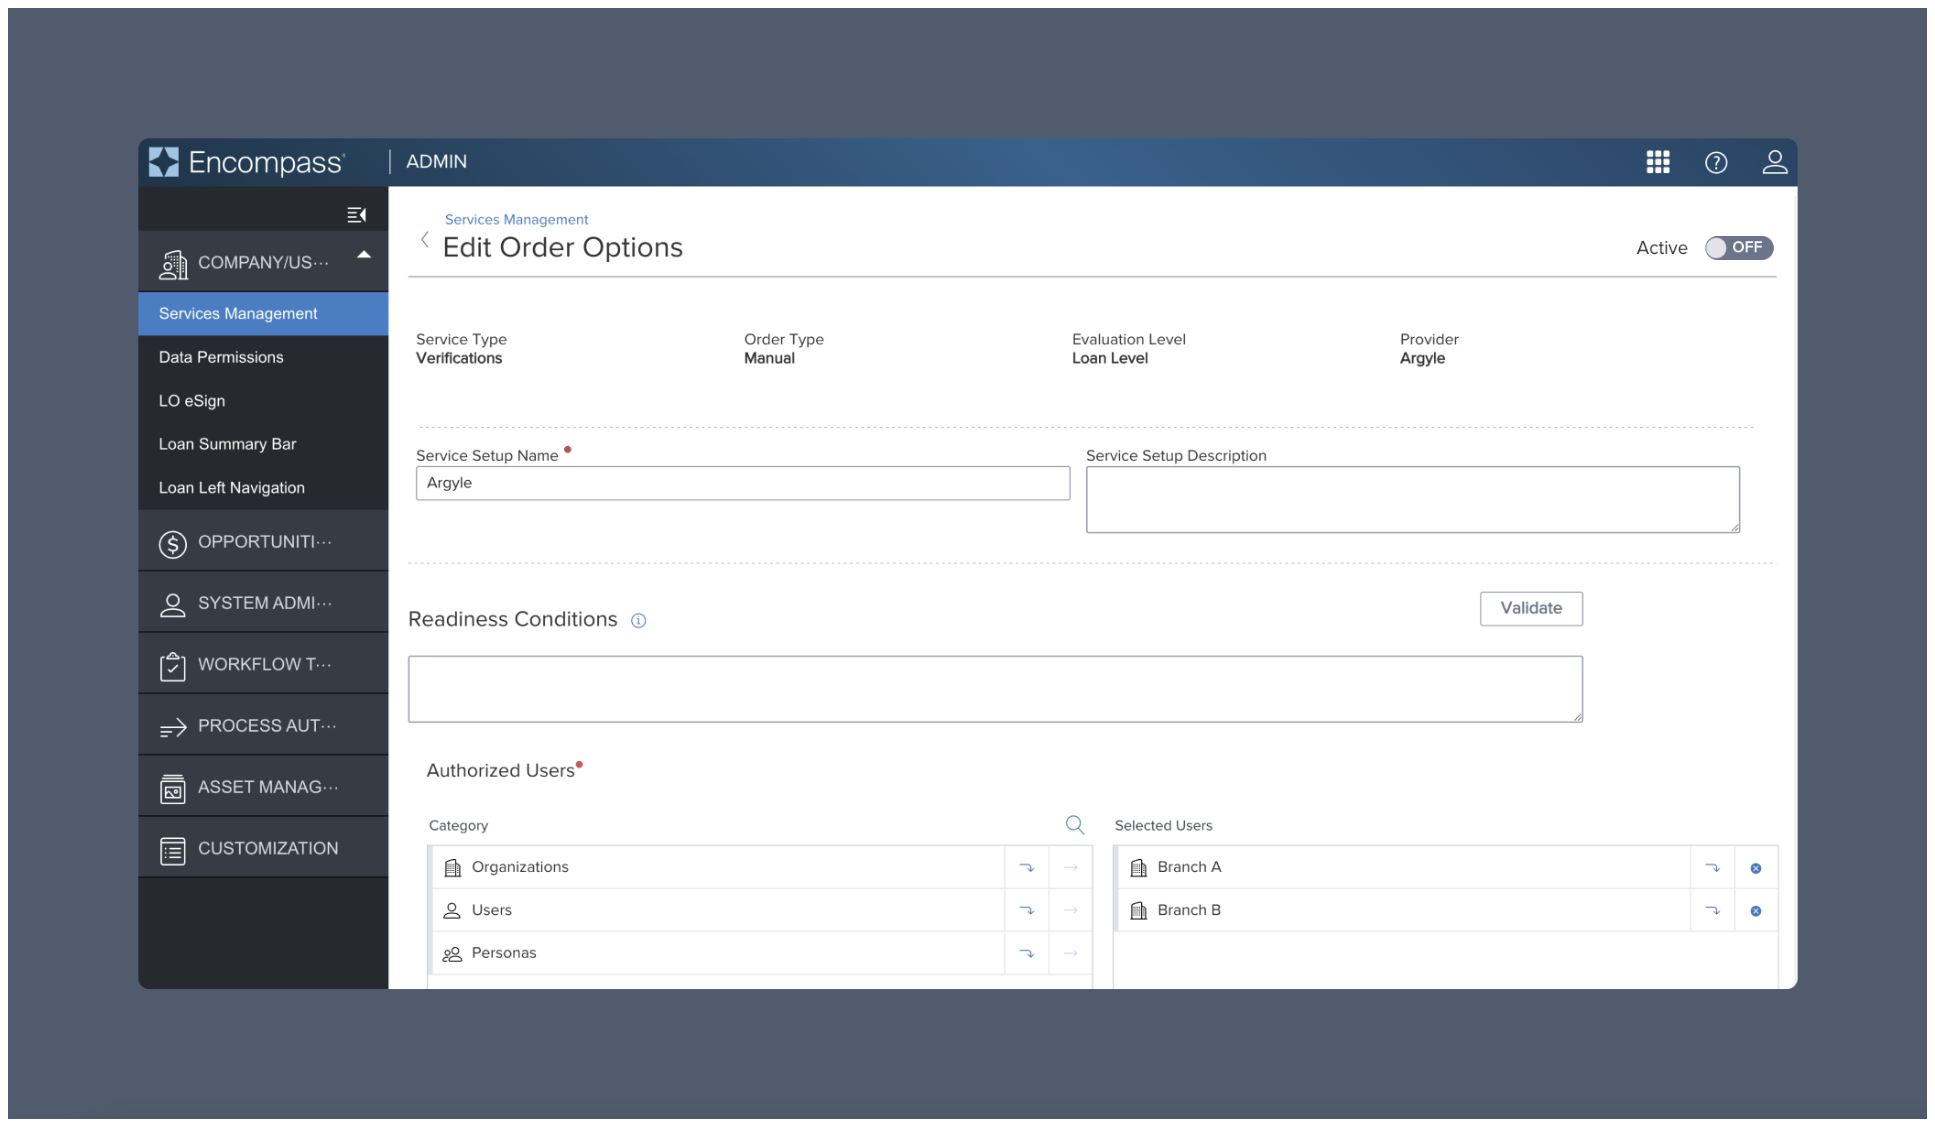
1. Choose a **Service Setup Name** and add **Authorized Users**.
2. Click **Save**.
### Add authorized users
1. Choose a **Service Setup Name** and add **Authorized Users**.
2. Click **Save**.
 ### Add Argyle API keys
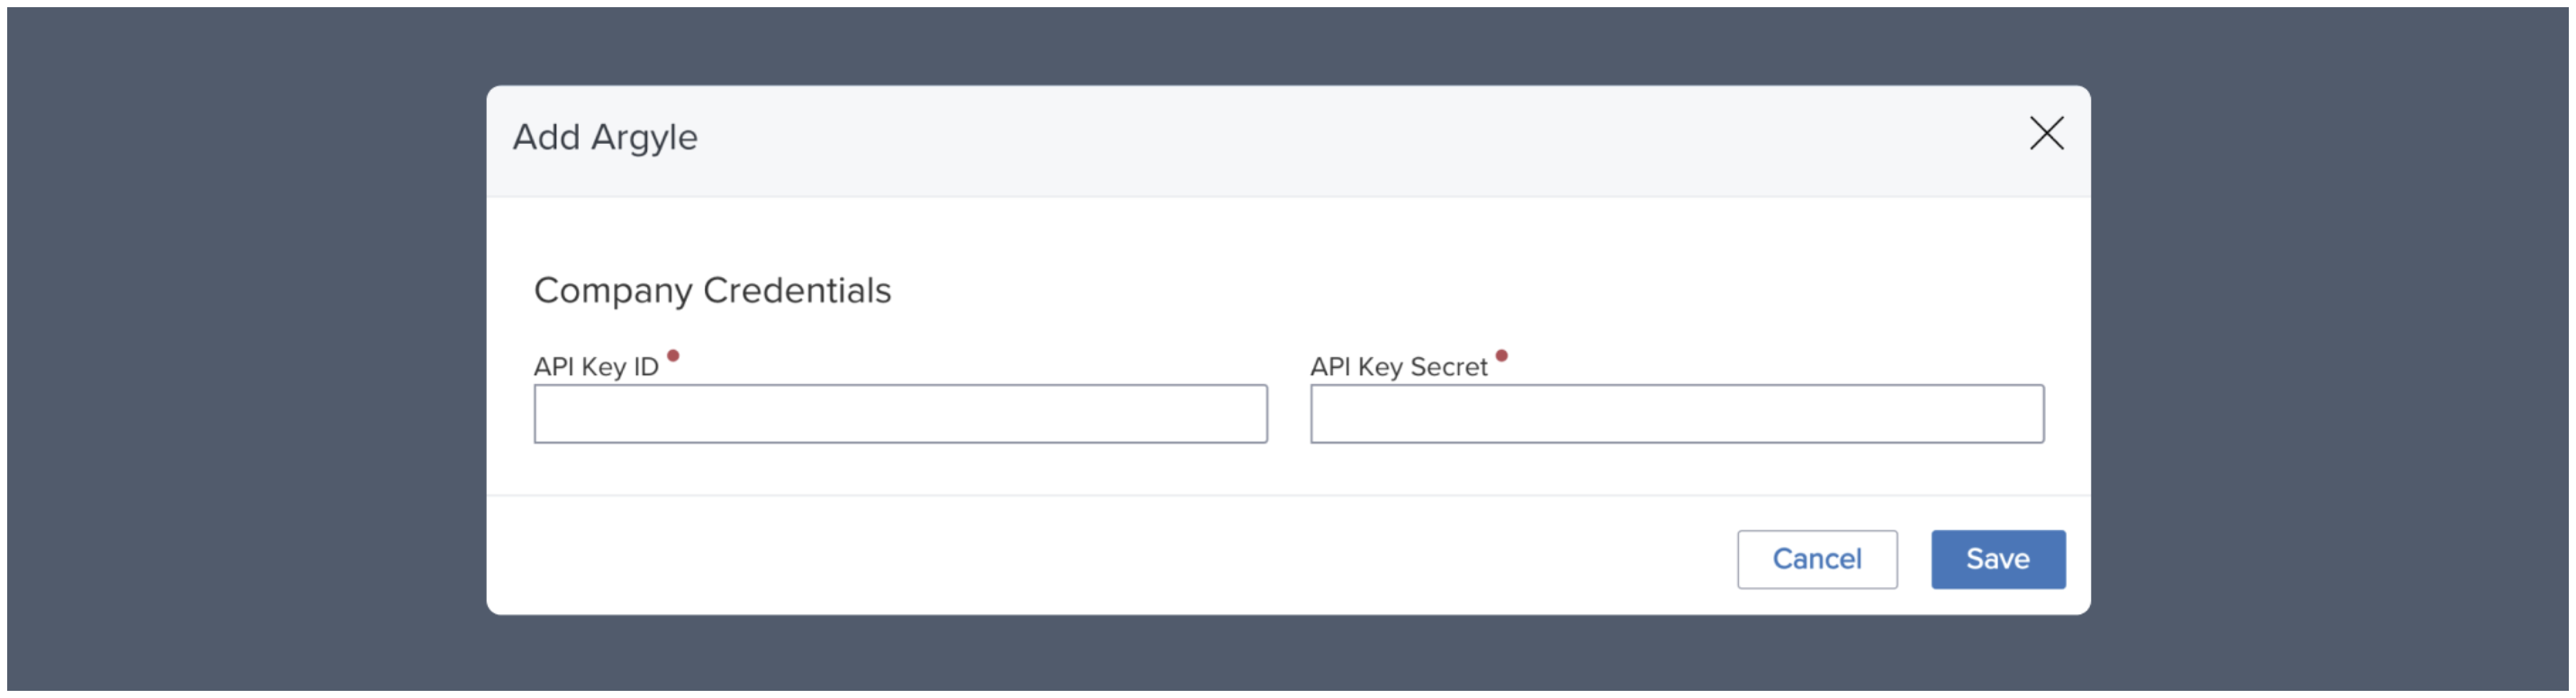
1. After Argyle is added to your configured services, return to **Services Management** and select **Credentials**.
2. In the pop-up, enter your Argyle API key and secret, which can be found or created in the Developers section of Argyle Console. Then click **Save**.
3. After saving and exiting, set the **Status toggle** to **ON**.
### Add Argyle API keys
1. After Argyle is added to your configured services, return to **Services Management** and select **Credentials**.
2. In the pop-up, enter your Argyle API key and secret, which can be found or created in the Developers section of Argyle Console. Then click **Save**.
3. After saving and exiting, set the **Status toggle** to **ON**.
 ### Add document mapping (optional)
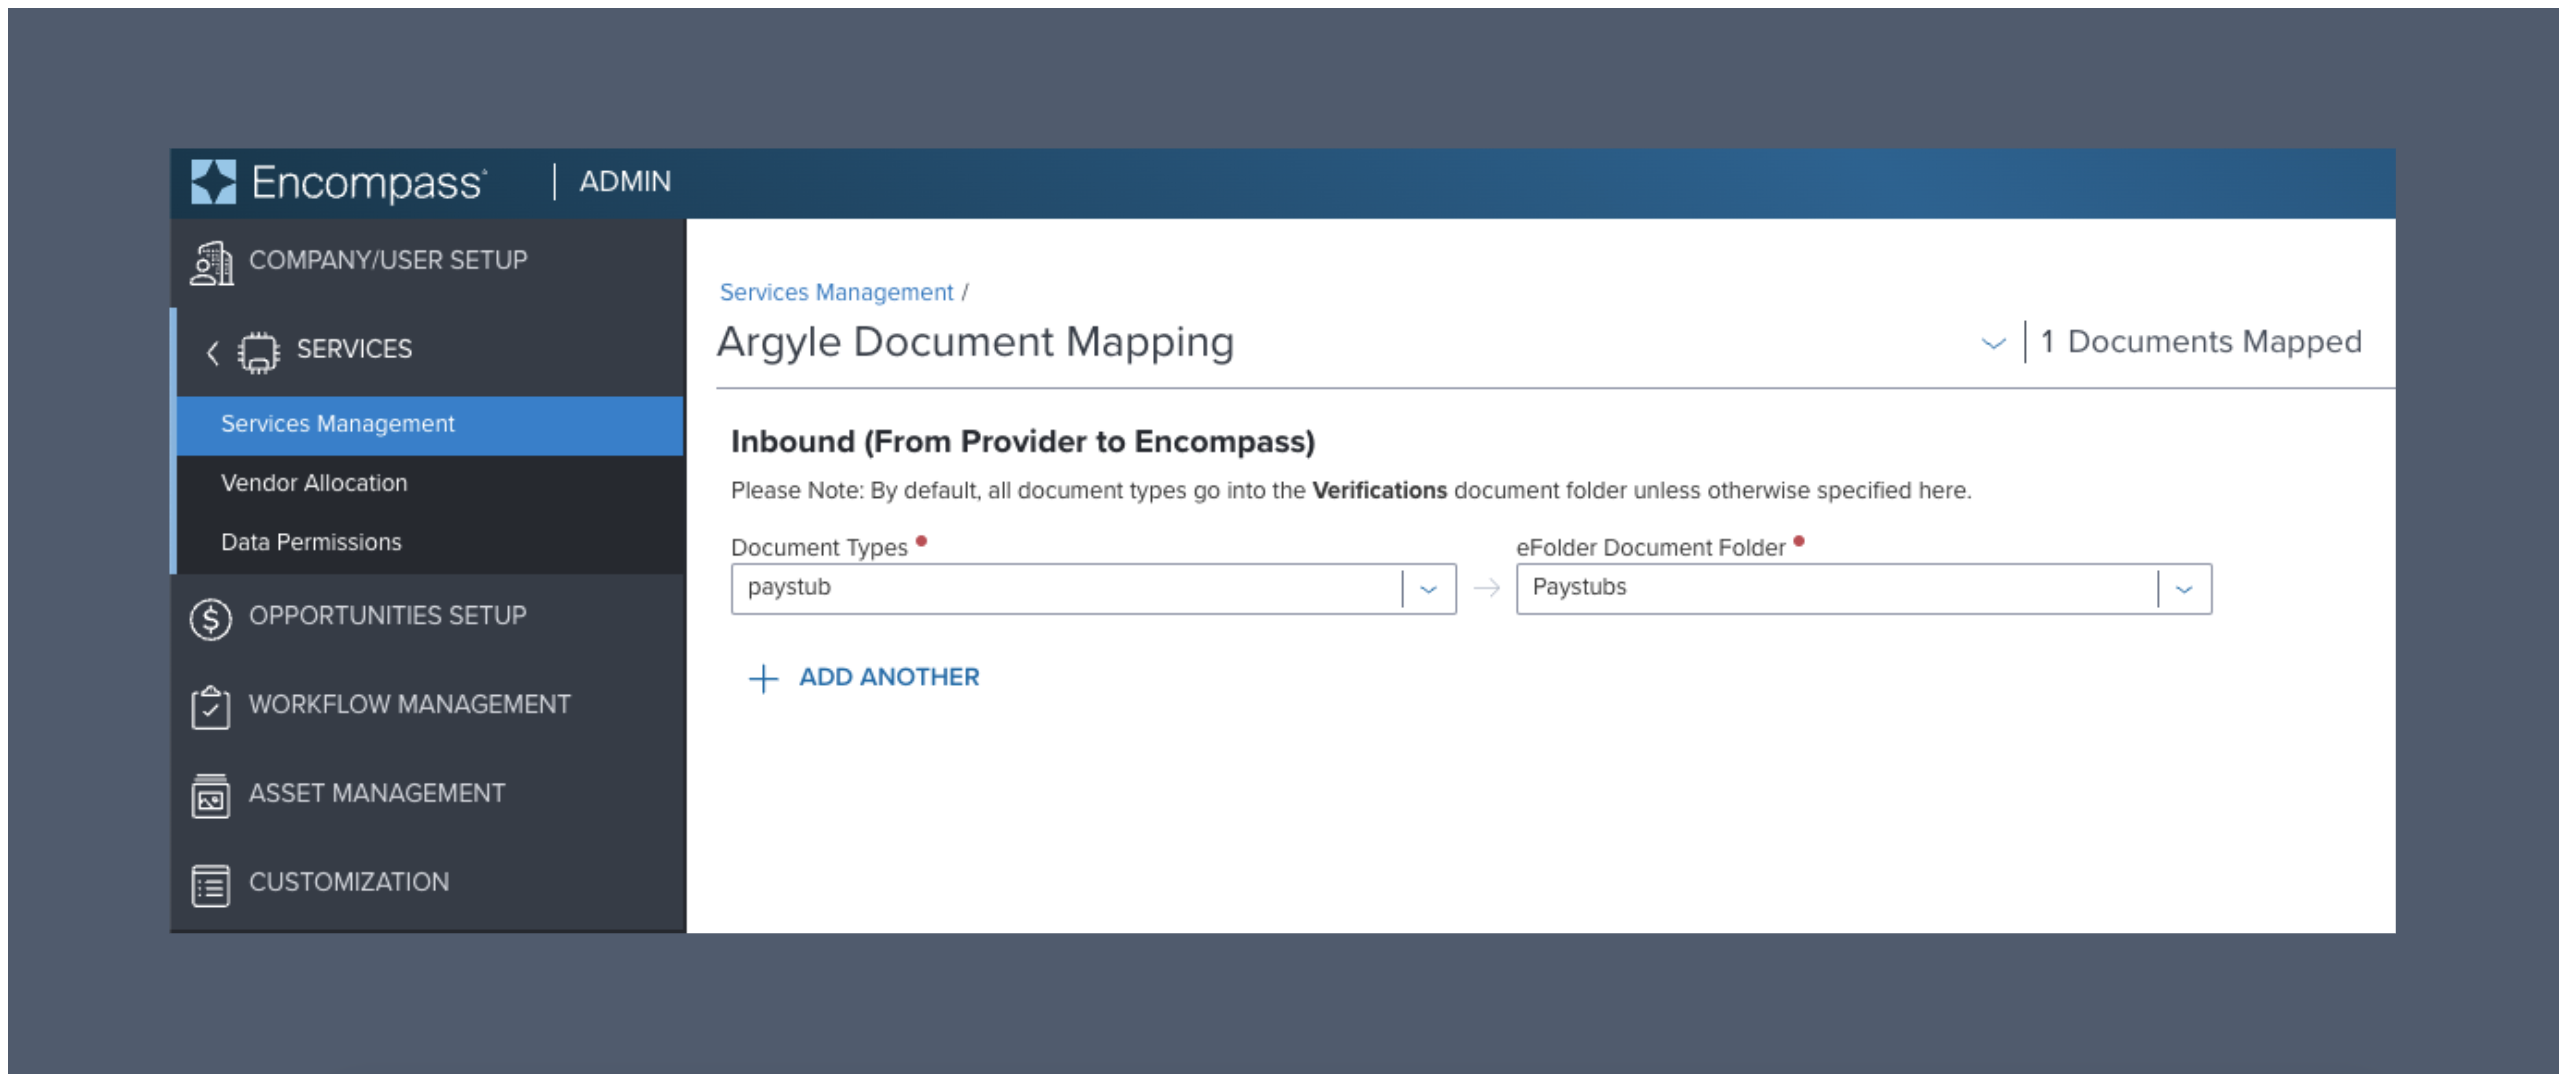
1. Select **Doc Mapping** to customize which **eFolder** should automatically receive each **type** of Argyle verification report and retrieved payroll document.
### Add document mapping (optional)
1. Select **Doc Mapping** to customize which **eFolder** should automatically receive each **type** of Argyle verification report and retrieved payroll document.
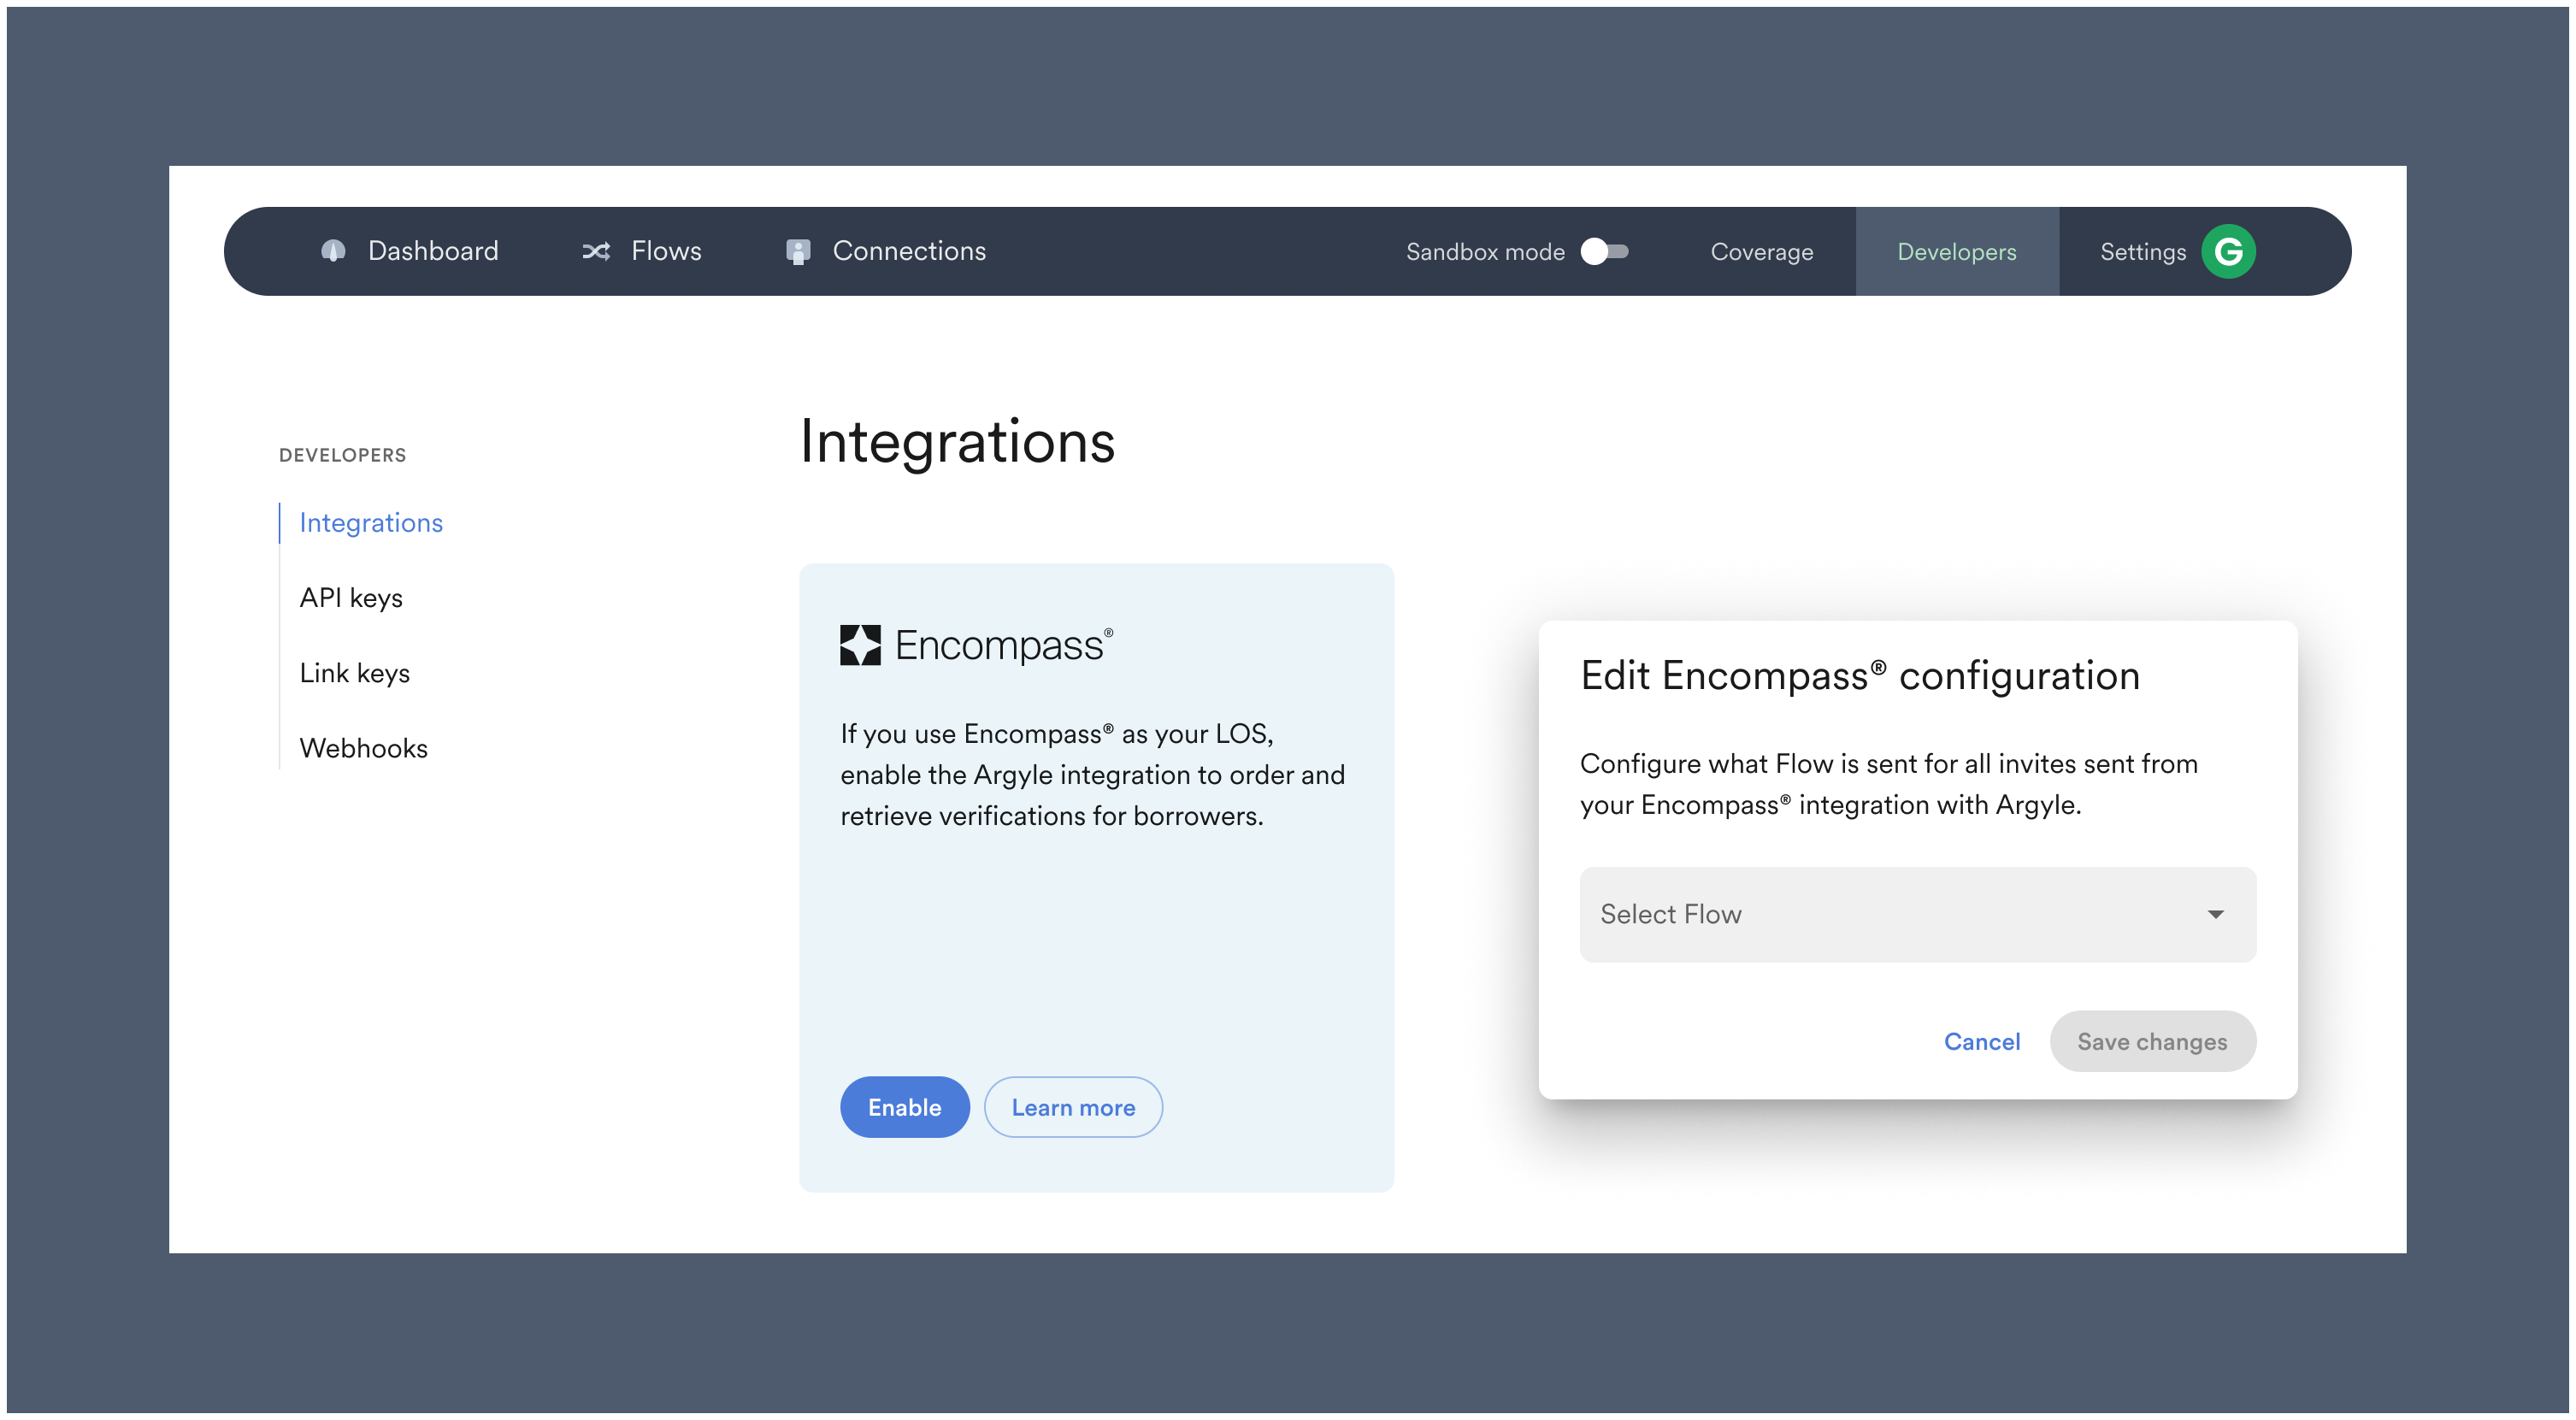
 ### Enable Encompass in Argyle Console
1. Enable the Encompass integration in the Integrations section of Argyle Console by clicking **Enable**.
2. (Optional) Selecting **Edit** after enabling the integration allows you to select an invitation [Flow](/console/flows/email-sms-templates#creating-emailsms-templates) (customized borrower experience) from a dropdown of your saved Flows.
### Enable Encompass in Argyle Console
1. Enable the Encompass integration in the Integrations section of Argyle Console by clicking **Enable**.
2. (Optional) Selecting **Edit** after enabling the integration allows you to select an invitation [Flow](/console/flows/email-sms-templates#creating-emailsms-templates) (customized borrower experience) from a dropdown of your saved Flows.
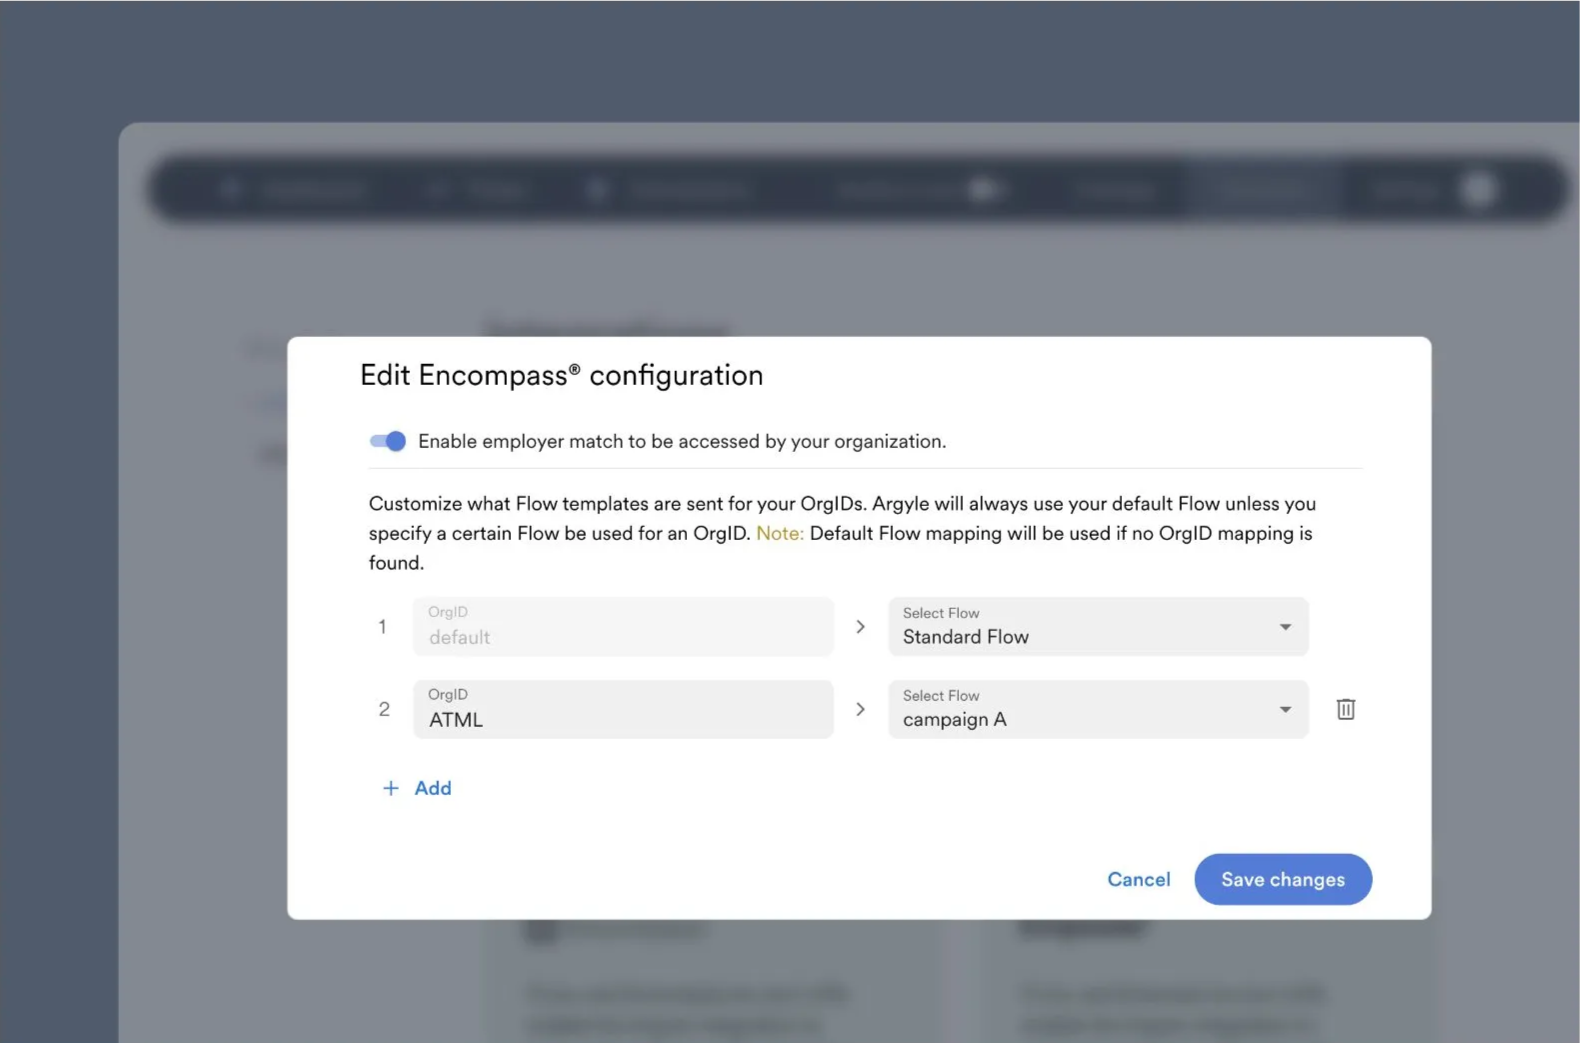
 ### Assign customizations (optional)
Customizations of the Argyle's payroll connection experience are called Link Flows, which allow you to have different branding for different branches for example.
* To assign different Link Flows to separate campaigns, branches, or doing-business-as (DBA) units, edit your Encompass configuration within the Integrations section of Console and assign Flows to specific OrgIDs.
* The OrgID associated with each loan file will determine which Link Flow is used.
### Assign customizations (optional)
Customizations of the Argyle's payroll connection experience are called Link Flows, which allow you to have different branding for different branches for example.
* To assign different Link Flows to separate campaigns, branches, or doing-business-as (DBA) units, edit your Encompass configuration within the Integrations section of Console and assign Flows to specific OrgIDs.
* The OrgID associated with each loan file will determine which Link Flow is used.
 ## Assets
### Admin login
1. Log in to Encompass Web® with an **administrator account** and select **Admin** within the applications dropdown.
### Add assets verification service
1. Select **Services Management** within the **SERVICES** dropdown.
2. Select **Add Service** and choose the **Verifications** category.
3. Search for **Finicity - Verification of Assets** and then select **Manual**.
## Assets
### Admin login
1. Log in to Encompass Web® with an **administrator account** and select **Admin** within the applications dropdown.
### Add assets verification service
1. Select **Services Management** within the **SERVICES** dropdown.
2. Select **Add Service** and choose the **Verifications** category.
3. Search for **Finicity - Verification of Assets** and then select **Manual**.
 ### Add authorized users
1. Choose a **Service Setup Name** and add **Authorized Users**.
2. Click **Save**.
### Add authorized users
1. Choose a **Service Setup Name** and add **Authorized Users**.
2. Click **Save**.
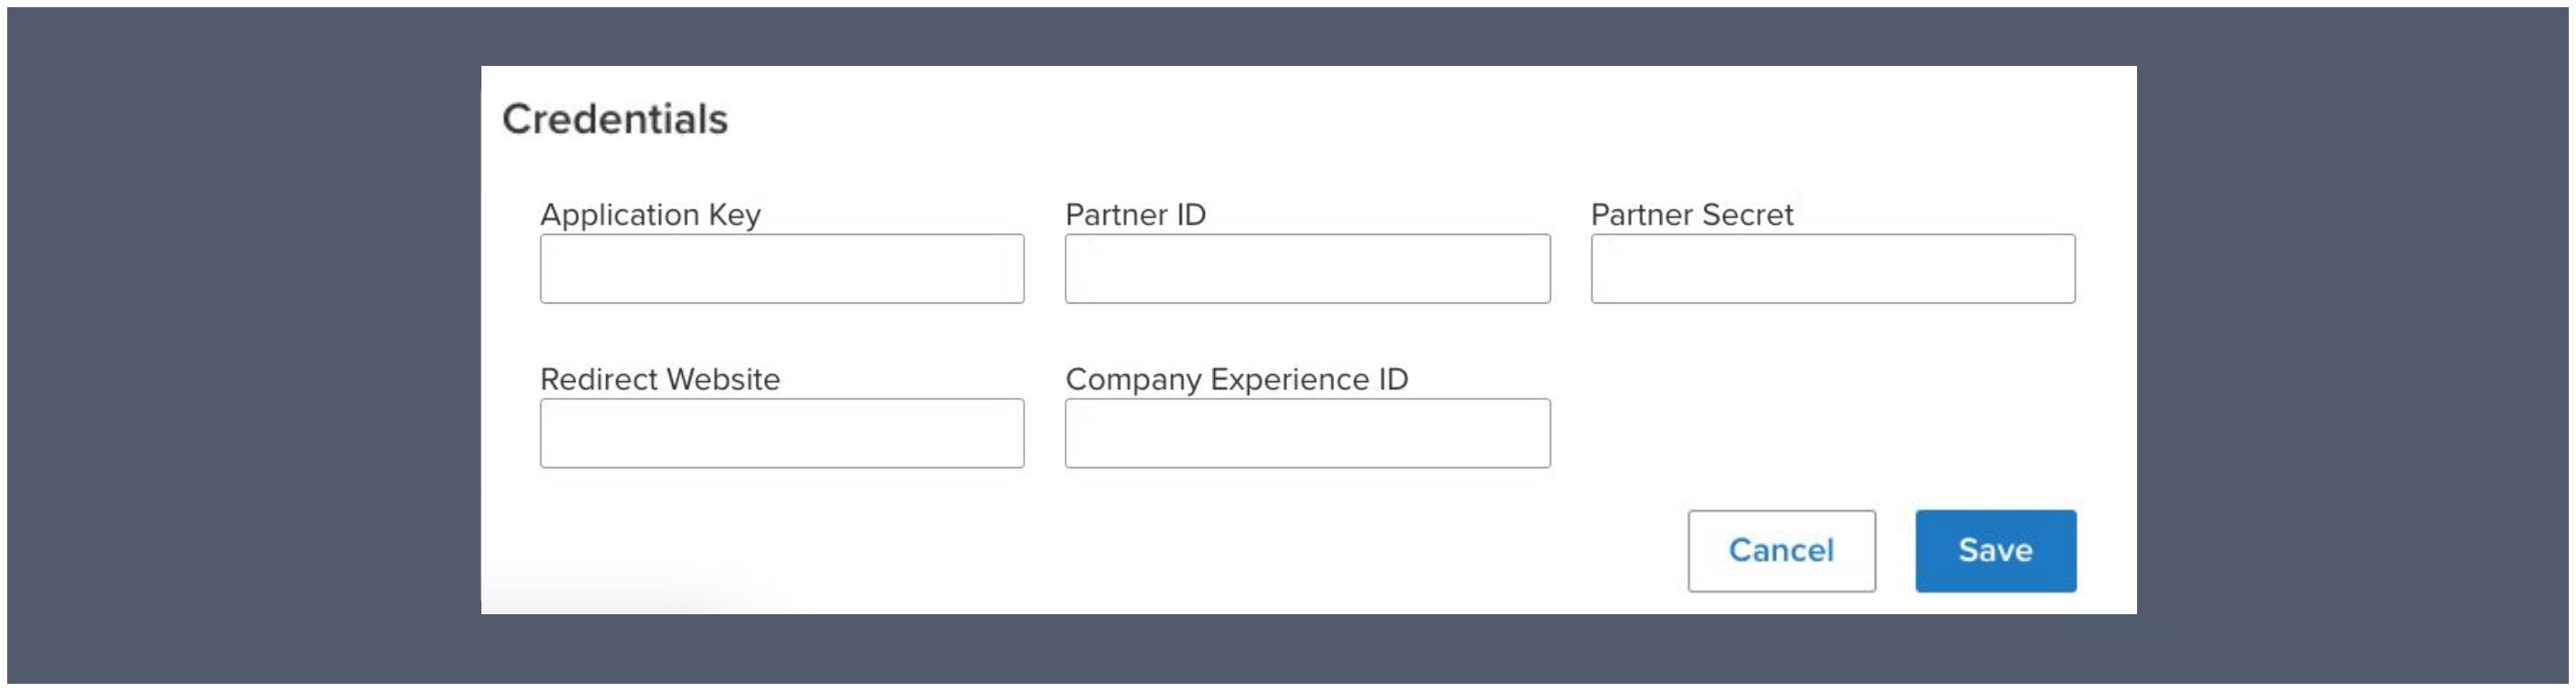
 ### Add credentials
1. After Argyle is added to your configured services, return to **Services Management** and select **Credentials**.
2. Select **ADD** for **Company Credentials**.
3. Enter your `Application Key`, `Partner ID`, `Partner Secret`, and `Company Experience ID`. Then click **Save**.
Reach out to your Argyle customer success manager for these credentials.
4. After saving and exiting, set the **Status toggle** to **ON**.
### Add credentials
1. After Argyle is added to your configured services, return to **Services Management** and select **Credentials**.
2. Select **ADD** for **Company Credentials**.
3. Enter your `Application Key`, `Partner ID`, `Partner Secret`, and `Company Experience ID`. Then click **Save**.
Reach out to your Argyle customer success manager for these credentials.
4. After saving and exiting, set the **Status toggle** to **ON**.
 ### Customize experience
Your Argyle customer success manager can help provide the following customizations:
* Your company name and logo shown to borrowers can be adjusted.
* Which financial institutions are shown by default on the home screen.
* After the borrower connects a financial institution, they will be shown a list of detected accounts (e.g. checking, savings, 401k).
- 457
- 529
- 401a
- 401k
- 403b
- Brokerage Account
- CD
- Checking
- Credit Card
- Crypto Currency
- Education Savings
- Employee Stock Purchase Plan
- Health Savings Account
- Investment
- Investment Tax Deferred
- IRA
- Keogh
- Line of Credit
- Loan
- Money Market
- Mortgage
- Non Taxable Brokerage Account
- Pension
- Profit Sharing Plan
- Rollover
- Roth
- Roth 401k
- Savings
- SEP IRA
- Simple IRA
- Student Loan
- Thrift Savings Plan
- UGMA
- Unknown
- UTMA
- Variable Annuity
### Customize experience
Your Argyle customer success manager can help provide the following customizations:
* Your company name and logo shown to borrowers can be adjusted.
* Which financial institutions are shown by default on the home screen.
* After the borrower connects a financial institution, they will be shown a list of detected accounts (e.g. checking, savings, 401k).
- 457
- 529
- 401a
- 401k
- 403b
- Brokerage Account
- CD
- Checking
- Credit Card
- Crypto Currency
- Education Savings
- Employee Stock Purchase Plan
- Health Savings Account
- Investment
- Investment Tax Deferred
- IRA
- Keogh
- Line of Credit
- Loan
- Money Market
- Mortgage
- Non Taxable Brokerage Account
- Pension
- Profit Sharing Plan
- Rollover
- Roth
- Roth 401k
- Savings
- SEP IRA
- Simple IRA
- Student Loan
- Thrift Savings Plan
- UGMA
- Unknown
- UTMA
- Variable Annuity
*For further assistance or specific feature requests, please reach out to [support@argyle.com](mailto:support@argyle.com) or your Customer Success Manager.*